

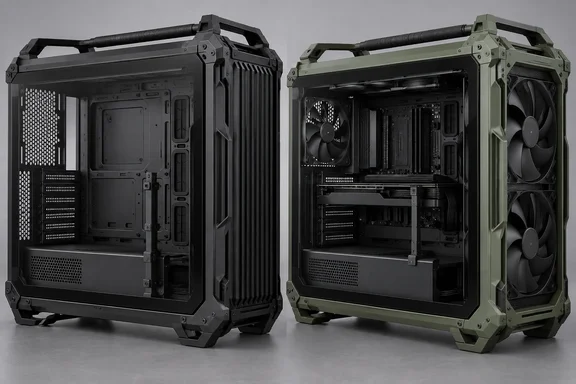
Corsair’s announcement, published by TechPowerUp, positions WARTHOG as a modern successor to the 2012 Vengeance C70. The company had already introduced it at Computex on June 2, describing its steel construction, integrated handles, reverse-connector motherboard support, and adjustable fan mounting. September’s news is the preorder and availability announcement, rather than the case’s first unveiling.
For a prospective build, the strongest case for WARTHOG is its collection of assembly and maintenance conveniences. Those include a light above the rear motherboard connections, substantial cable-routing space, removable mounting hardware, and an included graphics-card support arm. Cooling performance remains a separate purchasing question: Corsair makes airflow and noise claims, but the evidence available here contains no independent temperature or acoustic measurements.
WARTHOG and WARTHOG RS make the cooling purchase explicit
Both WARTHOG versions come in Black or Olive Drab. The standard WARTHOG ships without fans; WARTHOG RS includes two front-mounted RS200 200 mm intake fans and one RS120 120 mm rear exhaust fan. Corsair’s quick-start guide lists no included fan controller for either model.
That makes the standard version a reasonable starting point for someone transferring an existing cooling setup or selecting every fan individually. Its price must be considered alongside the cooling hardware needed to finish the build. WARTHOG RS supplies an intake-and-exhaust arrangement from the outset, reducing the number of separate installation decisions.
Corsair’s product explainer identifies the included RS fans as non-RGB models that connect directly to the motherboard. Its claims of high airflow at low rotational speeds and low noise describe the intended benefits of the RS200 fans, not measured results from a reviewed production system. The practical, documented benefit is simpler: three fans arrive installed, and basic motherboard-based fan control does not require a separately purchased Corsair controller.
| Purchase consideration | WARTHOG | WARTHOG RS |
|---|---|---|
| Included case fans | None. | Two RS200 front intake fans and one RS120 rear exhaust fan. |
| Included fan controller | None. | None. |
| Cooling work left to the builder | Select and install the case fans. | Connect the installed fans and decide whether the build needs additional cooling hardware. |
| Available colors | Black and Olive Drab. | Black and Olive Drab. |
Pricing is a material gap. The September announcement does not supply usable prices, so there is no basis for calculating the RS premium or declaring either version better value. A builder who already owns suitable fans may reach a different conclusion from someone buying a complete cooling setup.
Availability also needs to be checked at the point of purchase. Corsair’s U.S. landing page still says “deploying soon” and offers regional availability notifications, while the September release describes preorders, shipping within four weeks, and immediate stock through selected sellers. Buyers should distinguish an in-stock reseller listing from an order waiting on Corsair’s shipping window.
WARTHOG’s three radiator locations require a layout decision
Corsair advertises three locations for a 360 mm radiator: the front, roof, and side. The important qualification appears in its product explainer: front and top radiators cannot be installed simultaneously. The same explainer describes support for two 360 mm radiators at once.
That changes how to interpret the headline specification. Three locations offer placement choices; they do not establish room for three installed 360 mm radiators. Anyone planning separate liquid-cooling radiators for a CPU and graphics card needs to account for the front-versus-top restriction before choosing the layout.
The quick-start guide gives the following mounting options:
| Location | Fan mounting options | Radiator sizes listed in the quick-start guide |
|---|---|---|
| Front | Three 120 mm, two 140 mm, or two 200 mm fans. | 240 mm, 280 mm, or 360 mm. |
| Top | Three 120 mm or two 140 mm fans. | 240 mm, 280 mm, or 360 mm. |
| Side | Three 120 mm or two 140 mm fans. | 240 mm, 280 mm, or 360 mm. |
| Rear | One 120 mm or one 140 mm fan. | 120 mm or 140 mm. |
| PSU shroud | Two 120 mm fans. | No radiator support listed. |
| Bottom | One 120 mm fan. | No radiator mounting option specified. |
There is a smaller documentation disagreement at the rear: Corsair’s June product explainer lists only a 120 mm radiator there, whereas its quick-start guide lists both 120 mm and 140 mm. A build dependent on a rear 140 mm radiator therefore needs confirmation of that fit before purchase.
The advertised maximum of 13 120 mm fans describes an all-120 mm arrangement across the mounting locations. It should not be added to the RS model’s included fan count. Likewise, the September release’s allowance for five additional 140 mm fans includes a rear position already occupied by the supplied RS120; using a 140 mm fan there means replacing that rear fan.
InfiniRail is the mechanism behind some of the flexibility. The front and roof use adjustable steel rails, allowing builders to position mounting hardware instead of relying exclusively on fixed holes. The guide instructs builders to choose fan size and position before adjusting the rails, then loosen the Phillips-head fasteners and align the rails with the case markings.
Large front fans introduce another layout constraint. When using 200 mm front fans, Corsair requires the side fan bracket—or the optional cable cover—to sit in its secondary position, closer to the motherboard tray. This is particularly relevant to WARTHOG RS because those large fans arrive installed. The side area remains useful, but its placement must accommodate the front cooling hardware.
For an all-in-one liquid cooler, Corsair recommends mounting the radiator higher than the pump and identifies top mounting as its preferred configuration for noise. That provides a documented starting point for a single-radiator build. It does not supply comparative temperatures or justify filling every available fan position.
WARTHOG supports modern motherboards, with limits around oversized parts
The motherboard compatibility list covers Mini-ITX, Micro-ATX, ATX, and E-ATX, with E-ATX specifically limited to 305 mm by 267 mm. Corsair also names ASUS BTF, MSI Project Zero, and GIGABYTE Project Stealth reverse-connector motherboard support.
Reverse-connector designs place motherboard connections behind the board, so the chassis needs openings and routing space in the appropriate places. WARTHOG combines those openings with a RapidRoute 2.0 pegboard-style tray and 50 mm of rear cable space. Its adjustable strap mounting points let builders secure cable bundles where their particular board and power supply require them.
Conventional motherboards remain supported. An included magnetic strip can cover the reverse-connector opening when it is unused or help close the visible gap around a reverse-connector board’s 24-pin connection. The practical benefit is a tray that accommodates either approach without making a rear-connector motherboard a prerequisite.
Graphics-card clearance needs more care because Corsair’s published figures disagree:
- The September announcement describes support for graphics cards up to 400 mm.
- The June product explainer lists 405 mm with a front fan and 430 mm without a front fan.
- The quick-start guide lists a maximum of 435 mm without fans.
Those numbers should not be silently combined into a single maximum. A builder considering a card near these limits needs the usable clearance confirmed for the intended front fan or radiator arrangement. The largest fanless figure is not a safe substitute for the clearance in an assembled RS configuration.
The included Nano GPU Anti-sag Stabilization Arm provides adjustable support for a horizontally installed card. Corsair instructs builders to loosen its front-facing thumbscrew and slide the arm vertically into position. If the arm contacts a GPU fan or another component, the guide says to use the support supplied with the graphics card instead; an E-ATX board may also require removal of the case’s support-arm mount.
Vertical GPU installation is supported through the included PCI plate and mounting standoffs, but the PCIe riser is sold separately. The guide provides two standoff positions on the PSU shroud so the builder can choose the card’s position relative to the side panel. This makes vertical mounting an available configuration, with an additional component purchase.
Other limits are more consistent across Corsair’s documents. Maximum CPU cooler height is 190 mm, maximum PSU length is 200 mm, and the included combination drive plate holds one 3.5-inch hard drive plus two 2.5-inch SSDs. That supplied drive arrangement deserves attention for anyone transferring a workstation with several existing hard disks: the roomy cooling layout does not translate into a large bank of included drive bays.
WARTHOG’s steel styling still requires glass-panel precautions
The launch language emphasizes rugged steel construction, but Corsair’s quick-start guide specifies a tempered-glass left side panel and a steel right side panel. Buyers looking for a completely steel-sided chassis should account for that distinction. Integrated handles and an industrial exterior do not remove the glass-handling requirements.
Corsair warns against placing or storing the case on hard surfaces such as ceramic or porcelain tile, stone, masonry, or concrete. It strongly recommends removing the tempered-glass panel before positioning the case or beginning a build on a hard surface. For a finished system placed on such a surface, it advises elevating or isolating the case to reduce accidental contact.
The opening sequence also matters because the top panel cannot be removed first. Corsair’s documented access procedure is:
- Pull the top edge of each side panel outward and tilt the panel down. The panels use two ball snaps at the top and remain captive while tipped outward.
- Remove both side panels before attempting to remove the top panel.
- Loosen the two thumbscrews at the rear of the top panel.
- Pull the top panel’s nylon strap backward to remove the panel.
Corsair explicitly warns that the nylon strap is a panel-removal aid, not a carrying handle. Lifting a case or completed system by that strap risks damage and injury. The frame-connected carry handles described in the launch announcement are separate hardware.
Several internal components can be removed to make assembly easier. The side fan bracket is secured by a top screw and tilts outward after that screw is removed. The motherboard tray is retained by four screws, while the PSU shroud uses three; access to one shroud screw may require removing the side bracket first.
These details make the case’s modularity useful during installation. A builder can open working space before routing cables or fitting cooling hardware, rather than treating every panel and bracket as permanently fixed. Corsair also advises installing the graphics card last for easier assembly.
Maintenance access follows a similarly practical pattern. The front panel swings open on hinges and closes magnetically, exposing the front dust filter. The side filter detaches magnetically, and the bottom filter slides out. Corsair permits cleaning the filters with pressurized air or water, with the explicit requirement that rinsed filters be completely dry before reinstallation.
WARTHOG’s iCUE support is optional, while front-panel wiring needs attention
WARTHOG provides mounting space for an iCUE LINK System Hub, and Corsair promotes the case as ready for compatible LINK fans and coolers. That is physical accommodation for additional hardware. Neither case version includes a controller, and the RS model’s supplied fans connect to the motherboard.
For builders who want RS PWM fans and iCUE LINK fans managed together in iCUE, the September announcement identifies the separately sold COMMANDER DUO Lighting and Fan Controller. The distinction is useful when budgeting: the supplied RS cooling arrangement can use motherboard control, while Corsair’s combined software-control arrangement involves another purchase.
The rear I/O light is a separate convenience. A front-mounted switch activates illumination above the motherboard’s rear connections, making ports easier to identify in a dim space. Corsair’s wiring guide identifies a rear LED power connection using a +5 V ARGB pass-through, so the light needs to be included in the build’s wiring plan.
The front panel carries two USB 3.2 Gen 1 Type-A ports rated at 5 Gb/s, one USB 3.2 Gen 2x2 Type-C port rated at 20 Gb/s, and a combined headphone/microphone jack. The guide identifies a USB Type-E connection for the 20 Gb/s front port. When matching the case to a motherboard, that is the case-side connection to account for; the advertised port rating alone does not describe the completed system’s transfer performance.
Power-button wiring has a documented fallback. Corsair instructs users of standard Intel motherboard layouts to connect the keyed FPANEL plug to the front-panel header, sometimes labeled JFP1. For AMD or non-standard Intel layouts, it specifies the included adapter cable so the connections can be attached to individual header pins.
The same adapter is Corsair’s suggested troubleshooting step if a system will not power on or behaves incorrectly with the combined FPANEL plug. The guide also clarifies that the case has no HDD activity LED: although the adapter shows an HDD LED connection, it is intentionally unpopulated and nonfunctional. A missing drive-activity light is therefore expected behavior.
Choose WARTHOG around the parts you will actually install
Choose the standard WARTHOG if you already have a cooling plan and suitable fans; shortlist WARTHOG RS if you want its supplied front intake and rear exhaust arrangement. Builders whose decisions depend on quiet operation or comparative cooling performance should wait for relevant measurements before treating Corsair’s performance claims as a reason to buy. With no confirmed price in the announcement, neither model can yet be judged on value from these specifications alone.
Before placing an order, the most consequential checks are:
- Confirm whether the seller has stock or is taking a preorder tied to Corsair’s stated four-week shipping window.
- Plan radiator placement around Corsair’s restriction against using front and top radiators simultaneously.
- Obtain configuration-specific clearance confirmation if the graphics card approaches Corsair’s conflicting published length limits.
- Budget separately for a PCIe riser if using vertical GPU mounting, and for additional control hardware if choosing Corsair’s combined iCUE arrangement.
- Check the motherboard’s dimensions and connections, and count the existing storage drives against the supplied one-HDD, two-SSD mounting arrangement.
- Prepare a suitable workspace for the tempered-glass panel, and keep the top-panel removal strap separate in your mind from the carry handles.
WARTHOG brings a distinctive exterior to a chassis with useful, documented assembly features. Its strongest practical appeal lies in the choice of fan package, accessible mounting hardware, and support for both conventional and reverse-connector builds. For September buyers, the next decision is concrete: match those features to the intended components, establish the delivered price and stock status, and resolve any close-clearance fit before committing the rest of the build.
Update: HotHardware reports $179 and $199 Warthog pricing (September 23, 2026)
Contrary to the earlier pricing gap, HotHardware reports that Corsair’s standard WARTHOG is available to preorder for $179, while the WARTHOG RS configuration with three pre-installed fans is priced at $199.
If those listed prices hold across retailers, the RS version carries a $20 premium for two 200 mm front intake fans and a 120 mm rear exhaust fan. That materially changes the buying calculation: builders starting without compatible case fans may find the RS package more economical than purchasing equivalent airflow hardware separately, while owners of existing fans still have a clear reason to choose the fanless model.
HotHardware also notes that the chassis supports downloadable 3D-printable accessories, including an optional multi-bay hard-drive storage solution. That could help users needing more SATA-drive capacity than the included one 3.5-inch and two 2.5-inch mounting positions provide, but it requires access to a suitable printer and remains separate from the out-of-box storage arrangement.
Update: Independent testing finds WARTHOG RS cooling trails similarly priced rivals (September 25, 2026)
GamersNexus’ September 24 review adds the independent thermal and noise testing that was previously unavailable. In noise-normalized testing, the WARTHOG RS recorded a 47°C CPU rise above ambient, while GPU temperature reached 48°C above ambient and VRAM 53°C above ambient. GamersNexus characterized the GPU result as comparatively warm against several competing airflow-focused cases.
At full fan speed, the RS remained relatively quiet at 39 dBA and improved CPU results to 42°C above ambient, but GPU cooling still lagged the comparison group at 47°C above ambient. The outlet concludes that alternatives including Cooler Master’s HAF II 500, Fractal’s Torrent, HAVN’s BF 360 Flow, and Corsair’s less expensive Frame 4000D RS provide stronger performance-per-dollar.
The review also narrows the practical cooling options for the RS configuration. Its installed 200 mm front fans cannot be relocated, so using a front radiator means choosing the fanless WARTHOG instead. GamersNexus found that, with a standard ATX motherboard and the large front fans installed, the side mount is effectively unusable; it also considers a 280 mm top radiator more realistic than a 360 mm unit in that setup.
For storage-heavy builds, GamersNexus tested Corsair’s downloadable triple-HDD cage, but says it conflicts with the RS model’s front 200 mm fans. That accessory is therefore an option for the standard WARTHOG, not a straightforward expansion path for the RS.
References
- Corsair WARTHOG Gaming PC Case Review | Thermals, Noise, & Throwback - GamersNexus GamersNexus · 2026-09-24T17:00:00+00:00
- (PR) Corsair Deploys the WARTHOG Airflow Mid-Tower PC Case for Standout Builds TechPowerUp · 2026-09-22T14:30:52+00:00
- Corsair’s Warthog Airflow Chassis Takes Flight With High-Velocity Cooling - HotHardware HotHardware · 2026-09-22T18:15:00+00:00