

What this does
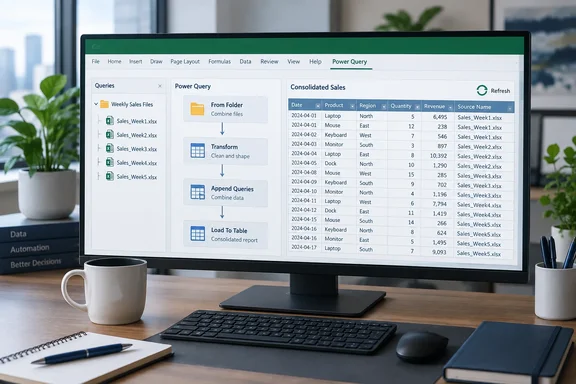
Microsoft's support page for Power Query folder imports lists Excel for Microsoft 365, Excel 2024, Excel 2021, Excel 2019 and Excel 2016. The idea is to take several files that share the same layout, called a schema, and combine them into one table. Microsoft's example is monthly budget workbooks from different departments. Each has the same columns, but the rows and values differ. After setup, you refresh the query to see the latest results.
Once it's built, you don't copy anything by hand. Excel reads the folder again on each refresh and stacks up whatever compatible files it finds.
Summary: This comes built into current Excel versions. Your ongoing work is dropping files into a folder, not copying and pasting.
Step 1: Use the same template every week
In Phillips's example, a folder called Weekly Reports gets one new workbook a week, named SalesWeek# with the week number in place of #. Each workbook has a worksheet called SalesData with the same six columns:
- Date
- Product
- Region
- Salesperson
- Quantity
- Revenue
The number of rows can change from week to week. In his setup, the worksheet name, the column headings and the basic layout have to stay the same. He leaves the data as ordinary worksheet ranges and doesn't convert them to Excel tables. That's a choice for this example, not a rule. Microsoft notes that an Excel workbook can have multiple worksheets, Excel tables, or named ranges, and you pick which one to combine.
Microsoft's advice for files you plan to combine:
- Put them in a dedicated folder with nothing else in it. Otherwise, every file in the folder and its subfolders gets included.
- Keep the column headers, data types and number of columns the same. Column order doesn't have to match, because Power Query matches columns by name.
- Where you can, leave unrelated data objects out of multi-object sources like Excel workbooks.
Phillips then creates the master workbook, Weekly Sales Report, inside the same folder: right-click in the folder, choose New > Excel Workbook, and name it. That keeps everything together, but it means you must tell Power Query to skip the master file. Otherwise it would try to read itself.
Summary: The same template every week makes everything else work. If the master workbook sits in the source folder, you have to filter it out.
Step 2: Connect Excel to the folder
- Open the master workbook.
- Go to Data > Get Data > From File > From Folder. The Browse dialog box appears. Locate the folder containing the files you want to combine.
- Select the folder and click Open. Excel lists the files it found.
- Click Transform Data, not one of the Combine shortcuts. This opens the Power Query Editor so you can filter the file list first.
Phillips's filter: click the arrow on the Name column header, choose Text Filters > Does Not Begin With, type Weekly, and apply it. That removes Weekly Sales Report and leaves the Sales_Week files.
Here's a caution his walkthrough skips. A filter that excludes a name only drops files starting with "Weekly." Any other stray file in the folder still gets combined, and a real source file that happens to start with "Weekly" gets dropped. A safer approach is to filter for the files you want, such as Begins With "Sales_Week", and add a filter on the Extension column. Microsoft's docs describe the same kind of filtering: you can select Transform data to access the Power Query editor and create a subset of the list of files (for example, by using filters on the folder path column to only include files from a specific subfolder). Moving the master workbook out of the source folder avoids the problem entirely.
- Find the Content column and click the Combine Files button in its header. Microsoft's Power BI documentation describes the same control: select Content (the first column label) and choose Home > Combine Files. Or you can just select the Combine Files icon next to Content.
- When asked which object to use, choose the SalesData worksheet and click OK.
- Click the top half of the split Close & Load button.
In Phillips's test, the master workbook then showed the 12 rows from Week 1, plus a Source.Name column showing which file each row came from. Microsoft's CSV walkthrough describes the same behavior: the source file name appears in the first column, followed by each file's data.
What Power Query built for you
Power Query picks a sample file, by default the first file in the list, and uses it as the template for the rest. Microsoft explains that it also adds several helper queries, including a "Sample File" query and a "Transform File" function, which apply that template to every file. If your source files ever need cleanup, such as extra header rows, you must fix the structure in the Sample File query not in the final combined query, according to a guide from DataBear.
Summary: Connect to the folder, filter to only the files you want, combine on the Content column, pick SalesData, and load.
Step 3: Add a week and refresh
Next, Phillips moved Sales_Week_2 into the folder, opened Weekly Sales Report, and clicked Data > Refresh All. Excel read the folder again, found the new workbook, and the report went from 12 rows to 24. He didn't touch the query or tell Excel about the new file.
Those row counts are just his sample data, not limits. A refresh re-reads the whole folder, so the result always reflects what's in it at that moment.
Summary: Drop in the file and click Refresh All. You don't have to rebuild anything.
Step 4: Refresh automatically when the file opens
- With the master workbook open, go to Data > Queries & Connections.
- Right-click the query and choose Properties.
- On the Usage tab, check Refresh data when opening the file.
- Click OK, then save and close the workbook.
Phillips then added Sales_Week_3 to the folder while the report was closed. When he reopened it, the query ran by itself and pulled in the third week. When he moved Week 3 back out, its rows disappeared on the next open, because the folder had been re-read.
The same tab has Refresh every n minutes. Microsoft says this refreshes the data at a set interval, which helps if reports arrive while the master workbook is open. Phillips uses 30 minutes as an example.
Summary: Refresh on open handles the usual weekly routine. A timed refresh covers files that arrive while the workbook is open.
What "updates itself" really means
Keep these limits in mind:
- It doesn't watch the folder. Dropping a file in changes nothing until something triggers a refresh: clicking Refresh All, opening the workbook with refresh-on-open turned on, or the timer while the workbook is open.
- Security settings can block it. Microsoft's Connection Properties page warns that external data connections may be disabled on your PC. To refresh on open, you may need to allow data connections from the Trust Center bar or keep the workbook in a trusted location. On managed business PCs, IT policy decides this, so check with your admins before you rely on it.
- One bad file can break or skew the result. A renamed column, a missing SalesData sheet, or an unrelated file in the folder can cause errors or missing rows. The Skip files with errors checkbox in the Combine Files dialog excludes failing files. That keeps the report running, but it can also hide a week that quietly failed. After each refresh, open the filter on the Source.Name column to confirm every expected file is listed.
- Subfolders count. Microsoft notes that subfolder contents are included unless you filter them out. An "Archive" subfolder inside Weekly Reports would get combined too.
- Stored logins. This doesn't matter for local workbooks. For other connection types, Microsoft warns that a saved password on the Definition tab isn't encrypted.
PivotTables and next steps
If your report summarizes the data, you can load the query straight into a PivotTable. Leila Gharani's Xelplus tutorial covers this: Select Home (tab) -> Close (group) -> Close and Load To… · In the Import Data dialog box, select "PivotTable Report". Phillips mentions that he also built a VBA tool to refresh PivotTables automatically, for anyone who doesn't trust themselves to click Refresh.
Folder queries also scale beyond a desktop. Microsoft notes that you can combine files from SharePoint, Azure Blob Storage and Azure Data Lake Storage with a similar process, and the same pattern works in Power BI Desktop. That makes a shared team folder a natural next step once the local version works.
Bottom line
Phillips's walkthrough holds up against Microsoft's documentation, with two changes worth making. Filter for the files you want rather than filtering out the master workbook. And treat refresh-on-open as a convenience that depends on your Trust Center settings, not a live feed. Keep one template, one clean folder and one query. After a few minutes of setup, the weekly copy-and-paste job is gone.
References
- I connected Excel to a folder on my PC, and my weekly report now updates itself How-To Geek · 2026-09-30T11:00:14+00:00
- Power Query Folder Import: Combine Files Automatically databear.com
- How to Combine Files From a Folder with Excel Power Query - Xelplus - Leila Gharani xelplus.com