

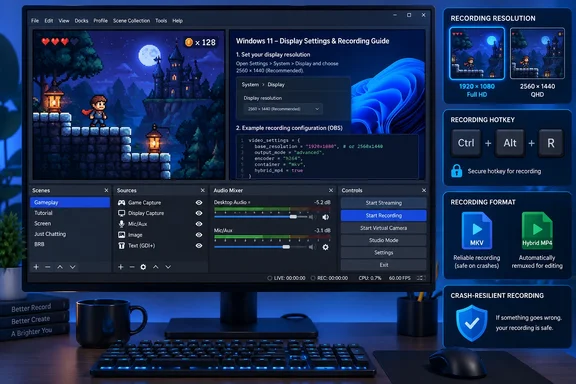
The article, published September 16, recommends four broad changes: streamline docks and hotkeys, standardize canvas and output scaling, use Simple Output mode, and record to MKV with automatic MP4 remuxing. Those are reasonable defaults for an occasional recorder. The practical correction is to set OBS around the material being captured rather than treating a 1920 × 1080 project as a universal answer.
OBS Studio’s official site currently lists version 32.2.2 for Windows 10 and Windows 11. That matters because OBS has added recording-format options since the old “never record straight to MP4” guidance became standard. The classic MKV-plus-remux workflow remains safe and useful, but Hybrid MP4 can now provide similar resilience without leaving every recording session with a separate MKV source file to manage.
Docks and hotkeys should remove friction, not remove recovery controls
The most useful part of the How-To Geek setup is its advice to customize OBS docks. Scenes, Sources, and the Audio Mixer are the three panels most local recordings need on screen. Locking that layout after arranging it prevents the familiar problem where a dock gets dragged, collapsed, or hidden during a rushed recording session.
Hiding the Controls dock is more debatable. It makes sense only after hotkeys have been tested, particularly if OBS is used for a tutorial where the presenter is switching between a terminal, browser, virtual machine, and application windows. A visible Stop Recording button is a simple recovery path when a hotkey fails, gets reassigned, or is pressed at the wrong moment.
The proposed Space bar shortcut for start and stop recording deserves extra caution. OBS itself uses Space in the preview area to pan and zoom when the preview has fixed scaling, and a bare Space bar is easy to trigger while interacting with the canvas. OBS’s official shortcut documentation confirms that Ctrl+F fits a selected source to the screen and Ctrl+S stretches it; those shortcuts already depend on what has focus in the interface.
A recording hotkey should therefore be memorable and hard to invoke accidentally. A modified combination such as Ctrl+Alt+R, or a function key that is not assigned elsewhere in a game or presentation, is usually safer than Space. Before relying on it, test the shortcut with OBS both in the foreground and while using the application you intend to capture.
For classroom tutorials, it is also worth creating a separate Scene Collection rather than continually rebuilding one general-purpose layout. One collection can have a Display Capture source, a microphone, and a clean 16:9 canvas for tutorials; another can contain game capture, a pixel-art scaling configuration, and different audio levels. This is less glamorous than changing themes, but it prevents sources and audio devices from leaking between unrelated recordings.
Canvas resolution is the decision that changes the recording
The walkthrough advises setting both Base (Canvas) Resolution and Output (Scaled) Resolution to 1920 × 1080. That is a defensible choice for a modest PC and for video intended for a 1080p audience. It is not automatically the best arrangement for screen-recorded lessons.
In OBS, the base canvas is the working surface where sources are positioned and composed. The output resolution is the file that the encoder produces. OBS’s own overview documentation makes an important distinction: changing the base canvas can require sources to be resized or realigned, while changing the output resolution does not.
For a Windows tutorial captured on a 2560 × 1440 display, using a 2560 × 1440 base canvas preserves more detail while editing the scene. OBS can then scale the completed result down to 1920 × 1080 for the recording. That can be especially helpful for PowerShell output, spreadsheets, code editors, and small interface labels, where downscaling begins with a sharper original image.
There is a cost. A larger canvas asks more of the GPU and encoder pipeline, and the author of the How-To Geek piece is using Intel Iris Xe integrated graphics rather than a dedicated gaming GPU. In that situation, a 1080p canvas may be a sensible performance compromise. The key is to make it deliberately:
- Use a 1920 × 1080 canvas and output when the source is already 1080p, the content is primarily game footage, or the system shows encoder overload.
- Use the display’s native resolution as the canvas when legible text is the priority, then downscale the output only if file size, bandwidth, or hardware performance requires it.
- Test the actual recorded file at its intended viewing size instead of judging only from OBS’s preview window.
The same caution applies to Transform commands. Fit to Screen preserves the source’s aspect ratio. Stretch to Screen fills the canvas by changing the image’s shape when the source and canvas do not share the same proportions. Stretching an old 4:3 game to a 16:9 canvas may eliminate black bars, but it also makes circles oval and sprites wider. For gameplay archives or retro footage, that is generally the wrong trade.
The suggested Point scale filter has a narrower but legitimate use. It is appropriate for pixel art when scaling by whole-number multiples, such as enlarging a 320 × 240 or 640 × 480 game image without smoothing individual pixels. It is a poor general setting for a Windows desktop, webcam, or modern 3D game, where nearest-neighbor scaling can make text and diagonals look rough. OBS lets each source have its own scale filter, so a pixel-art Game Capture source does not need to dictate how a Display Capture source is scaled.
Simple Output mode is a good default until audio needs editing
Using Simple Output mode is sound advice for someone who wants dependable local recordings without confronting encoder presets, rate control, keyframe intervals, and multiple audio tracks. OBS’s standard recording guide also frames Simple mode as the place to choose recording quality with less configuration overhead.
The limitation appears when the recording needs post-production. A teacher recording a software lesson may want the microphone, desktop sound, and a music bed on separate tracks. A gamer may want Discord or browser audio separated from the game. Those uses require Advanced Output mode and audio-track routing in OBS’s Advanced Audio Properties.
The How-To Geek article also recommends enabling automatic recording whenever streaming starts. That is useful only for a creator who regularly streams and wants a local archive by default. For a user who mainly records tutorials, it can create large unintended files and complicate storage management. It should be treated as a workflow preference, not a baseline setting.
Before changing output quality, users with integrated Intel graphics should make one short test recording and inspect OBS’s Stats window. Rendering lag indicates that scene composition or capture is straining the GPU; encoding lag indicates that the chosen encoder, resolution, frame rate, or quality level is too demanding. Lowering the output resolution or frame rate is usually a cleaner response than randomly changing every encoder option.
MKV remuxing remains safe, but Hybrid MP4 changes the choice
The strongest technical recommendation in the source article is to avoid conventional MP4 recording. Standard MP4 and MOV files require finalization when recording stops. A crash, power loss, forced reboot, or full disk can leave the file unplayable or difficult to recover. OBS has long recommended MKV because an interrupted MKV recording remains usable far more often.
Automatic remuxing still works exactly as described: record to MKV, then have OBS create an MP4 copy after recording ends. It is a strong option when an editor or upload workflow needs conventional MP4 files, and OBS’s documentation continues to recommend MKV for most use cases.
What the new article leaves out is the format OBS introduced in version 30.2: Hybrid MP4. OBS records it in a fragmented form that remains recoverable if writing is interrupted, then finalizes it into a broadly compatible MP4-style file when recording ends normally. OBS added Hybrid MOV in version 32.0 for workflows that need wider H.264, HEVC, and PCM audio support.
For Windows users recording ordinary H.264, HEVC, or AV1 footage, Hybrid MP4 deserves a trial before committing to an MKV-plus-remux routine. It can reduce file clutter and eliminate the brief remux wait after every recording. It does not make every compatibility issue disappear: older or specialized editors may still behave better with a conventional remuxed MP4, and MKV remains the more flexible container for unusual codec and multi-track combinations.
The choice comes down to what happens after Stop Recording is pressed. Users who want the most broadly flexible source file should choose MKV and remux only when required. Users who want one resilient, immediately usable file should test Hybrid MP4 in their editor and player. Users should avoid selecting ordinary MP4 merely because it is familiar.
OBS becomes less intimidating when its settings reflect the job at hand: preserve a recovery control, reserve Point scaling for actual pixel art, keep the canvas large enough for readable source material when the hardware permits it, and choose a recording container that matches the editing workflow. For a 1080p retro-game capture, the How-To Geek configuration is close to the mark. For Windows tutorials, the canvas and output decisions will determine whether viewers can read the screen long after the recording interface has been simplified.