

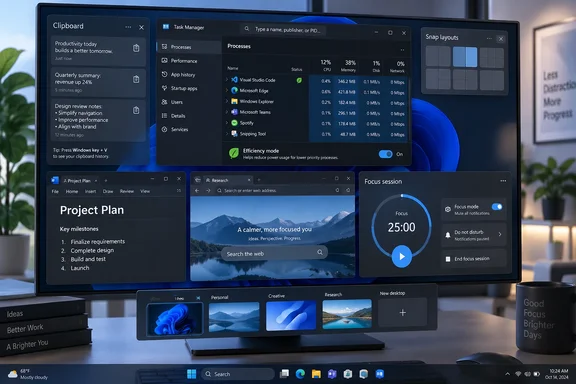
TechRepublic’s Windows 11 tips coverage similarly highlights useful built-in tools tucked behind shortcuts and settings. Microsoft’s support documentation supplies the important practical details: clipboard clearing preserves pinned entries, Efficiency mode has process-level restrictions, and Focus sessions follow configurable notification rules.
Here is how to use all five, including the checks and trade-offs that determine whether they fit your workflow.
Clipboard history: recover earlier copies without enabling cloud sync
Ordinary copy-and-paste gives you the latest clipboard content. Clipboard history lets you select from earlier copies instead, making it useful when collecting several passages before pasting them into a document.
Microsoft documents a limit of 25 copied entries, with support for text, HTML, and bitmap data up to 4 MB per item. Older unpinned entries are removed as new ones arrive, so this is a short-term working collection rather than an archive.
To start using it:
- Press Windows + V.
- Select Turn on if clipboard history is disabled.
- Copy some text, then copy a second item.
- Place the cursor where you want to paste, press Windows + V again, and select the earlier entry.
The history panel should now show the supported items you copied after enabling it. Turning history on cannot recover something that had already been overwritten before the feature was enabled.
Microsoft says restarting the PC clears unpinned history. Pinning is therefore useful for frequently reused text, but it also changes how long that content remains available.
Clear sensitive entries deliberately
Treat copied passwords, recovery codes, and confidential text as material you do not want retained in a reusable history.
For an individual entry, press Windows + V, open its See more (…) menu, and select Delete. To clear the broader history, use Clear all in the panel, or open Settings > System > Clipboard and select Clear under Clear clipboard data.
Bulk clearing leaves pinned items behind. Inspect those separately rather than assuming the entire collection has disappeared.
Clipboard history and cross-device syncing are separate choices. You can use the local history without switching on Clipboard history across your devices in Clipboard settings.
Microsoft says syncing is tied to a Microsoft account or work account, with the same login required on the participating devices. Automatic syncing sends copied text across devices; the manual option requires selecting the sync action for an entry, which uploads that text to the cloud. For someone who only wants to recover earlier copies on one PC, leaving cross-device sync disabled avoids that additional data transfer.
Efficiency mode: reduce a process’s priority without closing it
Task Manager’s Efficiency mode is useful when a background process is competing with the work you are actively doing. Microsoft describes it as a Windows 11 resource-control feature that lowers background process priority and can improve responsiveness while reducing power use and thermal noise.
The trade-off is that the selected process receives less favorable treatment. This makes it a selective control, rather than a setting to apply indiscriminately to every application.
Microsoft also warns that Efficiency mode can cause instability for certain processes. Choose a background task whose performance you can afford to reduce, and be prepared to reverse the change.
To apply it:
- Open Task Manager with Ctrl + Shift + Esc.
- Select Processes and locate the process you want to manage.
- If the application appears as an expandable group, expand it to inspect the individual processes.
- Right-click a supported process and select Efficiency mode.
- Accept the confirmation prompt if it appears.
A green double-leaf icon beside the process confirms that Efficiency mode is active. You can also select a process and use the Efficiency mode button near the top of Task Manager.
Why the option may be unavailable
Microsoft says Efficiency mode cannot be switched on or off for most process groups. A grayed-out control at the group level does not necessarily mean every child process is ineligible; expand the group and inspect the individual process you intend to change. Some selections will still be unavailable.
If the application becomes sluggish or behaves incorrectly, right-click that same process and select Efficiency mode again to turn it off. The green double-leaf indicator should disappear.
Do not confuse this with Microsoft Edge’s browser-level power controls. Microsoft explicitly distinguishes Task Manager’s Efficiency mode from Edge’s Energy saver, formerly also called efficiency mode. Turning one off does not turn the other off.
The supported benefit is conditional: reducing background competition may help active work. It does not establish a fixed percentage improvement for your PC, and the mode does not close the application.
Snap Layouts: choose a position, then fill the remaining spaces
Snap Layouts reduces the manual work of sizing windows for comparisons or reference tasks. You select where the current window should go, then Snap Assist offers other open windows for the remaining positions.
To use it:
- Activate the window you want to arrange.
- Hover over its maximize button, or press Windows + Z.
- Select a position in one of the displayed layouts.
- Select the other open windows suggested by Snap Assist to fill the remaining spaces.
The result should be a coordinated arrangement of windows without repeatedly dragging their borders. This is particularly useful when two applications need to remain visible together; switching with Alt + Tab would otherwise hide one behind the other.
If the layouts do not appear, open Settings > System > Multitasking. Check that Snap windows is enabled, then expand that section to review the available snapping options. Use the layout choices actually displayed on your PC rather than expecting every device to show an identical grid.
Microsoft also documents a simpler keyboard alternative: Windows + Left Arrow or Windows + Right Arrow snaps the active window to the corresponding half of the screen.
Snap is an arrangement tool. It does not require a separate workspace, making it the more direct choice when you want several windows visible at once.
Focus sessions: set notification behavior before starting the timer
Windows 11 Focus sessions combine a timed work period with distraction controls. According to Microsoft, the default session behavior turns on Do not disturb, displays a focus timer, and temporarily disables taskbar app badges and flashing.
You can configure those choices under Settings > System > Focus. That is worth doing before relying on a session to quiet your desktop: the timer, badges, flashing, and Do not disturb behavior are individually configurable.
To start from Clock:
- Open the Clock app.
- Select Focus sessions.
- Choose the session duration and whether you want breaks.
- Select Start focus session.
A focus timer appears, and Windows notifies you when the session ends. You can also end it early.
Clock is not the only entry point. Press Windows + N, choose a duration in the calendar and notification area, and select Focus. Alternatively, start a session from Settings > System > Focus. Microsoft says the Clock app must be reinstalled from Microsoft Store if it has been removed and you want to use Focus.
Silenced notifications still have rules
Do not disturb redirects muted notifications to Notification Center, where you can review them later. Under Settings > System > Notifications > Set priority notifications, you can choose which notifications are allowed through while Do not disturb is active.
That makes Focus a configurable notification-management tool, not a guarantee that every communication will be blocked. DigitBin’s suggestion to use a separate Focus Assist setting for call blocking is not the current Windows 11 procedure documented by Microsoft; the relevant controls here are Focus, Do not disturb, and priority notifications.
There is also an important end-of-session detail: if Do not disturb was already enabled before the session began, Microsoft says it remains enabled afterward.
Spotify is optional. In Clock’s Focus sessions page, select Link your Spotify, sign in, and choose a playlist or podcast to play during the session. No Spotify connection is needed simply to run the timer and reduce notifications.
Virtual desktops: separate window collections and control switching
Virtual desktops are useful when you want to separate activities rather than display everything together. Unlike Snap Layouts, which arranges windows within the current view, desktops provide different workspaces to switch between.
To create and use them:
- Press Windows + Tab to open Task View.
- Select New desktop.
- Open the windows you want to use in that workspace.
- Switch between existing desktops with Ctrl + Windows + Left Arrow or Ctrl + Windows + Right Arrow.
You can also return to Task View and select a desktop directly.
The degree of separation you see depends on two settings. Open Settings > System > Multitasking > Desktops, then choose whether the taskbar shows open windows from Only on the desktop I’m using or On all desktops. Make the corresponding choice for windows shown when pressing Alt + Tab.
Those controls address a common mismatch: creating separate desktops but continuing to see windows from every workspace in the task switcher. Choose the current-desktop options for a more focused view, or all desktops if quick access across workspaces matters more.
Virtual desktops organize running applications; they do not make those applications resource-free. Moving your attention to another workspace is not the same as closing its programs, so use desktops to reduce visual clutter rather than as a remedy for high CPU or memory use.