

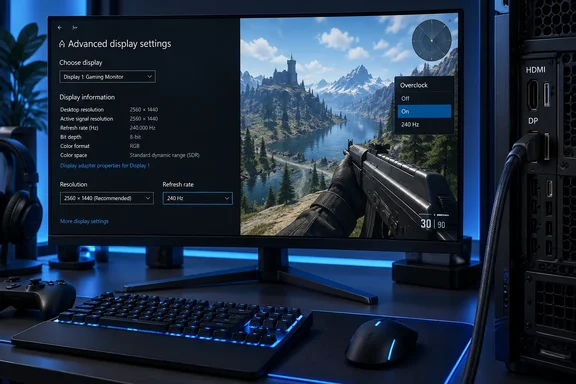
How-To Geek’s September 22 guide highlights this easily missed part of setting up a gaming monitor: connecting a display does not guarantee that you are using its advertised maximum. Microsoft’s Windows instructions provide an important refinement, too: selecting a higher refresh rate can sometimes change the resolution. The target is the right resolution and refresh rate together, not simply the largest number in a menu.
Windows Advanced display separates a settings problem from a connection limit
Refresh rate describes how many times a display updates its image each second. A 60Hz display refreshes 60 times per second; a 240Hz setting allows 240 refreshes per second. Microsoft identifies smoother scrolling, more fluid pen input, and improved gaming responsiveness among the potential benefits of higher refresh rates.
Windows obtains information about a monitor through data supplied by the display. Microsoft describes Extended Display Identification Data, or EDID, as metadata containing the monitor’s identity, timing information, and other capabilities. The graphics driver and Windows display components use this information when working with the monitor.
That explains how Windows can recognize a display and offer suitable modes without asking you to enter its specifications. It also explains why the monitor’s retail description and the available settings are different things: Windows works with the capabilities reported through the connected hardware, not the headline printed on the box.
How-To Geek presents a lower initial refresh rate as a compatibility precaution. Microsoft’s documentation supports a narrower conclusion: available rates depend on the display and its supported modes, and accurate capability information matters. There is no universal rule here that every new gaming monitor must start at 60Hz or that Windows deliberately holds every panel below its maximum.
The first check should therefore be observational. Look at what Windows is actually using, then compare it with what Windows offers.
Check Windows 11 without trading away resolution
Before changing anything, note the current resolution and refresh rate. Those values give you a useful baseline if the new setting produces an unsatisfactory picture.
- Press Windows key + I to open Settings.
- Open System > Display > Advanced display.
- If several displays are connected, select the monitor you intend to configure.
- Read the current resolution and refresh rate in the Display information panel.
- Open Choose a refresh rate and select the desired supported value.
- Check the resulting resolution and refresh rate again.
Microsoft specifically warns that an asterisk beside a refresh-rate option means that option does not support the current resolution. Selecting it changes the resolution to achieve the chosen rate. If your aim is to run the monitor at its native resolution—the panel’s own pixel dimensions—an asterisk is a reason to pause, not an invitation to select the fastest number regardless. Microsoft Support
For example, reaching a higher refresh rate by reducing resolution is a different configuration from reaching that rate at the monitor’s intended native resolution. It may be an acceptable trade-off for a particular use, but it should be a deliberate choice.
Use the Windows 10 controls for Windows 10
Microsoft documents slightly different labels for Windows 10. Open Settings > System > Display > Advanced display settings. On a multi-monitor PC, select the intended screen under Choose Display, then choose the desired value under Refresh rate.
Do not look for Windows 11’s Dynamic refresh rate control in Windows 10; Microsoft explicitly says Windows 10 does not support that feature. The basic fixed-refresh selection remains a separate task.
After either procedure, there are two main branches. If the desired rate is listed and works at the intended resolution, the problem was the selected setting. If it is absent, repeatedly reopening the menu will not resolve the underlying limit: move on to the connection and the monitor’s own configuration.
A monitor’s maximum refresh rate belongs to a particular input
The next check is the monitor’s input specification. A panel can support a particular refresh rate while one of its connectors supports a lower maximum. Both statements can be true without either the monitor or Windows malfunctioning.
BenQ’s high-refresh troubleshooting guidance explicitly describes monitors that support a lower rate through HDMI than through DisplayPort. For those models, using DisplayPort is the route to the higher supported rate. That is a model-specific connection requirement, not a general verdict that HDMI is unsuitable for gaming.
How-To Geek gives the MSI G274QRFW as a concrete example. It reports that the 2560 × 1440 monitor reaches up to 170Hz through DisplayPort 1.4 with overclocking enabled, while its HDMI 2.0b inputs top out at 144Hz. A user running that monitor at 144Hz over HDMI could therefore be using the connection correctly while still falling short of the product’s headline maximum.
The practical implication is straightforward: a faster cable cannot remove an input’s documented limit. If the monitor accepts only the lower rate through the selected connector, replacing the cable with a more expensive version of the same type will not unlock the higher input-specific mode.
For your own monitor, the relevant specification is a combination of three things:
- Identify the native resolution at which you want to use the display.
- Find the maximum refresh rate supported by the particular HDMI or DisplayPort input you are using.
- Check whether that rate requires an additional monitor setting, such as a manufacturer-provided overclock mode.
The exact model matters. A specification for a similar-looking display, another size in the same range, or a newer revision is not enough to establish the limits of the monitor on your desk. Where the supported maximum differs by connector, changing to the appropriate input is a targeted fix rather than an experiment.
The graphics output and cable must support the same display mode
Once the monitor’s input is understood, follow the connection back to the PC. The graphics output and cable also have to support the intended resolution and refresh rate. A compatible connector shape establishes that the cable plugs in; it does not establish that the whole path supports the desired mode.
How-To Geek points to older graphics cards as a reason to compare outputs rather than assume HDMI and DisplayPort are interchangeable. Its examples include NVIDIA’s RTX 20 series and AMD’s RX 5000 series, with HDMI 2.0b and DisplayPort 1.4 connections. The useful takeaway is to compare the capabilities of the actual graphics-card output with those of the monitor input.
On a desktop with a separate graphics card, also establish which device the cable is connected to. Motherboard video connectors and graphics-card connectors are different output paths. For a monitor intended to use the discrete card, checking that it is connected to that card is more useful than relying on a universal rule about where the socket appears on the back of the case.
A motherboard output is not automatically defective or inherently unsuitable. Its capabilities depend on the system. The point of this check is to ensure you are evaluating the output that you intend to use, rather than diagnosing one graphics device while the monitor is attached to another.
Cable selection comes next. How-To Geek recommends the official Ultra High Speed HDMI certification label when a monitor requires that cable category, and an appropriately specified VESA-certified cable for DisplayPort. That is more useful purchasing guidance than treating a vague “gaming,” “8K,” or interface-version claim as proof of suitability.
Avoid assuming that cable price establishes capability. Equally, the age or appearance of a cable is not a complete diagnosis. The relevant question is whether it supports the link required by the monitor and graphics output for the selected mode.
BenQ also identifies cable replacement as a troubleshooting step for symptoms such as flicker and refresh-rate drops. Those symptoms make the cable worth investigating, but they do not uniquely identify it as the cause. A monitor overclock can produce display problems too, so the setting in use remains part of the diagnosis.
A sensible order is to establish the supported input and output first, then use a cable specified for that connection. This avoids buying a replacement that still connects two ports whose documented limits fall short of the target.
Monitor overclocking can explain an absent advertised maximum
Some displays require a setting in their own on-screen display before their highest advertised refresh rate becomes available. This menu belongs to the monitor, rather than to Windows Settings. Until the relevant mode is enabled, Windows may offer the panel’s default maximum instead.
How-To Geek uses the Alienware AW2723DF to illustrate this distinction. It reports a default maximum of 240Hz over DisplayPort 1.4, with the advertised 280Hz available after enabling the monitor’s overclock mode. In that situation, finding 240Hz in Windows is a clue about the monitor configuration, not immediate evidence of an inadequate cable.
The practical order matters. First establish that you are using an input that supports the higher mode. Then enable the manufacturer-provided setting, if needed, and return to Windows Advanced display to check which rates are available. Changing only one side of that arrangement can leave you short of the intended result.
Setting names and menu locations vary by model. Look for the monitor’s documented refresh-rate or overclock option; there is no single button sequence that safely applies to every brand. Nor should a missing advertised mode be treated as a reason to invent custom timings or force an undocumented overclock.
Stability remains part of a successful setup. If enabling the monitor’s higher mode produces flicker, visual corruption, or other abnormal behavior, return to the last stable refresh rate and disable the overclock option. A clean, stable image at the default supported rate is preferable to a larger number accompanied by display faults.
It is also worth distinguishing a manufacturer-provided overclock option from EDID editing. Microsoft documents EDID overrides as a mechanism through which manufacturers can correct erroneous capability information. That documentation explains how display reporting works; it is not a routine recommendation for users to rewrite a monitor’s capabilities to expose a missing refresh rate.
Windows 11 Dynamic Refresh Rate changes the meaning of a lower reading
A lower refresh rate is not always an accidental configuration. Windows 11’s Dynamic Refresh Rate, or DRR, can adjust the rate according to activity, balancing smoothness against power consumption. On supported hardware, a lower rate during less demanding use can be intentional.
Microsoft places the control under Settings > System > Display > Advanced display. DRR requires a display that supports variable refresh rate and at least 120Hz, and Windows only permits the feature when the hardware supports it. Windows 10 does not offer DRR.
Microsoft also documents a gaming limitation that is directly relevant to this troubleshooting task: DRR should not affect games designed for variable refresh rate, but it can limit the maximum refresh rate of other games. If enabling DRR makes a particular game appear to run at a lower refresh rate, Microsoft recommends disabling DRR. That is a specific Windows 11 troubleshooting branch, not a reason for everyone to switch it off.
Variable refresh rate, or VRR, is related but serves a different purpose. It allows the display refresh to adapt to a game’s changing presentation rate on supported hardware. DRR is Windows’ activity-dependent refresh-rate feature; the two names should not be used interchangeably.
For a battery-powered PC, maximum refresh all the time may not be the preferred configuration. Microsoft notes that lowering refresh rate can save power. A user who values longer battery life can therefore make a reasonable choice to retain dynamic behavior or select a lower fixed rate.
There is also a limit to what a successful Windows setting proves. Selecting 240Hz establishes the display configuration; it is not a measurement showing that a game renders 240 distinct frames every second. If Windows reports the expected mode but gameplay remains disappointing, the original “monitor stuck at a lower setting” diagnosis no longer explains the whole experience.
Check the display path before buying replacement hardware
Start with the free settings check, then investigate only the branch that fits the result. A listed but unselected rate calls for a Windows change. An absent rate calls for a comparison of input limits, graphics output, cable capability, and monitor settings. An unstable rate calls for a return to the stable configuration before further troubleshooting.
Verification should include both the current resolution and the current refresh rate. Smooth-looking cursor movement is useful feedback, but the Display information panel gives you a concrete configuration to record. For a multi-monitor system, make sure that record belongs to the display you actually changed.
How-To Geek’s author reports that a 240Hz LG monitor sometimes falls back to 144Hz, while treating a possible connection to driver updates as speculation. That is a reasonable prompt to recheck settings when something feels different, not grounds to assume that every graphics-driver update resets refresh rates.
Keep the troubleshooting priorities narrow:
- Check the intended monitor in Windows Advanced display before replacing hardware.
- Select the desired rate at the intended resolution, paying attention to Windows 11’s asterisk warning.
- Match the monitor input and graphics output to the required mode before deciding that the cable needs replacing.
- Enable a manufacturer-provided monitor overclock only when the advertised maximum requires it, and disable it if the image becomes unstable.
- On supported Windows 11 hardware, consider DRR separately from a fixed lower refresh setting, particularly when the problem occurs in a specific game.
- Recheck the resolution and refresh rate after changing the connection or configuration instead of assuming the previous selection still applies.
Getting the speed you paid for means establishing a supported path from the graphics output to the panel, then confirming that Windows is using it. Sometimes that takes one dropdown change; sometimes it takes a different input or a monitor setting. Once the intended resolution and refresh rate are active and stable, there is no benefit in continuing to replace components simply because a higher number appeared on a box.