

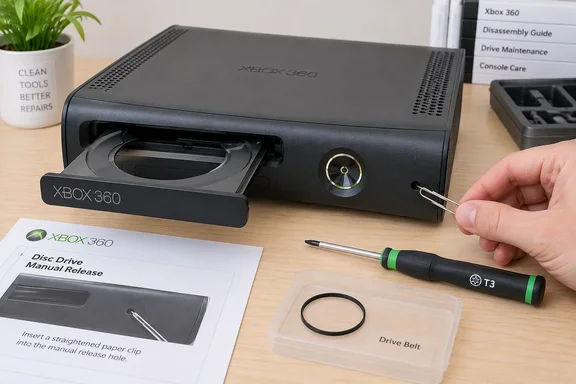
The Xbox 360 went on sale on November 22, 2005, and Microsoft no longer puts real effort into supporting it. Its own help page for the problem now carries the notice that "XBOX 360 support content is no longer being maintained." Owners fixing these consoles today mostly rely on that frozen Microsoft documentation, repair wikis like iFixit, and years of forum advice. This piece sorts that material by how risky each step is and how well it's documented.
Stuck tray or unresponsive eject button: two different Xbox 360 faults
Start by working out which symptom you have. A tray that won't move at all, a tray that jams halfway, an eject button that does nothing, and a tray that moves fine but won't read discs can all look like "the disc drive is broken." They have different causes and different fixes.
The quick checks are worth doing, but don't expect too much from them. Fully powering the console off, unplugging it for about a minute, and trying the eject button again rules out a drive that didn't start up properly. If the console still boots to the dashboard, try ejecting from the software as well. If the dashboard command opens the tray and the physical button doesn't, the button or its front panel is the likelier suspect. If neither works, look at the drive mechanism. Treat this as a clue rather than proof. Some troubleshooting guides say a successful manual eject means the fault is "usually mechanical rather than electronic," which is more certain than the evidence supports.
Next, look at the outside of the console. Take off any stickers or labels near the tray and eject control, remove anything resting against the front, and make sure the console sits on a flat, stable surface. Twinfinite also suggests checking whether the disc in the system isn't sticky or gooey, causing the tray to jam. That's easy to miss after a disc has been sitting in a humid room or has picked up residue from a label.
If the tray moves normally but games won't load, you're dealing with a disc-reading fault. The common signs are a persistent "Open Tray" message, "Unrecognized Disc" errors, or repeated read failures. iFixit files "Xbox 360 Not Reading Disks" as its own troubleshooting topic, separate from stuck trays, and one of its busiest forum threads is titled "Xbox always says open disc tray," with 25 answers. That volume of discussion suggests many owners mix the two problems up. Cleaning or replacing the laser belongs to this second branch. It won't fix a tray that physically won't move.
Microsoft's Xbox 360 manual eject procedure depends on your model
Microsoft's own fix for a stuck tray is the manual eject. Its support page explains how to manually eject the disc tray from your XBOX 360 console when the eject button doesn't work. Microsoft's older knowledge base article on the same task, KB 906935 (Xbox 360: How to manually eject a disc from the disc tray), is still available on archive mirrors.
Generic advice skips an important detail: there is no single "manual eject hole" that works the same way on every Xbox 360. Microsoft's legacy instructions describe different release points and actions for different disc drive types. On some drives the pin presses a lever. On others, repeated pushes turn a gear. Twinfinite's guide, which follows Microsoft's steps closely, likewise describes more than one method depending on the console's design.
For original-style consoles with a removable faceplate, Twinfinite describes this sequence:
- Shut the console down and remove all the cables plugged into it, including power.
- Hold the console securely and use your thumbs to pull the faceplate off the front of it.
- With the faceplate off, insert a paper clip into the hole underneath the disc drive's right side (if there is no hole there, skip to the next paragraph) and push until some resistance is felt.
- When the tray pops out slightly, pull it the rest of the way by hand.
Twinfinite describes a different release point for another design. After you move the console to a horizontal position, you look carefully into the vents on the system's left side, where the release sits about 2.25 inches from the front. You then insert a large paper clip into the eject button hole and push it in about an inch and a half. Two positions that far apart show why guessing is risky. Poking a stiff wire into the wrong vent does nothing for the tray and could hit internal components.
If you can't find the release point, or the tray fights back, stop. Microsoft's procedure is meant to release the tray a small amount so you can pull it out gently. It is not meant for levering the tray open. A good manual eject also tells you something useful: the tray itself is free to slide, so the fault is somewhere in the motor, belt, or control path.
Replacing the Xbox 360 drive belt means opening the case
If a manual eject works but the tray still won't open under power, the drive belt is the most commonly suggested culprit. It's a small rubber band that links the tray motor to the mechanism, and forum and repair-community advice points to it constantly. iFixit's belt guide makes a similar point, noting that the Xbox 360 disc tray often stops working as the console ages. It's a plausible and cheap repair. However, nobody has published failure-rate data showing that belts are "by far" the most common cause across every Xbox 360 model, and a new belt isn't guaranteed to fix the problem for good.
The part is cheap, but fitting it takes real work. iFixit's How to Replace the Xbox 360 Optical Drive Belt guide goes through the following steps:
- Fully disconnect the console, then remove the hard drive.
- Pry off the faceplate with a pry tool.
- Press down through the indicated holes to release the clips holding the base plate and top plate, one side at a time.
- Gently unhook the four clips on the front of the console. The guide warns that these plastic clips may be fragile.
- Press down on the case indents with a flathead screwdriver and lift off the top casing.
- Remove six screws with a T3 Torx screwdriver, flip the console, and lift off the casing.
- Unplug the two connections at the rear of the disc drive, remove the four screws underneath it, and take off the drive casing.
- Turn the indicated wheel with a flathead screwdriver to open the drive, pull out the old belt with tweezers, and fit the new one.
- Reassemble in reverse order.
The comments on the guide suggest it's harder than the steps make it look. One owner said they couldn't get past the case-release step and were damaging the plastic by prying with a screwdriver. Another commenter recommended buying a dedicated Xbox 360 opening tool instead, warning that a screwdriver can wreck the case. A third reader reached the belt step and found solid plastic where the guide shows two openings on the drive front, and concluded that different drive types must be in use. A later reply suggested sliding a small bar to one side to lower the laser and free the tray. That's one commenter's workaround, not a documented procedure. Another commenter said the teardown in this particular guide isn't very accurate and recommended iFixit's other disc drive guide.
The takeaway is simple. The belt fix is well documented, but it's an invasive repair, and your drive may not match the photos. iFixit lists a separate Optical Drive Belt guide, an Eject Button replacement guide, and an Xbox 360 Optical Drive Replacement guide. It also covers the Xbox 360 S separately from the original console, so pick the guide that matches your hardware.
Identifying your Xbox 360 revision before you pick up a screwdriver
The Xbox 360 went through several internal revisions. iFixit's device page asks owners to choose between Xenon, Zephyr, Falcon, Opus, and Jasper motherboards for the original chassis, and it points to the model information on the back of the console near the HDMI port. The Xbox 360 S (often called the Slim) arrived in mid-2010, and the Xbox 360 E came later. Each has a different case and front panel.
Model differences matter most around the eject control. On original consoles it's a physical button. On the Xbox 360 S, owners have reported problems with the touch-sensitive eject panel, including no response, erratic behaviour, and trays that open repeatedly. The suggested fixes (reseating the front panel cable, cleaning the sensor area, or replacing the panel) all come from user reports rather than Microsoft documentation. If your Slim's tray opens from the dashboard but not the touch panel, look at the panel before you touch the drive.
The same caution applies to internal ribbon cables. A loose connector after a previous repair can certainly leave a drive unresponsive. Still, reseating connectors inside an opened console only makes sense if you're following a disassembly guide for your exact model. Pulling cables at random is a good way to create a second fault.
Why a replacement Xbox 360 DVD drive isn't a simple swap
Some troubleshooting guides end by recommending you replace the whole DVD drive if the belt, cleaning, cables, and laser don't help. Before you buy a used drive, know one thing that's widely discussed in Xbox 360 repair circles: each console's optical drive is paired to its motherboard using console-specific drive key information. A drive pulled from another console may open and close perfectly and still fail to play games unless that pairing is dealt with. The details come from specialist repair write-ups rather than current Microsoft consumer documentation, so treat full drive replacement as a job for an experienced repairer. Also keep your original drive's circuit board rather than throwing it away.
Some common advice also lacks a documented procedure. Spraying compressed air into an open drive and wiping the laser lens with isopropyl alcohol are both frequently suggested on forums. iFixit does list cotton swabs and isopropyl alcohol among the tools commonly used on this console. However, none of the sources here give a verified, model-specific procedure for cleaning the Xbox 360 laser safely. Replacing the laser is further down the disc-reading branch again and doesn't fix a jammed tray.
What this means for you
What you should do depends on how much risk you're willing to take. Anyone can safely do the external checks and the power-off manual eject. Opening the case to fit a belt suits confident DIYers with the right tools. Replacing the whole drive should go to someone who understands drive pairing.
- Unplug the console before any manual eject attempt. Use a straightened paper clip only at the release point Microsoft or a guide for your specific design identifies, and stop if the tray resists.
- Try ejecting from the dashboard as well as the physical button or touch panel. The result tells you whether to look at the eject control first or the drive mechanism.
- Check the model information near the HDMI port on the back of the console before following any disassembly guide, because release points, cases, and drives differ between revisions.
- Buy a proper Xbox 360 opening tool and a T3 Torx driver before attempting a belt swap. Owners who pried the case with screwdrivers report broken clips and damaged plastic.
- Treat "Open Tray" and "Unrecognized Disc" errors on a tray that moves normally as a disc-reading fault, not a belt problem.
- Don't assume a used replacement DVD drive will play games straight away, since the original drive's pairing information may need to be carried over.
A 20-year-old console is being kept alive by frozen Microsoft support pages and community repair notes. The fix that works most reliably is the manual eject, which is also the only one Microsoft ever documented. A cheap belt can bring many trays back to life, but only if you're prepared to open the case carefully and your drive matches the guide. If the tray still won't move after that, a specialist repairer, or even a replacement console, starts to look like better value than more DIY work.
References
- Manually eject your XBOX 360 console disc tray | XBOX Support support.xbox.com
- How to Open a Stuck or Sticky Xbox 360 Disc Tray - Twinfinite twinfinite.net
- Xbox 360 Repair Help: Learn How to Fix It Yourself. ifixit.com