

Monitor overclocking can make a Windows gaming setup feel more responsive without buying a new display, but it is not a guaranteed way to turn every 144Hz monitor into a reliable 165Hz or 180Hz panel. The practical goal is simpler: create a slightly faster refresh-rate mode, test it properly, and keep it only if the monitor, GPU, cable, and Windows driver stack all deliver every frame cleanly.
A successful monitor overclock can improve perceived motion smoothness and reduce the interval between screen refreshes. It will not increase a game’s rendered FPS, improve the display’s native pixel response time, or magically remove ghosting caused by the panel itself. It is a display-timing experiment, not a performance upgrade for the GPU.
For many Windows enthusiasts, the attraction is obvious. A stable move from 60Hz to 75Hz is immediately noticeable on the desktop and in games. A modest bump from 144Hz to 155Hz or 165Hz can also be worthwhile, especially for esports titles where a system already produces frame rates above the monitor’s factory refresh ceiling.
The important caveat is that the monitor’s advertised refresh rate is a validated operating specification, not necessarily an artificial limit waiting to be unlocked. Some panels have useful margin; others do not. The difference comes down to the individual monitor, its internal scaler, panel timing controller, cable path, firmware, GPU driver, color settings, and variable-refresh-rate behavior.
A monitor refresh rate describes how many times per second the screen redraws the image. At 60Hz, a full refresh occurs every 16.67 milliseconds. At 144Hz, that interval falls to roughly 6.94 milliseconds. At 165Hz, it is about 6.06 milliseconds.
That timing difference is why higher refresh rates can feel smoother during camera movement, scrolling, racing games, fighting games, and first-person shooters. However, the visual benefit becomes progressively smaller as refresh rates increase. The leap from 60Hz to 120Hz is dramatic; the leap from 144Hz to 165Hz is real but more subtle.
Monitor overclocking means adding a custom display mode with the monitor’s native resolution but a higher refresh rate. Windows, the GPU driver, and the display then negotiate that mode over DisplayPort or HDMI.
This process does not alter the monitor’s firmware. It does not modify the panel electronically in the way that a firmware flash would. Tools such as NVIDIA Control Panel, AMD Software: Adrenalin Edition, and Custom Resolution Utility generally add or expose software-side display modes rather than rewriting the monitor’s hardware configuration. CRU specifically works by creating software EDID overrides in Windows rather than modifying the display itself.
That makes monitor overclocking comparatively low-risk, but not consequence-free. A bad mode can cause a black screen, signal loss, flickering, unstable variable refresh behavior, pixel artifacts, or a driver reset. The sensible approach is not to hunt for the largest number possible. It is to find the highest refresh rate that remains completely stable in normal use.
The right mindset is validation, not unlocking.
Before changing anything, record the monitor’s original configuration:
An external monitor attached directly to a laptop’s DisplayPort, USB-C DisplayPort Alt Mode, or HDMI output may still be viable. The internal laptop display is simply less predictable.
AMD’s current custom-resolution workflow creates a profile, checks compatibility with the display, and lets the resulting mode be selected in Windows or in-game. NVIDIA’s Control Panel similarly provides a custom-resolution creation and test path.
That is why a custom refresh rate might work at 1080p but fail at 1440p, or work with 8-bit SDR but disappear when HDR is enabled.
Do not assume that a cable labeled only “HDMI” or “DisplayPort” is sufficient. Use the monitor’s included cable for initial testing where possible. If a custom mode should fit on paper but fails inconsistently, test with a known-good certified cable before blaming the panel.
Once a stable maximum has been identified, restore preferred color settings and test again. A refresh rate that works only under stripped-down conditions may not be worth using day to day.
There is no reason to test 165Hz if Windows is still configured for 144Hz on a monitor that officially supports 165Hz.
This prevents an existing cable, driver, or panel issue from being mistaken for an overclocking failure.
Adapters and docks can impose their own bandwidth or EDID restrictions. A direct DisplayPort connection is preferable for troubleshooting.
Enter the monitor’s existing native resolution. Change only the refresh-rate field at first. Leave timing parameters on automatic unless there is a specific reason to adjust them.
NVIDIA’s custom-resolution interface includes a test function before the mode is saved, providing a useful first line of protection against an unusable setting.
If the monitor displays “No Signal,” severe flicker, colored sparkles, or a distorted image, do not confirm the mode. Allow the test to revert, then choose a lower refresh rate.
Use the existing native resolution and raise the refresh rate by only a few hertz. AMD’s software checks the proposed custom resolution for compatibility, though a successful profile creation is not proof that long-term display operation will be stable.
Check the desktop, move windows rapidly, scroll text, and watch for flickering or intermittent signal loss before launching a game.
CRU is an EDID editor, so it should be treated with more care than a simple slider. It can add detailed resolutions, alter display capability reporting, and adjust parameters such as FreeSync ranges. It also includes recovery and reset tools.
Enter the new refresh rate. For a first pass, use an automatic timing option appropriate to PC monitors. Detailed resolutions are the preferred place for custom high-refresh modes because they offer more precise control than standard resolutions.
CRU’s documentation notes that if the display does not return after roughly 15 seconds, its recovery mode can temporarily unload EDID overrides. The package also includes
If it does not appear, restart Windows once. If it is still unavailable, remove the custom entry rather than stacking multiple experimental modes on top of one another.
A browser’s refresh-rate readout, a game overlay, and the Windows settings page can confirm that the mode was selected. They cannot, by themselves, prove that the monitor displays each refresh without silently dropping frames.
Use a frame-skipping test and verify it with a camera at an appropriate shutter speed. Simply watching a moving test pattern with the naked eye is not a reliable frame-skipping check; the camera method is specifically recommended for verification.
If the camera capture shows repeated, missing, or unevenly spaced frames, lower the refresh rate and test again.
Back down by 2Hz to 5Hz, then retest. If the problem persists, return to the last known-good mode.
Reduced blanking timings reduce unnecessary overhead, lowering the required pixel clock for a given resolution and refresh rate. This can make a custom mode fit within the available link bandwidth without changing the visible resolution.
However, reduced blanking is not a universal fix. A display may reject a reduced-blanking timing even if it accepts a standard timing at a lower refresh rate. Timing experimentation belongs at the advanced stage of monitor overclocking, after conservative automatic timing tests have already established that the panel has some headroom.
CRU includes timing options for this purpose, but manual timing edits should be approached cautiously. The tool’s documentation highlights pixel-clock and interface limits, especially with HDMI, DisplayPort adapters, older GPUs, and certain multi-display configurations.
For example, a monitor may support FreeSync from 48Hz to 144Hz at stock settings. A custom 165Hz fixed-refresh mode does not automatically mean the monitor will provide clean VRR operation from 48Hz to 165Hz.
Potential problems include:
For many users, a stable 155Hz or 165Hz mode with dependable VRR is preferable to a fragile 175Hz mode that creates intermittent flicker.
Still, “low risk” is not the same as “guaranteed safe.” A monitor is being asked to operate outside its advertised specification. Manufacturer support may be limited, and warranty terms vary by brand and region.
The practical safety rules are straightforward:
For a 60Hz display, that might be 75Hz. For a 144Hz gaming monitor, it could be 150Hz, 155Hz, or 165Hz. For many monitors, the correct answer will remain the factory setting—and that is still a successful result because it avoids trading reliability for a meaningless headline number.
Treat monitor overclocking as a careful display-timing test, not a guaranteed hidden upgrade. With conservative steps, a sound recovery plan, a quality cable, and honest validation, Windows users can determine whether their specific display has real refresh-rate headroom without turning a useful gaming monitor into an unreliable one.
A successful monitor overclock can improve perceived motion smoothness and reduce the interval between screen refreshes. It will not increase a game’s rendered FPS, improve the display’s native pixel response time, or magically remove ghosting caused by the panel itself. It is a display-timing experiment, not a performance upgrade for the GPU.
For many Windows enthusiasts, the attraction is obvious. A stable move from 60Hz to 75Hz is immediately noticeable on the desktop and in games. A modest bump from 144Hz to 155Hz or 165Hz can also be worthwhile, especially for esports titles where a system already produces frame rates above the monitor’s factory refresh ceiling.
The important caveat is that the monitor’s advertised refresh rate is a validated operating specification, not necessarily an artificial limit waiting to be unlocked. Some panels have useful margin; others do not. The difference comes down to the individual monitor, its internal scaler, panel timing controller, cable path, firmware, GPU driver, color settings, and variable-refresh-rate behavior.
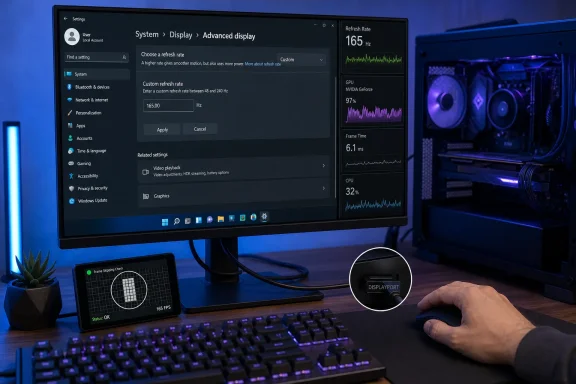 What Monitor Overclocking Actually Changes
A monitor refresh rate describes how many times per second the screen redraws the image. At 60Hz, a full refresh occurs every 16.67 milliseconds. At 144Hz, that interval falls to roughly 6.94 milliseconds. At 165Hz, it is about 6.06 milliseconds.That timing difference is why higher refresh rates can feel smoother during camera movement, scrolling, racing games, fighting games, and first-person shooters. However, the visual benefit becomes progressively smaller as refresh rates increase. The leap from 60Hz to 120Hz is dramatic; the leap from 144Hz to 165Hz is real but more subtle.
Monitor overclocking means adding a custom display mode with the monitor’s native resolution but a higher refresh rate. Windows, the GPU driver, and the display then negotiate that mode over DisplayPort or HDMI.
This process does not alter the monitor’s firmware. It does not modify the panel electronically in the way that a firmware flash would. Tools such as NVIDIA Control Panel, AMD Software: Adrenalin Edition, and Custom Resolution Utility generally add or expose software-side display modes rather than rewriting the monitor’s hardware configuration. CRU specifically works by creating software EDID overrides in Windows rather than modifying the display itself.
That makes monitor overclocking comparatively low-risk, but not consequence-free. A bad mode can cause a black screen, signal loss, flickering, unstable variable refresh behavior, pixel artifacts, or a driver reset. The sensible approach is not to hunt for the largest number possible. It is to find the highest refresh rate that remains completely stable in normal use.
The Reality Behind “Hidden Refresh Rate”
It is tempting to assume that monitor manufacturers deliberately hold back performance. Sometimes a lower factory specification does leave margin because vendors certify a guaranteed refresh rate across a production run. But there are many legitimate reasons a display ships with a fixed maximum refresh rate:- The panel may be stable only within a narrow range.
- The scaler may reject timings above the validated limit.
- The included cable path may not support more bandwidth.
- HDR, 10-bit color, DSC, and adaptive sync can complicate timing limits.
- A refresh-rate increase can worsen overshoot, inverse ghosting, or flicker.
- The manufacturer may have tested VRR only within its advertised range.
The right mindset is validation, not unlocking.
Before You Start: The Windows Monitor Overclocking Checklist
Monitor overclocking is best attempted on an external display connected directly to the GPU. Desktop systems with DisplayPort connections generally provide the most straightforward environment, although HDMI can work well when the GPU, monitor, and cable support the necessary bandwidth.Before changing anything, record the monitor’s original configuration:
- Native resolution, such as
1920 × 1080or2560 × 1440 - Factory refresh rate
- Connection type: DisplayPort, HDMI, USB-C DisplayPort Alt Mode, or adapter
- GPU model and current graphics driver version
- Whether HDR is enabled
- Whether FreeSync, Adaptive-Sync, or G-SYNC Compatible mode is enabled
- Current color depth and output format
- The monitor’s model number and firmware version, if available
Avoid Laptop Internal Panels for a First Attempt
Built-in laptop screens are a poor starting point. Many laptop panels are constrained by embedded DisplayPort connections, firmware behavior, hybrid graphics routing, or Intel driver limitations. CRU documentation notes that laptop displays usually lack conventional monitor scalers, and Intel drivers can ignore EDID overrides in some configurations.An external monitor attached directly to a laptop’s DisplayPort, USB-C DisplayPort Alt Mode, or HDMI output may still be viable. The internal laptop display is simply less predictable.
Update the Graphics Driver First
Use the latest stable graphics driver offered for the installed GPU. NVIDIA and AMD both include custom-resolution functions in their driver ecosystems, and driver changes can affect whether a custom timing appears, survives a restart, or works with VRR.AMD’s current custom-resolution workflow creates a profile, checks compatibility with the display, and lets the resulting mode be selected in Windows or in-game. NVIDIA’s Control Panel similarly provides a custom-resolution creation and test path.
Cable Bandwidth Matters More Than Many Guides Admit
Higher refresh rates require more display bandwidth. Resolution, refresh rate, color depth, chroma format, blanking intervals, HDR, and compression all affect the amount of data sent from GPU to monitor.That is why a custom refresh rate might work at 1080p but fail at 1440p, or work with 8-bit SDR but disappear when HDR is enabled.
DisplayPort and HDMI Considerations
As a general rule:- DisplayPort is often the most flexible connection for PC monitor overclocking.
- HDMI 2.0 can become restrictive at high resolutions and refresh rates.
- HDMI 2.1 offers substantially more link bandwidth when the GPU, monitor, and cable all support it.
- DisplayPort 1.4 can support demanding modes, often with Display Stream Compression where applicable.
- DisplayPort 2.1 expands bandwidth further, but the practical result still depends on the exact GPU, monitor, port implementation, and cable certification.
Do not assume that a cable labeled only “HDMI” or “DisplayPort” is sufficient. Use the monitor’s included cable for initial testing where possible. If a custom mode should fit on paper but fails inconsistently, test with a known-good certified cable before blaming the panel.
Do Not Ignore Color Settings
A monitor may handle a high-refresh custom mode at:- 8-bit RGB
- SDR
- Full chroma
- Reduced blanking timings
Once a stable maximum has been identified, restore preferred color settings and test again. A refresh rate that works only under stripped-down conditions may not be worth using day to day.
How to Overclock a Monitor in 13 Careful Steps
The following workflow favors stability over speed. It works best on Windows 10 or Windows 11 with an external monitor.1. Confirm the Factory Refresh Rate
Open Settings > System > Display > Advanced display. Record the current refresh rate and ensure the monitor is already operating at its advertised maximum.There is no reason to test 165Hz if Windows is still configured for 144Hz on a monitor that officially supports 165Hz.
2. Capture a Baseline
Use the monitor normally for several minutes at its stock setting. Run a familiar game, check for existing flicker or artifacts, and note whether VRR and HDR are working correctly.This prevents an existing cable, driver, or panel issue from being mistaken for an overclocking failure.
3. Check the Connection Path
Verify that the display is connected directly to the GPU or laptop output rather than through an uncertain dock, low-bandwidth adapter, capture device, KVM switch, or older receiver.Adapters and docks can impose their own bandwidth or EDID restrictions. A direct DisplayPort connection is preferable for troubleshooting.
4. Choose a Conservative Target
Start with a small increase:- 60Hz → 65Hz or 70Hz
- 75Hz → 80Hz
- 120Hz → 125Hz
- 144Hz → 150Hz
- 165Hz → 170Hz
- 240Hz → 245Hz
5. Use NVIDIA Control Panel on NVIDIA GPUs
Open NVIDIA Control Panel, then navigate to:Display > Change resolution > Customize > Create Custom ResolutionEnter the monitor’s existing native resolution. Change only the refresh-rate field at first. Leave timing parameters on automatic unless there is a specific reason to adjust them.
NVIDIA’s custom-resolution interface includes a test function before the mode is saved, providing a useful first line of protection against an unusable setting.
6. Test the New NVIDIA Mode
Click Test. A brief black screen during the mode switch is normal. If the image returns cleanly, save the mode.If the monitor displays “No Signal,” severe flicker, colored sparkles, or a distorted image, do not confirm the mode. Allow the test to revert, then choose a lower refresh rate.
7. Use AMD Software: Adrenalin Edition on AMD GPUs
Open AMD Software: Adrenalin Edition, search for Custom Resolution, choose the appropriate display, and select Create New.Use the existing native resolution and raise the refresh rate by only a few hertz. AMD’s software checks the proposed custom resolution for compatibility, though a successful profile creation is not proof that long-term display operation will be stable.
8. Apply the AMD Mode in Windows
After saving the new profile, return to Advanced display in Windows and select the new refresh rate.Check the desktop, move windows rapidly, scroll text, and watch for flickering or intermittent signal loss before launching a game.
9. Use CRU When Driver Tools Are Insufficient
Custom Resolution Utility, commonly called CRU, is a more advanced option for external monitors when NVIDIA or AMD controls do not expose the desired flexibility.CRU is an EDID editor, so it should be treated with more care than a simple slider. It can add detailed resolutions, alter display capability reporting, and adjust parameters such as FreeSync ranges. It also includes recovery and reset tools.
10. Add a Detailed Resolution in CRU
Select the correct active monitor in CRU. Under Detailed resolutions, choose Add and keep the native horizontal and vertical resolution unchanged.Enter the new refresh rate. For a first pass, use an automatic timing option appropriate to PC monitors. Detailed resolutions are the preferred place for custom high-refresh modes because they offer more precise control than standard resolutions.
11. Restart the Graphics Driver
Save the change and run the includedrestart.exe or restart64.exe tool. The screen will briefly disconnect while Windows reloads the graphics driver.CRU’s documentation notes that if the display does not return after roughly 15 seconds, its recovery mode can temporarily unload EDID overrides. The package also includes
reset-all.exe for returning displays to their default configuration.12. Select the Mode in Windows
Return to Settings > System > Display > Advanced display and select the new refresh rate.If it does not appear, restart Windows once. If it is still unavailable, remove the custom entry rather than stacking multiple experimental modes on top of one another.
13. Verify That Frames Are Not Being Skipped
This is the step that separates a working monitor overclock from a number that merely appears in Windows.A browser’s refresh-rate readout, a game overlay, and the Windows settings page can confirm that the mode was selected. They cannot, by themselves, prove that the monitor displays each refresh without silently dropping frames.
Use a frame-skipping test and verify it with a camera at an appropriate shutter speed. Simply watching a moving test pattern with the naked eye is not a reliable frame-skipping check; the camera method is specifically recommended for verification.
If the camera capture shows repeated, missing, or unevenly spaced frames, lower the refresh rate and test again.
What Stable Looks Like
A stable overclock should meet all of these conditions:- The monitor wakes reliably after sleep and reboot.
- Windows consistently offers the selected refresh rate.
- No black screens occur during desktop use or gaming.
- No white sparkles, colored pixels, horizontal lines, or image corruption appear.
- The monitor does not silently fall back to a lower refresh rate.
- Frame-skipping verification is clean.
- VRR remains functional if it is part of the intended setup.
- HDR and preferred color settings still work, if enabled.
- The display remains stable through at least one extended gaming session.
Symptoms That Mean You Should Back Off
Stop increasing refresh rate immediately when any of the following appears:- Single-pixel sparkling or random white dots
- Flickering, especially near the edges of the image
- Horizontal scan lines
- Brief black flashes
- Signal loss
- Image distortion
- Excessive inverse ghosting
- VRR flicker that was absent at stock settings
- Frame skipping
- Inconsistent wake-from-sleep behavior
Back down by 2Hz to 5Hz, then retest. If the problem persists, return to the last known-good mode.
Why Reduced Blanking Can Help
At higher resolutions, the connection can become the limiting factor before the panel itself does. Display timings include more than visible pixels; they also include synchronization and blanking intervals.Reduced blanking timings reduce unnecessary overhead, lowering the required pixel clock for a given resolution and refresh rate. This can make a custom mode fit within the available link bandwidth without changing the visible resolution.
However, reduced blanking is not a universal fix. A display may reject a reduced-blanking timing even if it accepts a standard timing at a lower refresh rate. Timing experimentation belongs at the advanced stage of monitor overclocking, after conservative automatic timing tests have already established that the panel has some headroom.
CRU includes timing options for this purpose, but manual timing edits should be approached cautiously. The tool’s documentation highlights pixel-clock and interface limits, especially with HDMI, DisplayPort adapters, older GPUs, and certain multi-display configurations.
FreeSync, G-SYNC Compatible, and VRR Risks
Variable refresh rate technology complicates monitor overclocking because the display’s original VRR range is normally certified around its factory operating limits.For example, a monitor may support FreeSync from 48Hz to 144Hz at stock settings. A custom 165Hz fixed-refresh mode does not automatically mean the monitor will provide clean VRR operation from 48Hz to 165Hz.
Potential problems include:
- Flickering at low frame rates
- VRR disengaging near the new maximum refresh rate
- Stutter caused by an incorrect range
- Inconsistent low-framerate compensation behavior
- Black screens during game loading or alt-tabbing
For many users, a stable 155Hz or 165Hz mode with dependable VRR is preferable to a fragile 175Hz mode that creates intermittent flicker.
The Best Candidates for a Monitor Overclock
The strongest candidates are often older or midrange external gaming monitors that are no longer at the leading edge of the market:- 60Hz IPS, VA, or TN monitors with a potential path to 70Hz or 75Hz
- 75Hz office and entry-level gaming monitors
- 120Hz or 144Hz gaming monitors with DisplayPort connectivity
- Older 1440p gaming displays where a small gain could delay an upgrade
- External displays connected directly to a modern desktop GPU
- Laptop internal panels
- Displays connected through uncertain adapters or docks
- Already extreme high-refresh esports monitors
- OLED displays where the manufacturer has already tuned the panel aggressively
- Monitors with known VRR flicker at stock settings
- Systems using legacy HDMI links at high resolutions
Is Monitor Overclocking Safe?
Monitor overclocking is generally less hazardous than GPU core or memory overclocking because it does not involve manually increasing GPU voltage, power limits, or thermal load. The normal failure mode is a rejected display mode, black screen, driver reset, or visual artifact that disappears after reverting to a stable timing.Still, “low risk” is not the same as “guaranteed safe.” A monitor is being asked to operate outside its advertised specification. Manufacturer support may be limited, and warranty terms vary by brand and region.
The practical safety rules are straightforward:
- Use small increments.
- Keep the native resolution unchanged.
- Do not force unstable modes repeatedly.
- Test with a camera-based frame-skipping check.
- Keep a recovery method available.
- Return to stock settings before troubleshooting unrelated monitor faults.
- Do not confuse a selected refresh rate with a verified refresh rate.
The Bottom Line
The best monitor overclock is not the highest refresh rate that appears in a settings menu. It is the highest refresh rate that remains stable through real games, survives sleep and reboot cycles, preserves the features that matter, and passes proper frame-skipping verification.For a 60Hz display, that might be 75Hz. For a 144Hz gaming monitor, it could be 150Hz, 155Hz, or 165Hz. For many monitors, the correct answer will remain the factory setting—and that is still a successful result because it avoids trading reliability for a meaningless headline number.
Treat monitor overclocking as a careful display-timing test, not a guaranteed hidden upgrade. With conservative steps, a sound recovery plan, a quality cable, and honest validation, Windows users can determine whether their specific display has real refresh-rate headroom without turning a useful gaming monitor into an unreliable one.
References
- Primary source: tech-insider.org
Published: 2026-07-23T19:54:36+00:00
How to Overclock a Monitor: 13 Steps, 45 Min [2026]
How to overclock a monitor in 2026: CRU, Nvidia, and AMD steps to raise your Hz safely, verify stability, and fix common problems.tech-insider.org - Referenced source: monitortests.com
Custom Resolution Utility (CRU)
Custom Resolution Utility (CRU) is an EDID editor that focuses on custom resolutions. CRU shows you how the monitor defines resolutions and other capabilities and gives you the power to change it. Addwww.monitortests.com - Referenced source: amd.com
- Referenced source: nvidia.com
- Referenced source: hdmi.org