Create a Restore-Friendly Recovery Drive in Windows 10/11 and Test It Safely
Difficulty: Beginner | Time Required: 20 minutesA recovery drive is one of those tools you hope you never need—but when Windows refuses to boot, it can save you a lot of stress. In Windows 10 and Windows 11, a USB recovery drive can help you access troubleshooting tools, repair startup issues, restore from a system image, or reset your PC.
This guide shows you how to create a restore-friendly recovery drive and how to test it safely without accidentally reinstalling Windows or erasing your files. The goal is simple: make sure the drive works before an emergency happens.
Why create a recovery drive?
If your PC stops starting properly, a recovery drive gives you access to the Windows Recovery Environment (WinRE). From there, you can use tools such as:Quick walkthrough
- Startup Repair
- System Restore
- Uninstall Updates
- Command Prompt
- System Image Recovery
- Reset this PC
Prerequisites
Before you begin, make sure you have:- A USB flash drive with at least 16 GB of space recommended
- Some systems may work with 8 GB, but 16 GB or more is safer
- Administrator access on the PC
- A working Windows 10 or Windows 11 installation
- About 20 minutes
- Any important files copied off the USB drive first
Warning: Creating a recovery drive will erase everything currently on the USB flash drive.
Windows version notes
This process works on:- Windows 10
- Windows 11
Note: On many modern PCs, the recovery drive wizard includes an option to Back up system files to the recovery drive. If available, keeping this checked makes the drive more useful for reinstalling or recovering Windows.
Step-by-step: Create a restore-friendly recovery drive
1. Insert your USB flash drive
Plug your USB flash drive into the PC.If File Explorer opens automatically, close it for now. Make sure there is nothing important on the drive, because the process will format it.
2. Open the Recovery Drive tool
There are several ways to open it:- Press Start
- Type Recovery Drive
- Select Create a recovery drive
Tip: If Start search does not find it, open Control Panel, switch to Large icons or Small icons, then select Recovery > Create a recovery drive.
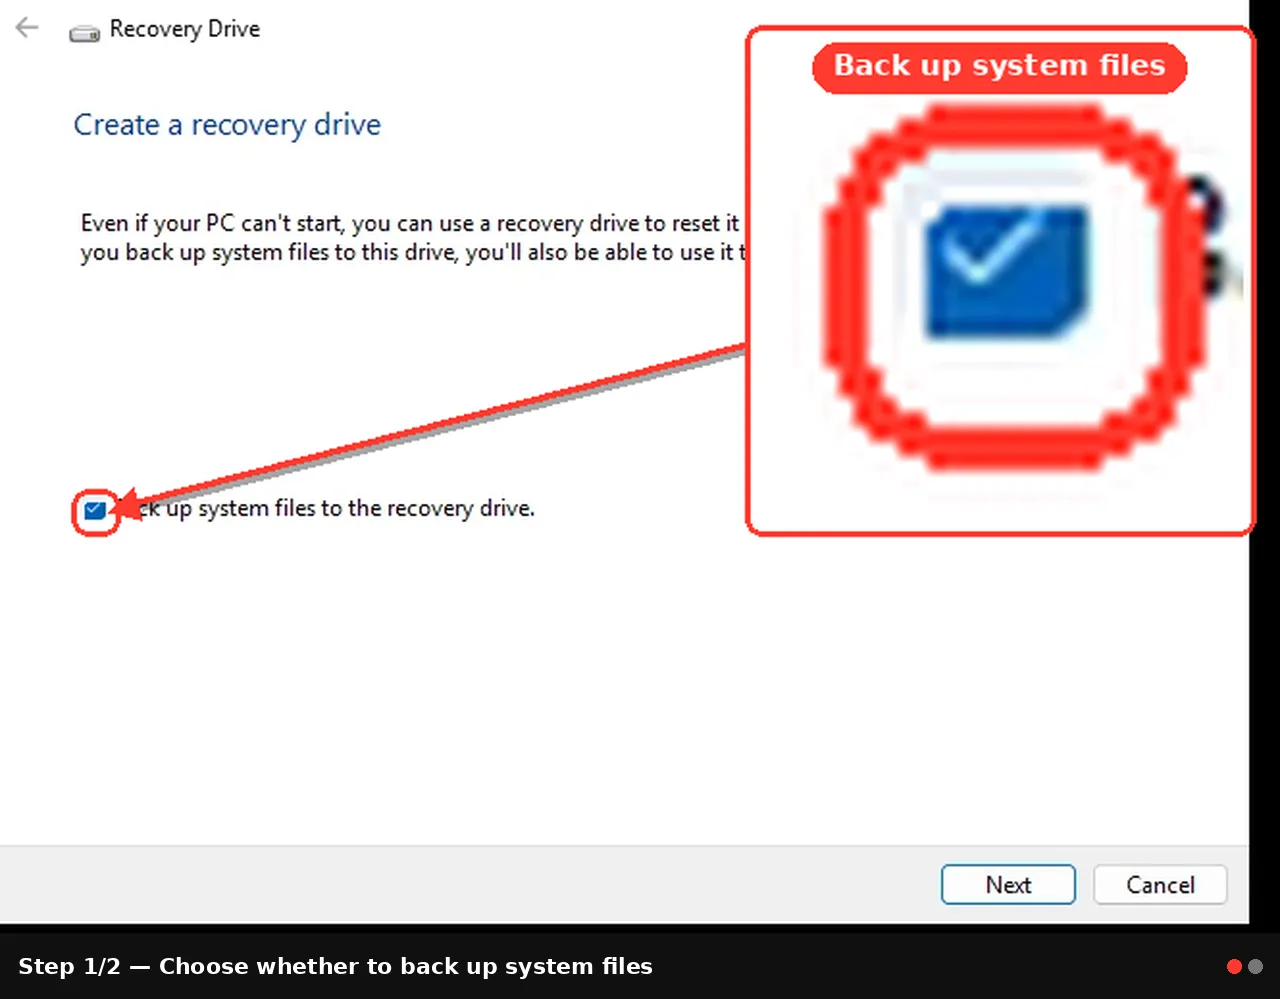
3. Choose whether to back up system files
You may see a checkbox labeled:
Back up system files to the recovery drive
If it appears, leave it checked.
Why this matters:
- It makes the USB drive more complete
- It can help with reinstalling Windows in some recovery situations
- It improves your options if the internal recovery partition becomes unusable
Note: This step may take a minute while Windows gathers recovery information.
4. Select the correct USB drive
Windows will display a list of available drives. Choose your USB flash drive carefully.Double-check:
- Drive letter
- Capacity
- Label, if shown
Warning: Be absolutely sure you picked the correct USB drive. The selected drive will be erased.
5. Create the recovery drive
Click Create to begin.Windows will:
- Format the USB drive
- Copy recovery tools
- Add system files if that option was selected
- USB speed
- Drive size
- PC performance
- Whether system files are included
6. Label the USB drive clearly
Open File Explorer, right-click the USB drive, and choose Rename.Use a clear label such as:
Windows RecoveryWin10 Recovery USBWin11 Recovery USB
Laptop-Recovery-2026OfficePC-Win11-Recovery
Tip: A small sticky label on the physical USB drive is also helpful. Include the PC name and creation date.
7. Store it somewhere safe
Remove the USB drive safely and store it in a place you will remember.Good options include:
- A desk drawer
- A laptop bag
- A labeled tech storage box
Step-by-step: Test the recovery drive safely
Creating the drive is only half the job. A recovery drive is most valuable if you know it actually boots.The safe way to test it is to boot to the recovery menu only, confirm it works, and then exit without choosing any repair or reset actions.
8. Leave the recovery USB inserted
Insert the newly created recovery drive if you removed it.Save any open work and close your apps before rebooting.
9. Open Advanced Startup from Windows
In Windows 10:- Go to Settings > Update & Security > Recovery
- Go to Settings > System > Recovery
Under Advanced startup, click Restart now.
10. Choose to boot from the USB device
After restart, Windows will show the recovery startup screen.Select:
- Use a device
Your system may restart again and boot from the USB stick.
Note: On some PCs, you may instead need to use a boot menu key such as F12, Esc, F9, or F11 during startup. The exact key depends on your PC manufacturer.
11. Confirm that the recovery environment loads
If the recovery drive is working, you should reach a recovery or keyboard layout screen.You may see:
- Choose your keyboard layout
- Troubleshoot
- Recover from a drive
- Other recovery options
- The USB drive is bootable
- The PC can see it
- Recovery tools are accessible
Important: Do not click options such as Reset this PC, Recover from a drive, or anything that begins an actual repair or reinstall unless you truly need it.
12. Exit safely without making changes
To leave safely:- Choose Continue to exit and boot into Windows, if available
or - Power off the PC and remove the USB drive, then start the PC normally
Tips and troubleshooting notes
If the PC does not boot from the recovery USB
Try these checks:- Make sure the USB drive is inserted directly into the PC, not through a hub
- Try a different USB port
- Recreate the recovery drive on another USB stick
- Use the one-time boot menu key during startup
- Check BIOS/UEFI settings if USB boot is disabled
If “Recovery Drive” will not open
- Make sure you are using an administrator account
- Restart the PC and try again
- Run Windows Update and install pending updates
- Check whether system files are damaged using built-in repair tools if needed
If the “Back up system files” option is missing
This can happen on some systems depending on:- OEM setup
- Recovery partition status
- Windows configuration
Keep it current
If you make major changes later, consider creating a fresh recovery drive:- After a feature update
- After replacing the system drive
- After major hardware changes
Tip: It is also smart to create a separate full system image backup. A recovery drive helps you boot and troubleshoot, but a system image helps you restore the entire PC more completely.
Consider System Restore too
A recovery drive is even more useful when System Restore is enabled. If Windows becomes unstable after a driver or update issue, you may be able to use the recovery drive to reach System Restore and roll back to a working state.Conclusion
A recovery drive is a simple but powerful safety tool for both Windows 10 and Windows 11. In just a few minutes, you can create a bootable USB that gives you access to repair and restore options when your PC will not start normally. Even better, testing it safely now means you will not be guessing during a real emergency.If you only do one basic recovery task this week, make it this one—it is quick, beginner-friendly, and can save hours of frustration later.
Key Takeaways:
- A Windows recovery drive helps you access repair and restore tools when Windows will not boot
- Using Back up system files to the recovery drive makes the USB more useful when available
- Creating the drive will erase the USB, so back up its contents first
- You can test the drive safely by booting to the recovery menu without starting any reset or reinstall action
- Keeping a labeled, updated recovery drive ready can make troubleshooting much easier
This tutorial was generated to help WindowsForum.com users get the most out of their Windows experience.
Last edited: