Enable and Use Windows Speech Recognition for Hands-Free Typing
Difficulty: Beginner | Time Required: 15 minutesIf you ever wanted to type without using your hands, Windows Speech Recognition is a built-in tool that lets you dictate text and control your PC with your voice. It’s especially handy for long emails, writing in documents, or when a laptop keyboard isn’t convenient. This tutorial walks you through enabling and using Windows Speech Recognition so you can start typing hands-free in under 15 minutes.
Introduction
Windows Speech Recognition (WSR) is a classic accessibility feature that turns spoken words into typed text and lets you issue voice commands to your computer. It works with most text fields in Windows apps (Notepad, Word, browsers, email clients, etc. and supports punctuation, editing commands, and basic navigation. While newer voice features exist (like Voice Typing in Windows 10/11), WSR remains a reliable option for hands-free typing with more comprehensive voice commands.Note: This guide references both Windows 10 and Windows 11. The setup steps are similar, but you may access instructions slightly differently depending on your OS version.
Prerequisites
Quick walkthrough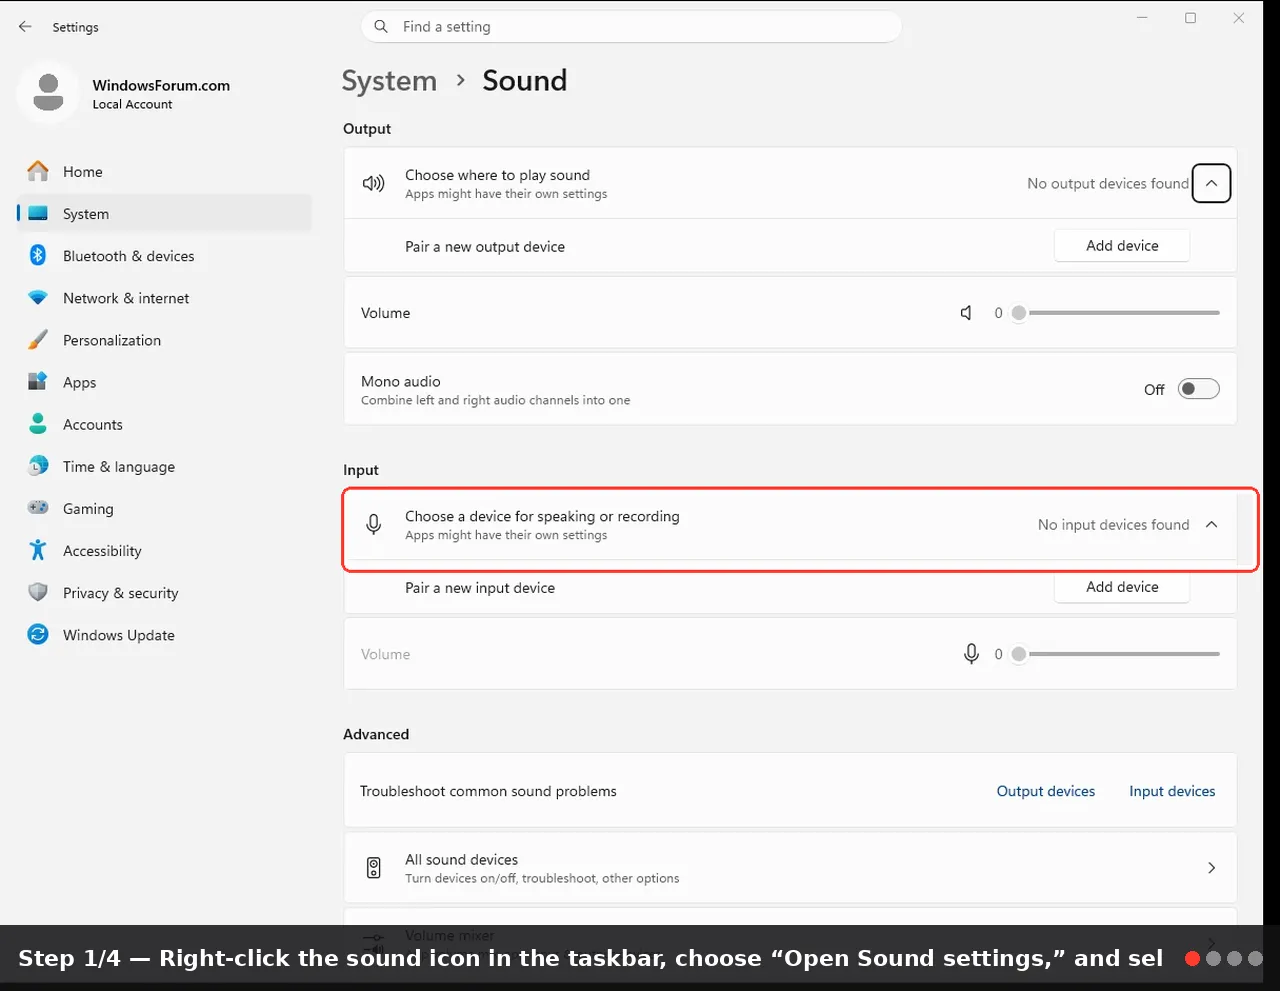
- A working microphone or headset (preferably USB or a built-in mic with decent pickup).
- A PC running Windows 10 (any recent build) or Windows 11.
- A quiet environment to improve recognition accuracy.
- Optional: Some basic privacy awareness (see Tips and Troubleshooting).
- Right-click the sound icon in the taskbar, choose “Open Sound settings,” and select your input device.
- Use the “Test your microphone” option (Windows 10) or speak into the mic in the test field (Windows 11) to ensure you’re getting a waveform.
Windows Speech Recognition works best after you set up and train it to understand your voice. If you plan to use it often, go through the setup and training steps so accuracy improves over time.
Step-by-Step Instructions
- Open the Speech Recognition setup
- Windows 10:
- Open the Start menu and type “Speech Recognition.” Choose “Windows Speech Recognition” (desktop app).
- If you don’t see it, go to Settings > Time & language > Speech, then click “Turn on Speech Recognition” or use the classic Control Panel route: Control Panel > Ease of Access > Speech > Turn on Speech Recognition.
- Windows 11:
- Open the Start menu and search for “Windows Speech Recognition.” Launch the app. If it’s not visible, you can still access it via Settings > Accessibility > Speech (look for related options) or search directly for the app.
2) Run the setup wizard
- The first launch will start a setup wizard. It will guide you through microphone setup and basic configuration.
- Choose your preferred microphone profile if prompted.
- The wizard may ask you to read a short paragraph to train the system. This helps WSR recognize your voice better.
- Create a user profile and complete training (recommended)
- The setup will offer to create a speech profile for you. This lets Windows tailor recognition to your voice.
- Complete the optional Voice Training. The more you train, the better it recognizes you, especially with background noise or regional accents.
- Start Windows Speech Recognition
- After setup, you’ll be shown a small Speech Recognition toolbar (often a microphone icon). You can click the microphone to toggle listening or say “Start Listening” to begin.
- You can position the toolbar anywhere on the screen for easy access.
- Use WSR to dictate text
- Open a text field or document (Notepad, Word, an email composer, etc..
- Place the cursor where you want the text to appear.
- Say “Start Listening” (if not already listening) and begin speaking.
- Speak clearly in a natural pace. To insert punctuation, say the punctuation word (for example: “period,” “comma,” “question mark,” “exclamation point”).
- To add a new line or paragraph, say “new line” or “new paragraph.”
- To correct or adjust text, you can say:
- “Correct that” to open the correction dialog for the last phrase.
- “Delete that” to remove the last dictated text.
- “Spell that” if you want to spell a word letter by letter.
- When you’re done dictating, say “Stop Listening” to pause voice input. You can resume with “Start Listening” anytime.
- Basic voice commands you’ll use often
- Open or switch apps: “Open Notepad,” “Open Word,” or “Switch to Chrome.”
- Basic editing: “Select that,” “Copy that,” “Paste that,” “Cut that.”
- Navigation in text: “Move cursor up,” “Move cursor down,” “Move to end of line.”
- Punctuation and formatting: “Comma,” “Period,” “Question mark,” “Exclamation point,” “New paragraph,” “All caps,” or “Lowercase.”
- Practice a simple dictation session (example)
- In Notepad, place the cursor and say: “Hello world. This is Windows Speech Recognition. I am testing hands-free typing. Please insert a comma here. This is a new line.”
- Review the output, then correct any mistakes with the commands you’ve learned.
8) Optional: use dictation-only mode
- If you want to focus on typing, you can keep the microphone on in listening mode and speak continuously. Remember to pause briefly between phrases to help accuracy.
Tips and Troubleshooting Notes
- Accuracy tips
- Speak clearly and at a steady, moderate pace.
- Enunciate consonants; avoid slurring words.
- Use a quiet environment and a good-quality microphone.
- Run the Voice Training or re-train after a system or microphone change.
- Environment and privacy
- Some settings may send voice data to Microsoft for improved recognition. If privacy is a concern, check Settings > Privacy > Speech, in both Windows 10 and Windows 11, and adjust online speech recognition options accordingly.
- If you often work with specialized vocabulary, consider adding custom words to a dictionary or using the “Spell that” command for tricky terms.
- If WSR isn’t working as expected
- Ensure the microphone is the default input device and not muted in both Windows and any physical mic switch.
- Revisit the setup wizard and retry microphone training.
- Close interfering apps that create background noise or auto-mute the mic.
- Try a different microphone if available to rule out hardware issues.
- App compatibility
- Windows Speech Recognition works best with standard Windows apps and many third-party programs that accept text input. Some modern web apps or browser-based editors may require focusing the text field first or using the browser’s own voice typing features as a supplement.
- If you can’t locate Windows Speech Recognition
- In Windows 10, you’ll usually find it under Control Panel > Ease of Access > Speech or by searching “Windows Speech Recognition.”
- In Windows 11, the feature persists but might be accessed by searching for the app or via Settings > Accessibility > Speech. If you only need quick dictation, Windows Voice Typing (Win + H) is a fast alternative for enabled apps.
- Quick alternative: Windows Voice Typing (Windows + H)
- If you want a lightweight dictation tool without the full WSR setup, press Windows key + H to start voice typing in supported text fields. This uses modern, on-device or online recognition depending on settings and can be quicker to start for short notes.
Conclusion
Windows Speech Recognition is a powerful, built-in way to type hands-free, control your PC with voice, and improve accessibility for everyday tasks. With a one-time setup, microphone training, and a bit of practice, you can dictate emails, documents, and messages efficiently, while learning the voice commands that speed up editing and navigation.Key benefits include:
- Hands-free typing in most Windows apps
- Shortcuts for punctuation, editing, and basic navigation
- Adjustable accuracy through microphone selection and voice training
- A helpful accessibility option that works alongside newer dictation features
Key Takeaways:
- Set up a good microphone, run the Speech Recognition setup, and train your voice for best results.
- Use commands for punctuation, line breaks, and editing to keep your documents flowing.
- Practice in common apps (Notepad, Word, email) to build familiarity with the voice commands.
- If WSR feels slow or inaccurate, adjust microphone placement, re-train, and consider privacy settings to optimize performance.
This tutorial was generated to help WindowsForum.com users get the most out of their Windows experience.
Last edited: