
The installation guide published by H2S Media correctly highlights that hardware gate and the official LM Studio documentation backs it up. It also gets a second point right that is easy to miss in older tutorials: Element Labs removed LM Studio’s separate commercial-use permission requirement on July 8, 2025. The desktop app is now free to use at work under its current terms, although that does not transfer rights for every third-party model a user downloads.
What the H2S guide leaves muddled is the boundary between the LM Studio desktop application, its newer Bionic agent product, and the tools that surround them. For a Windows workstation that needs a local chat interface, model browser, and programmable server, install the standard LM Studio app. Bionic is a separate agent-focused product; it is not an alternate edition required to make the familiar local-model desktop workflow work.
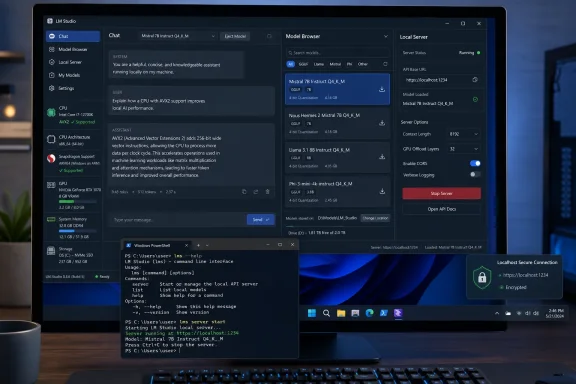 Start with the hardware check, not the download
On an x64 Windows PC, AVX2 is mandatory. The practical way to verify it is to identify the processor in System Information or Task Manager, then confirm its instruction-set support on the processor vendor’s specifications page. Many mainstream Intel Core and AMD Ryzen processors released in the past decade support AVX2, but older machines and some low-end parts do not.
LM Studio officially recommends 16GB of system memory and, for GPU acceleration, at least 4GB of dedicated VRAM. Those are reasonable starting points rather than a promise that every model will perform well. Model size, quantization, context length, and whether the model has vision or reasoning features all affect the real memory requirement.
An 8GB Windows PC can run smaller models, but it is a constrained setup. Windows itself needs memory, the runtime needs memory, and increasing the context window can consume several additional gigabytes. A small 3B-class model may be usable; treating a 7B or larger model as a casual download is how a system starts swapping to disk and turns a local AI demo into a slow-motion troubleshooting exercise.
Disk space deserves the same planning. The application is modest compared with the model library, but models frequently occupy several gigabytes each. A user experimenting with several quantizations of the same model can burn through a laptop’s system SSD faster than expected.
Install the standard app—or use WinGet in the right context
The normal route is the LM Studio download page, which offers Windows x64 and Windows ARM builds. Choose the ARM build deliberately on Snapdragon hardware rather than assuming a browser’s detection routine got it right. Run the downloaded installer from the user account that will use the app.
LM Studio also has a Windows Package Manager entry under Element Labs’ publisher identity. The command is:
winget install --id ElementLabs.LMStudio -e
For unattended use in an interactive user context, administrators can add the usual agreement switches:
winget install --id ElementLabs.LMStudio -e --silent --accept-package-agreements --accept-source-agreements
The important qualification is that WinGet itself is not supported in the LocalSystem context. Microsoft’s WinGet troubleshooting documentation is explicit on this point: the App Installer package is registered per user, not for NT AUTHORITY\SYSTEM. A deployment job that runs as SYSTEM is therefore the wrong foundation for installing a user-oriented LM Studio setup, regardless of whether an RMM console reports a successful command exit.
That makes the H2S warning about remote deployments useful, but its explanation is too application-specific. The failure mode starts with WinGet’s operating context, not merely LM Studio. For Intune, Configuration Manager, or RMM workflows, run the install in the intended user’s session if the goal is a usable per-user desktop application. Do not interpret a successful SYSTEM-context command as proof that the employee received a working app and Start-menu entry.
There is also a versioning wrinkle worth checking before standardizing a deployment. LM Studio’s official changelog lists version 0.4.20, Build 1, released July 22, 2026. The download page can lag behind the changelog’s newest listed release in search indexing, and WinGet packaging has previously struggled to detect LM Studio changes that update a build number without changing the core version. In a managed fleet, test winget upgrade behavior rather than assuming every in-app update will appear immediately as a package-manager update.
Put models on the drive you mean to use
After first launch, set the models directory before building a library. LM Studio stores models under its .lmstudio data area by default, organized in a publisher-and-model hierarchy that mirrors Hugging Face naming. That default is convenient on a desktop with a large C: drive and inconvenient on a 256GB laptop already carrying a Windows installation, user profile, and OneDrive cache.
The application’s My Models area can change the model directory. Do that first, then download the starter model. Moving a collection afterwards is possible, but it introduces avoidable path confusion and duplicate files during the transition.
H2S Media advises users to manually recreate LM Studio’s folder hierarchy when adding GGUF files downloaded elsewhere. That works, and LM Studio documents the expected publisher/model/model-file.gguf arrangement. But current LM Studio documentation provides a better operational option: the experimental lms import command. It can import a GGUF file, prompt for its destination, and can copy, hard-link, or symbolically link a model rather than leaving users to guess where a file belongs.
For example:
lms import C:\Users\YourName\Downloads\model.gguf --copy
That is safer than manually dropping a file into an approximate directory and wondering why the user interface cannot find it. It also lets an administrator preserve a sanctioned source file while importing a working copy into the user’s model library.
Use the built-in estimate instead of generic sizing charts
LM Studio’s model browser presents multiple quantizations of the same model. A 4-bit option is generally the sensible starting point for local use because quantization compresses the model enough to make common consumer hardware viable. But the label alone does not establish that a model will fit once the context length and GPU offload settings are considered.
The application’s fit estimate is more useful than a static blog-table calculation because it is based on the machine in front of it. For scripted workflows, the CLI has an equivalent diagnostic:
lms load --estimate-only model-key
The estimate takes account of configuration factors including requested context length, GPU allocation, vision capability, and flash attention. That is the check to make before scheduling a large coding model on a machine with 16GB of RAM and assuming its nominal GGUF file size tells the whole story.
GPU offload is a performance setting, not a requirement for basic operation. A model can run entirely on the CPU, but longer answers and code generation become laborious. When using a supported GPU, LM Studio can automatically select GPU usage; the CLI also supports explicit values such as --gpu max, --gpu 0.5, or --gpu off. If output is unexpectedly slow, reduce model size or context length before blindly forcing more layers onto a GPU that does not have the VRAM to hold them.
The CLI guidance in the H2S article is outdated
The biggest practical error in the submitted guide is its instruction to run lms bootstrap. Current LM Studio documentation says the lms command-line utility ships with LM Studio and needs no separate installation step. The prerequisite is simply that LM Studio must be launched once before using the CLI.
Open a new PowerShell or Windows Terminal window after the initial app launch and verify it with:
lms --help
Useful basic commands include:
lms ls
lms server start
lms server status
The first lists local models; the latter two manage the local API server. If lms is not recognized, confirm that the app has been run at least once and start a fresh terminal. Do not begin by trying an undocumented bootstrap command.
The H2S shortcut for the model browser is also questionable. LM Studio’s current documentation identifies Ctrl+2 on Windows and Linux as the shortcut for the Discover tab. That is where users can search LM Studio’s built-in catalog, inspect available files, and choose a model.
Treat the local API as a service, not a toggle
The API server is the feature that turns LM Studio from a desktop chat app into local development infrastructure. It listens on port 1234 by default and supports OpenAI-compatible endpoints, a native /api/v1 REST interface, and an Anthropic-compatible /v1/messages endpoint. The latter is why LM Studio can act as a local endpoint for Claude Code-style workflows.
On Windows PowerShell, however, do not paste the Unix-style export commands shown in some LM Studio examples. Use PowerShell syntax for a current-session test:
$env:ANTHROPIC_BASE_URL = "[url]http://localhost:1234[/url]"
$env:ANTHROPIC_AUTH_TOKEN = "lmstudio"
claude --model openai/gpt-oss-20b
The official Claude Code integration documentation recommends a context size above roughly 25,000 tokens for coding work. That is a hardware planning issue: adding context raises memory pressure, so a model that chats comfortably may still be a poor fit for a repository-scale agent session.
Keep the API bound locally unless there is a deliberate reason to share it. LM Studio’s server settings require authentication when enabling “Serve on Local Network,” and that safeguard should remain enabled. The risk increases further if a user enables remote MCP connections or permits tools with file-system access. A local model does not automatically mean a low-risk automation setup once it can call tools or accept requests from other devices.
LM Studio is a straightforward Windows install once the machine has AVX2 or Snapdragon ARM support, enough memory, and space for models. The useful correction is to plan it as a per-user local-AI workstation: select the standard app, set the model drive before downloading, verify model fit with the actual runtime, and use the built-in lms CLI rather than obsolete bootstrap instructions.