
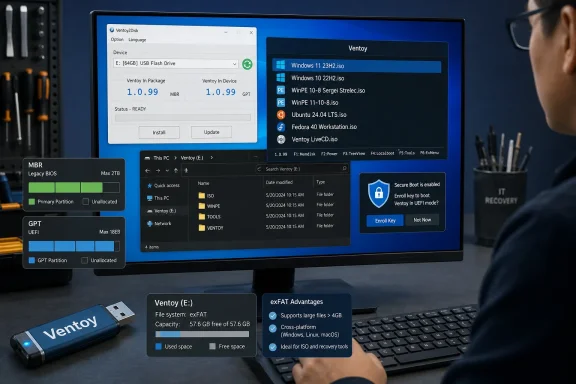
The basic method is sound and independently matches Ventoy’s own documentation and a January 2026 walkthrough from Pureinfotech. Download the Windows ZIP package from Ventoy’s official project page, extract it, run Ventoy2Disk.exe as administrator, select the removable USB disk, and choose Install. That first installation is destructive. Once it finishes, Windows will show a normal data partition—usually named Ventoy—and ISO files can simply be copied to it.
As of August 24, the current release listed by Ventoy is version 1.1.17, released July 24, 2026. That version matters more than the submitted guide suggests: the project changed its UEFI Secure Boot certificate chain in the 1.1.14 through 1.1.17 sequence, which can require a one-time key enrollment on each PC that boots the updated USB with Secure Boot enabled.
 Create the USB once, then treat it as storage
Ventoy differs from Microsoft’s Media Creation Tool and a conventional Rufus workflow because it does not extract one operating system image onto the entire flash drive. It installs its own boot environment, then scans the main data partition recursively for supported image formats, including ISO, WIM, IMG, VHD, VHDX, and EFI files.
For a straightforward Windows technician drive, the practical workflow is:
- Back up the USB drive and disconnect other removable storage where possible. The Install action repartitions the selected disk, and selecting the wrong device can wipe a working external drive.
- Run
Ventoy2Disk.exe, confirm the capacity and drive selection, choose the partition style under the Options menu if needed, and install Ventoy. - Open the newly created Ventoy volume in File Explorer and copy verified Windows installation ISOs to folders such as
\ISO\Windows\. Linux or rescue images can sit alongside them in their own folders. - Use Windows’ “Safely Remove Hardware” function after transfers. Ventoy’s documentation specifically warns that a completed copy dialog does not guarantee all write-cache data has reached the USB drive.
- Boot the target PC from the USB, select the desired image from Ventoy’s menu, and use its normal boot mode first.
The submitted guide says Ventoy lets users work “without a GUI tool,” which is misleading. Its core advantage is that it avoids repeatedly writing ISOs with an imaging tool after the initial setup—not that the initial setup has no utility or interface. On Windows, Ventoy2Disk.exe is the GUI utility that creates the bootable layout.
For routine use, a 32GB or 64GB USB drive is much more realistic than treating 16GB as a general recommendation. A current Windows 11 ISO plus a Windows 10 image, a WinPE recovery environment, and one Linux distribution can consume most of a 16GB device before leaving room for replacements. Capacity is not Ventoy’s limiting factor; the usable space of the flash drive is.
Choose MBR or GPT before the first install
Ventoy offers MBR by default and GPT as an installation-time choice. This is not a cosmetic setting: changing it later requires reinstalling Ventoy and therefore treating the drive as destructive media again. Updating Ventoy does not change the existing partition style.
MBR is usually the practical choice for a general-purpose repair drive because Ventoy documents support for both Legacy BIOS and UEFI booting with an MBR-formatted device. GPT is the better choice for a USB larger than 2TB, for installations requiring more partitions, or for systems whose UEFI firmware refuses to recognize an MBR removable drive.
There is no universal winner. Some older machines have weak Legacy BIOS support for GPT, while some newer UEFI implementations are pickier about MBR USB media. For a drive intended to boot a mixture of older desktops and modern PCs, start with MBR. For a modern UEFI-only environment—or a drive that specifically fails to appear in a machine’s UEFI boot menu—rebuild it as GPT after backing up the ISO files.
Ventoy creates two partitions. The large first partition is where users place images and ordinary files; it defaults to exFAT and is visible to Windows. The small EFI partition contains the boot files and should be left alone. Do not “clean up” that partition in Disk Management or format it because it appears tiny or unfamiliar.
The project also allows the main data partition to be reformatted as FAT32 or NTFS, among other file systems. For a Windows-focused multiboot drive, exFAT is the sensible default because it avoids FAT32’s 4GB single-file limit while remaining broadly usable across current Windows, Linux, and macOS systems. Reformatting the first partition is an advanced option, not a required part of the setup.
Secure Boot is the 2026 complication
The largest omission in the submitted instructions is Secure Boot. Ventoy’s official documentation says the project moved to a new UEFI Secure Boot certificate authority in version 1.1.14 to address the UEFI CA 2023 transition. Version 1.1.15 followed with a fix for certain systems when Secure Boot was disabled, and version 1.1.17 lists further Secure Boot process optimization.
The consequence is simple: a Ventoy USB updated from an older release may reach a one-time enrollment screen when first booted on a Secure Boot-enabled PC. This is expected behavior with the newer certificate chain, not evidence that the ISO is corrupt. Follow the project’s enrollment procedure on that PC, then restart and boot from the USB again.
Some firmware requires an option named Allow Microsoft 3rd Party UEFI CA or similar before Ventoy can boot with Secure Boot enabled. The wording varies by manufacturer, and many business-managed systems hide or lock the setting. On those machines, do not assume a failed Ventoy boot is a Windows ISO problem.
There is a more important security implication for IT administrators. Ventoy’s documentation describes its default Secure Boot behavior as permitting EFI files without checking each file under its default policy. In practical terms, the USB should be treated as privileged boot media: source every image from a trusted publisher, restrict physical access, and do not use a shared, unattended Ventoy stick as if Secure Boot alone makes its contents trustworthy.
For organizations that require a tighter boot chain, test Ventoy’s Secure Boot policy controls in a lab before deploying it. A multiboot USB is convenient precisely because it can launch many images; that flexibility increases the importance of controlling who can alter the drive.
Windows ISO failures have a useful fallback
Most official Windows ISOs boot normally through Ventoy’s default mode. When a Windows installer or WinPE image fails at boot on a particular PC, Ventoy provides WIMBOOT mode as a fallback. The project explains that Ventoy normally presents an ISO much like a virtual optical disc, and some noncompliant or buggy UEFI firmware struggles with that approach.
At Ventoy’s secondary boot menu, try Normal mode first. If the official Windows ISO fails, select WIMBOOT mode instead. Ventoy also supports a filename suffix, _VTWIMBOOT, to make that behavior automatic for a particular image, such as Win11_25H2_x64_VTWIMBOOT.iso.
WIMBOOT is not a cure-all and should not be the default. Ventoy says it is intended for official Windows ISOs and some WinPE images, specifically when normal booting fails. If both modes fail, verify the ISO rather than repeatedly changing boot modes.
Ventoy includes a checksum function in its boot menu: highlight an image and press m to calculate a checksum. This is especially useful after copying large Windows images to inexpensive flash media. The project also supports adjacent .sha256 files or a VENTOY_CHECKSUM manifest so it can compare the calculated result against an expected hash.
Updating Ventoy does not replace your ISOs
The submitted guide is correct on one important operational point: use Update, not Install, when refreshing an existing Ventoy drive. Ventoy states that an update preserves the files stored on the main data partition, including the ISO library. Still, copy critical files elsewhere before a major update; preserving files is the designed behavior, not a substitute for a backup.
The same distinction applies when replacing a Windows release. Download the new ISO from Microsoft or another publisher’s official channel, verify its hash when one is supplied, copy it to the Ventoy drive, and remove the old image only after testing the replacement. There is no need to recreate the USB for each Windows 11, Windows 10, Ubuntu, Fedora, or recovery-image refresh.
For home users, Ventoy is a convenience tool. For administrators, it is portable boot infrastructure. Build it deliberately, keep the image library verified, document whether it uses MBR or GPT, and test Secure Boot enrollment before the drive is needed during an outage or a bare-metal recovery.