

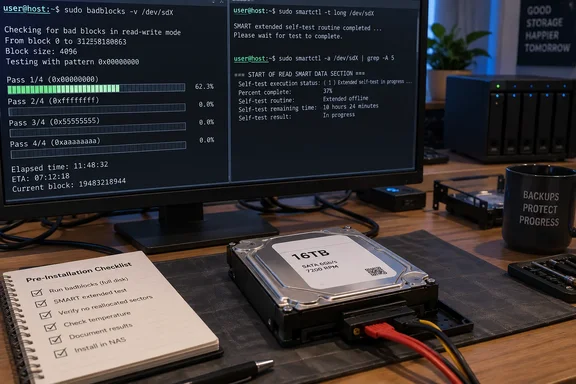
badblocks pass writes to and reads back every block on the disk. Then an extended SMART self-test runs on the drive's own firmware.This guide covers what each stage does, the exact commands, and what a pass looks like. It also covers one common mistake that makes large drives fail the test within about a second, which the usual one-line instructions tend to skip.
Why test a drive that's brand new?
The argument is about timing. A sealed anti-static bag doesn't prove a drive survived shipping. When you add a disk to a NAS, the storage pool usually starts building or rebuilding right away. That can mean hours of continuous reads and writes, and if the drive has a mechanical flaw or weak sectors, that is when they will show up.
Some popular advice goes further than the evidence. You will read that many drives die within hours of first power-on, and that manufacturers don't stress-test every platter or head. Neither claim is backed by the primary documentation behind this guide, so treat them as opinion, not statistics. The practical point stands anyway: a failure is much cheaper on an empty drive than on one holding your only copy of the family photos.
Section summary: Burn-in is cheap insurance. It doesn't guarantee the drive will last, but it moves any early failure to a point where it costs you nothing.
What the two tests actually do
Stage one: destructive badblocks
badblocks is part of the e2fsprogs package and searches a device for bad blocks. Three flags matter here:
-w: write-mode test. It writes four patterns (0xaa,0x55,0xff,0x00) to every block, reads each block back and compares the contents.-s: shows a rough completion percentage for the current pass.-v: verbose mode, which reports counts of read errors, write errors and data corruption.
The -w test erases everything on the target. The manual says never to use it on a device that holds an existing filesystem. It also says badblocks normally refuses read/write tests on a mounted device. Don't get round that with -f: the manual warns that if you think you're smarter than the program, you almost certainly aren't.
Stage two: SMART extended self-test
smartctl comes from smartmontools. smartctl -t long tells the drive's firmware to run its extended self-test. According to the smartctl manual, the self-tests check the disk's electrical and mechanical performance as well as its read performance, and the results go into a self-test log that you read with -l selftest. The test runs in the background, so issuing the command doesn't mean it has finished, let alone passed.
The two stages complement each other. badblocks drives heavy host-side writes and reads across the whole disk. The long SMART test is the drive checking itself and logging the result.
The large-drive trap: badblocks -wsv alone can fail instantly
Many guides give the command as plain badblocks -wsv. On modern high-capacity drives that often doesn't run at all. badblocks uses a 1024-byte block size by default and stores the block count in a 32-bit integer. According to one infrastructure operator's write-up, it therefore refuses to start on anything past ~4.4 TB with Value too large for defined data type … must be 32-bit value. That applies to the 16TB drive in the example above.
The usual fix is to set a 4096-byte block size. The same write-up recommends badblocks -b 4096 -wsv /dev/sdX — and just make -b 4096 your default on large drives (it covers up to ~17.6 TB; go -b 8192 beyond that).
For drives above that ceiling, people in the TrueNAS community describe two workarounds:
- Use a larger block size that is still a multiple of the drive's physical block size, such as 8192. One user added that using a non-native block size can cause false negatives - albeit this was anecdotal.
- Split the run into ranges.
badblocksaccepts optional last-block and first-block arguments, so you can test the disk in chunks that each stay under the 32-bit limit.
There's another cost to large block sizes. One blogger who worked through the problem noted that with -b 8192 you only get to know whether the drive has bad sectors or not, but we would not know their exact location or their count. For a pass/fail burn-in that trade-off is usually fine.
Also watch for a false pass. The same write-up puts it bluntly: A one-second "run" is a failed run. If the test "finishes" almost immediately, scroll up and look for the 32-bit error.
Step-by-step burn-in procedure
These tools run on Linux. A Linux live USB on a spare PC, or a NAS operating system that gives you a shell, are the typical ways to run them. Device names vary by system and controller, so /dev/sdX below is a placeholder, not a real path.
- Connect only the new drive, if you can. Fewer disks attached means fewer chances to wipe the wrong one.
- Identify the target. List block devices with
lsblk; one admin warns that listingsd?misses two-letter device names. Then runsmartctl -i /dev/sdX, which prints the model, serial number and firmware version. Match the serial to the label on the drive. - Take a SMART baseline. Run
smartctl -a /dev/sdXand save the output so you can compare it later. On ATA drives the smartctl manual also lists a conveyance self-test (-t conveyance), which takes minutes and is meant to spot damage from shipping. It's worth running as a quick first check. - Check the estimated test time.
smartctl -c /dev/sdXshows the drive's own estimate of how long its self-tests take. Trust that figure over any general rule of thumb. - Start
badblocksin a session that survives disconnection. For example, insidescreen, runbadblocks -b 4096 -wsv -o badblocks-sdX.txt /dev/sdX. The-oflag writes any bad blocks found to a file. Keep the progress display in mind: because-wmakes several passes, one pass hitting 100% doesn't mean the whole test is done. - Be patient. Four full write-and-read passes over a multi-terabyte disk take a long time. Many guides say days rather than hours, but the badblocks manual gives no estimate. Speed depends on capacity, the drive and the connection.
- Run the extended SMART test. Once
badblocksfinishes, runsmartctl -t long /dev/sdX. The smartctl manual says an extended test can take several hours on large disks. - Read the results. Run
smartctl -l selftest /dev/sdXto confirm the long test completed, thensmartctl -a /dev/sdXagain and compare it with your baseline.
| Stage | Command | What it tells you |
|---|---|---|
| Identify | lsblk, smartctl -i /dev/sdX | Which physical disk you're about to erase |
| Baseline | smartctl -a /dev/sdX | Starting health status and attributes |
| Surface test | badblocks -b 4096 -wsv /dev/sdX | Read, write and corruption error counts |
| Firmware test | smartctl -t long /dev/sdX | Starts the extended self-test |
| Verdict | smartctl -l selftest /dev/sdX | Whether the self-test completed without error |
What success looks like and when to send a drive back
A clean result has three parts:
badblocksreaches the end of every pass and reports zero read, write and corruption errors.- The self-test log shows the extended test completed without error.
smartctl -Hreports that overall health has passed.
The smartctl manual is blunt about the opposite case. A failing health status means the device has either already failed or is predicting its own failure within 24 hours. If that happens, or badblocks reports errors, don't put the drive into service. Take it up with the seller or the manufacturer's warranty process.
Be careful with individual SMART attributes. According to smartctl's documentation, each vendor uses its own method to turn raw values into normalized ones, and some use unusual conventions. A strange raw number isn't automatically a problem. Compare your before and after readings, and check the manufacturer's documentation for anything unfamiliar.
The counterargument and the limits
Not everyone thinks this is worth the effort. In a FreeBSD forum thread about testing an 18TB drive, one participant said most people let the drive's internal errror corrections handle it, and argued that watching SMART data, using RAID and keeping regular backups is enough. That's a fair position. A burn-in is a snapshot. It can't detect every hidden weakness, and it can't prevent damage that happens after the test.
Still, the two views overlap more than they disagree. Burn-in doesn't replace redundancy or backups; it screens out obvious early failures before they end up inside your array. And a NAS rebuild is when your data is most exposed, so the extra days are cheap insurance.
Bottom line: Only test an empty drive, check its serial number before you run anything destructive, use -b 4096 (or a range-split approach) on large disks, and read the logs instead of assuming a pass. And keep a backup either way.
References
- Every hard drive should survive this test before it earns a place in your NAS MakeUseOf · 2026-09-27T10:00:14+00:00
- Hard Drive Burn-in Testing - Reviews | TrueNAS Community truenas.com
- smartmontools: smartctl.cpp Source File smartmontools.org