

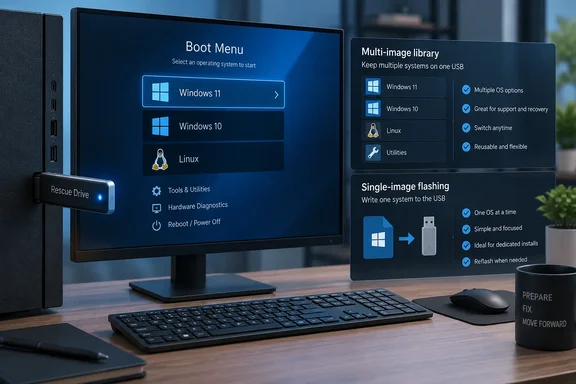
That distinction matters. This was a practical preference test, not a controlled performance benchmark. The useful takeaway for Windows users is less “Rufus has been dethroned” and more “choose the tool that matches how often your USB drive’s job changes.”
Three tools, three different priorities
Hein’s account gives each utility a reasonably clear role:
- balenaEtcher felt easiest for preparing Linux Mint media.
- Rufus successfully handled the image and offered more configuration control.
- Ventoy required an initial setup and additional boot-menu screens, but made maintaining several images more convenient.
His intended toolkit included Windows 10, Windows 11 and Linux installation images. Ventoy’s ability to keep those files together was the deciding factor, while Rufus remained a tool he expected to use when greater control mattered.
The comparison therefore identifies a winner for a particular workload: someone regularly switching operating systems or helping several machines. It does not establish that one utility is best for every installation.
Etcher’s limitation is Windows media—not running on Windows
Hein preferred Etcher’s straightforward Linux Mint workflow: choose the image, choose the drive and flash it. That matches balena’s documented three-step design, which also includes flashing validation and hides system drives by default.
However, the phrase “Windows support” needs unpacking. Etcher runs on Windows; its standard flashing process is not designed to turn Windows ISOs into bootable Windows installation media. Balena’s FAQ explicitly explains that those images need additional treatment beyond what Etcher provides.
For someone creating suitable Linux boot media, that boundary may be irrelevant. For someone wanting one utility to cover both Windows and Linux installers, it is a meaningful restriction.
Validation is useful, but it should not be mistaken for a complete compatibility test. Our practical recommendation is to boot the finished drive on the intended machine before relying on it during a repair.
Rufus’s extra settings have a purpose
Rufus worked in Hein’s Linux Mint test. His reservation was the additional decision-making around settings such as partition scheme and target system, along with his observation that preparing the drive took longer.
The configuration choices are not merely dashboard decoration. Rufus’s official FAQ explains that, for Windows ISOs supporting both boot modes, selecting MBR with BIOS or UEFI-CSM produces BIOS-mode media, while GPT produces UEFI-mode media. The choices must match the intended boot environment.
There is also a useful primary-source explanation for the workflow difference: Rufus’s FAQ says multiboot support is outside its planned feature set and explicitly identifies Ventoy as an alternative for users wanting multiple images on one drive. These tools are pursuing different goals, not simply competing over the same collection of buttons.
The speed claim deserves restraint. How-To Geek’s account provides no writing-time measurements, USB specifications, software versions or repeated trials. Hein’s estimate of roughly a minute to reach Linux Mint’s live session through Ventoy is a boot observation—not proof of superior image-writing performance.
Ventoy changes the maintenance routine
Ventoy’s official instructions corroborate the central advantage: install it on the USB drive, then copy ISO files onto its data partition. It discovers images and offers a boot menu, rather than requiring a fresh image-writing operation for every change.
That explains Hein’s preference. If your next assignment might involve Windows installation media or a Linux live environment, keeping several options available can matter more than minimizing the number of boot screens.
Preparing a Ventoy drive from Windows
You need the Windows installation package, your chosen ISO files and a USB drive with sufficient capacity. Back up its contents first.
- Extract the Ventoy Windows package.
- Run
Ventoy2Disk.exe. - Select the intended USB device and choose Install. The standard installation formats the drive and erases its contents.
- Copy your ISO files to the first, larger partition, formatted as exFAT by default.
- Boot the target PC from the USB and select an image.
Ventoy’s documented Update operation preserves files on the first partition; it is distinct from initial installation.
For acceptance testing, our recommendation is to confirm both that the image appears in the menu and that its installer or live environment actually starts. A populated menu alone is not a successful rescue-drive test.
The catch: boot compatibility still needs checking
Ventoy’s Secure Boot documentation acknowledges machine-specific limitations and describes first-boot key enrollment. It also states that its default policy bypasses checks on subsequently loaded EFI files unless its Secure Boot policy is configured otherwise. Secure Boot support should not be read as an assurance that every image receives normal signature enforcement.
For managed PCs, our recommendation is to follow the organization’s boot-security policy rather than changing firmware settings merely to get a troubleshooting drive running.
Two other practical checks are documented:
- An image will not boot: Ventoy’s FAQ recommends checking that the image file is not corrupted.
- Etcher flashing fails: balena recommends retrying and testing another drive, adapter or USB port.
A workflow winner, not a universal replacement
The strongest conclusion is the narrower one. Hein chose Ventoy because maintaining a reusable, multi-image rescue drive suited his work better than repeatedly preparing single-image media.
Our assessment follows the documented boundaries: consider Ventoy for a regularly changing image collection, Rufus for target-specific Windows media creation, and Etcher for a simple flash-and-validate workflow with suitable images.
Rufus did not become obsolete. In this comparison, it simply stopped being the default for every job—and that is a more useful lesson than declaring another utility the undisputed king of the USB drawer.
References
- I tried 3 popular bootable USB tools, and 1 clear winner replaced Rufus How-To Geek · 2026-10-02T14:30:14+00:00
- Get start . Ventoy ventoy.net
- secure . Ventoy ventoy.net