

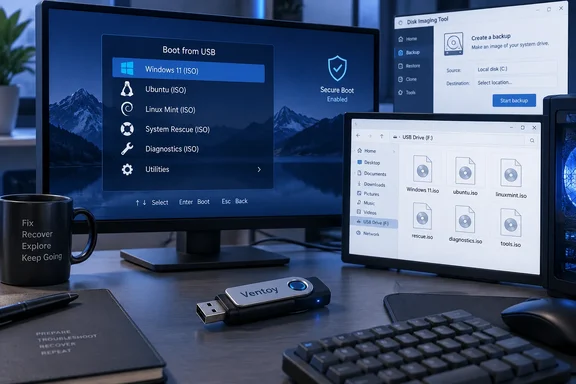
The workflow is the subject of MakeUseOf’s September 22 account of replacing repeated Rufus sessions with Ventoy. Its author describes maintaining Windows, Linux, and rescue images together, replacing individual files when new releases arrive rather than rebuilding the entire drive. Separate reporting by XDA Developers describes the same install-once, copy-images-later approach.
The useful conclusion is narrower than “nobody needs to flash an ISO anymore.” Ventoy separates maintenance of the bootable USB from maintenance of the images stored on it. That helps people who regularly change their toolkit; it does not make every alternative obsolete or every bootable image interchangeable.
Ventoy turns the USB drive into a reusable image library
An ISO is a disk-image file commonly used to distribute operating-system installers, live environments, and recovery tools. In a conventional single-image USB workflow, preparing the next environment means writing another image to the device, replacing its previous bootable contents. Ventoy moves the reusable boot machinery onto the USB drive and leaves the images as ordinary files.
After installation, the large data partition serves as a library. Copy a Windows installer, a supported Linux live image, and a rescue ISO onto it, then select the required image from Ventoy’s menu at startup. Adding another image does not require reinstalling Ventoy, and removing an obsolete image is a file-management operation.
That difference becomes valuable when the contents change frequently. How-To Geek’s July comparison describes the repeated reformatting and replacement involved in its Rufus workflow, while XDA Developers describes keeping multiple installers on one Ventoy stick. These accounts establish a workflow advantage, not a measured claim that Ventoy boots an operating system faster.
The distinction also prevents a misleading comparison with Rufus. MakeUseOf characterizes conventional imaging as writing an ISO sector by sector, but the practical decision here does not depend on assuming that every media-creation tool handles every image identically. What changes for the user is the unit of replacement: a file within a reusable collection, rather than the prepared contents of the whole device.
Ventoy’s data partition can also hold ordinary files. That is useful when a large USB drive would otherwise be dedicated to a single installer, although sharing storage does not give those files any additional protection. The same drive can contain boot images and working documents; neither becomes a backup simply because it sits beside the other.
There are consequently two separate maintenance tasks. Updating an ISO changes the installer or environment that will run. Updating Ventoy changes the software responsible for presenting and booting that image. A current Windows ISO does not imply a current Ventoy installation, and a current Ventoy installation does not refresh an old Windows ISO.
Ventoy2Disk makes installation destructive and later updates reusable
The most important safety boundary comes before the convenience begins: a normal first installation of Ventoy erases the selected drive. Existing files must be copied somewhere else before using the Install operation. Choosing the wrong device can destroy unrelated data; the fact that subsequent ISO additions are nondestructive does not make initial setup nondestructive.
The Windows utility is Ventoy2Disk.exe. The procedure described by MakeUseOf, also reflected in the independent Ventoy installation walkthrough at ventoy.io, is straightforward:
- Back up the contents of the USB drive you intend to use.
- Extract the Ventoy Windows ZIP package and open
Ventoy2Disk.exe. - Select the intended USB device in the Device dropdown, checking its identity and capacity before continuing.
- Choose Install and confirm the destructive-operation warnings only after checking the target again.
- Wait for installation to finish, then open the large Ventoy data partition in File Explorer.
- Copy the ISO files onto that partition as files, without extracting their contents.
The independent walkthrough explicitly identifies itself as unaffiliated with Ventoy’s authors. That distinction matters when selecting a download: an explanatory website is not automatically the software publisher. The project’s GitHub release records and its documentation at ventoy.net are the first-party records used here for version and Secure Boot details.
According to MakeUseOf’s walkthrough, a standard installation creates a large data partition using exFAT by default and a small boot-related partition of roughly 32MB. The large partition is where the images and ordinary files belong. Its exFAT format permits the large Windows ISO files discussed in the report to be copied without the file-size workaround that a FAT32 data partition would require.
Treat that as the documented default layout, rather than a requirement to reproduce partition sizes manually. Installer options can change aspects of the setup, including the partition-table choice. Nothing in the basic copy-and-boot workflow requires readers to repartition the resulting drive themselves.
Folders are useful rather than cosmetic. Ventoy searches subfolders, so separate Windows, Linux, and rescue directories can keep a growing collection intelligible. Replacing an image normally means deleting the obsolete file and copying the replacement; there is no need to erase the other installers beside it.
When updating an existing Ventoy drive, use Update rather than Install. The Update operation is intended to refresh Ventoy while preserving the data partition. Keeping a separate copy of important files remains prudent before a disk-maintenance operation, but repeating Install merely to obtain a newer Ventoy release defeats the preservation boundary on which this workflow depends.
Booting a Ventoy ISO is only the first checkpoint
The USB drive must be selected as the computer’s startup device. MakeUseOf lists F9, F10, F11, F12, and Esc as common startup-menu keys, with the actual choice varying by manufacturer and model. Its HP example uses Esc to reach a Startup Menu and F9 to reach the boot-device list; that is an example, not a universal Windows procedure.
With the drive connected, restart the PC, invoke its one-time boot menu, and select the USB entry. Depending on the firmware, that entry may use the drive’s brand name or a label such as “UEFI: USB.” The expected next stage is Ventoy’s image-selection menu, subject to any Secure Boot enrollment requirement.
There are three distinct checkpoints worth keeping separate:
- The firmware must recognize the USB drive as a startup option.
- Ventoy must display the image that was copied onto the data partition.
- The selected image must successfully start its own installer, live desktop, or recovery environment.
Passing the second checkpoint does not establish the third. An ISO appearing in the menu proves that Ventoy found the file; it does not prove that the image will boot correctly on that PC. This is why testing the intended images on the intended hardware is more useful than treating a populated menu as a completed recovery kit.
In MakeUseOf’s walkthrough, selecting an image opens a secondary choice that includes “Boot in normal mode.” That is its first-choice path. “Boot in grub2 mode” provides an alternative for some Linux distributions that do not start through the normal path; it should not be presented as a universal repair for Windows installers or every incompatible image.
The distinction between booting and installing is equally important. Selecting a Windows ISO starts the image’s boot process; it does not, by that selection alone, complete a Windows installation. Likewise, starting a supported Linux live environment does not inherently mean installing Linux on the internal drive. Subsequent choices belong to the installer or recovery tool that has been launched.
MakeUseOf describes a live session as leaving Windows files untouched. That needs a tighter boundary: choosing a live environment avoids committing to an installation, but it is not a promise that every action inside that environment is harmless. A toolkit carried specifically to repair disks must be treated according to the operations its tools perform. Ventoy supplies the route into those tools, not a protective barrier around the internal drive.
Ventoy Secure Boot support requires a security decision
Secure Boot is the largest qualification to the simple “copy an ISO and boot it” description. Ventoy’s official documentation says Secure Boot support has been enabled by default since version 1.0.76 and identifies the Windows installer option as Option → Secure Boot Support. Whether the computer accepts the resulting boot path still depends on its firmware configuration.
The project also says some computers require the firmware option “Allow Microsoft 3rd Part UEFI CA.” That is a machine setting, not a preference inside Windows or a property of the ISO file. On a managed PC, changing boot trust should be an authorized IT decision rather than an improvised response to a startup error.
Most significantly, the official documentation warns that Ventoy’s default policy allows EFI files to boot without checking them against Secure Boot policy. It describes this as fully bypassing Secure Boot and points to a Global Control Plugin option for users who want to follow UEFI Secure Boot policy. The first-party material examined here names that configurable behavior but does not establish the exact setting values needed for a safe, complete configuration procedure.
That limitation changes the recommendation for administrators. “Secure Boot remains enabled in firmware” and “every image selected through this USB retains the expected Secure Boot enforcement” are not equivalent claims. A successful Ventoy startup is therefore insufficient evidence that an organization’s required boot policy remains enforced throughout the selected boot path.
Ventoy key enrollment is specific to the PC and certificate generation
The first Secure Boot attempt may open MokManager, a key-enrollment interface. In MakeUseOf’s reported procedure, the user chooses “Enroll key from disk,” opens the VTOYEFI partition, selects ENROLL_THIS_KEY_IN_MOKMANAGER.cer, then chooses Continue and Yes before rebooting. Those exact screen steps come from that outlet’s walkthrough; Ventoy’s official documentation independently confirms the need for key enrollment but does not guarantee identical behavior on every computer.
Enrollment should be an intentional trust decision made for a Ventoy drive obtained from a trusted project distribution. It is not a generic instruction to approve whatever certificate appears on a blue screen. For an organization-owned computer, the appropriate boundary is the organization’s authorization to use that bootloader and enrollment process.
The often-repeated description of enrollment as “once per PC” also needs a version qualification. Ventoy’s GitHub release notes for version 1.1.14 say the project updated its Secure Boot shim to address the UEFI CA 2023 issue and introduced a new certificate authority, requiring enrollment of the new key at first boot. Versions 1.1.15 and 1.1.16 repeat that warning.
There is a small discrepancy in the first-party records: the Secure Boot documentation describes the new-key boundary as “1.1.13+,” whereas the release history marks 1.1.13 as deprecated because of a mistake and carries the replacement-key announcement in 1.1.14. The practical instruction is to account for the new enrollment when moving from a pre-1.1.14 installation to the replacement release line, rather than assuming an old enrollment lasts indefinitely.
The release record examined for this report lists Ventoy 1.1.17 as the latest version and includes further Secure Boot process optimization. It also records boot fixes in 1.1.15 and 1.1.16. Those entries reinforce the need to distinguish Ventoy’s version from the versions of the images it carries, without implying that every user will encounter the faults those releases addressed.
Ventoy acknowledges that its Secure Boot approach does not work on every machine and discusses disabling Secure Boot as a compatibility response. That is not a suitable universal recommendation for WindowsForum readers. Where the required boot policy cannot be maintained or enrollment is not permitted, use an approved alternative media path rather than weakening the computer’s configuration merely to preserve the multiboot convenience.
Ventoy persistence adds saved state, not universal compatibility
A normal live session is useful precisely because it can be temporary. MakeUseOf describes changes within its live environment as residing in memory and disappearing at shutdown. That description should remain scoped to the live environment’s temporary changes; it does not mean files deliberately written to another mounted storage device are automatically discarded.
Ventoy’s Persistence Plugin addresses a different requirement: retaining supported live-system changes across boots. It associates an ISO with a separate storage-image file, commonly carrying a .dat extension. The operating system then has somewhere to retain the changes supported by its persistence implementation.
The storage file alone cannot make persistence universal. Distribution-specific expectations still apply, and a successful boot through Ventoy does not prove that persistence is supported. This feature should not be read as a way to turn a Windows installation ISO into a persistent portable Windows desktop.
VentoyPlugson connects a supported ISO to its persistence file
MakeUseOf’s example uses a prebuilt persistence image and Ventoy’s graphical configuration utility:
- Obtain the project’s persistence-image archive, identified in the walkthrough as
images.zip. - Select and extract a persistence image suitable for the particular Linux distribution and the desired capacity.
- Create a
persistencefolder on the large Ventoy data partition and place the extracted.datfile inside it. - Open
VentoyPlugson.exe, select the Ventoy drive, and choose Start. - In the browser-based configuration page, open Persistence Plugin, choose Add, and enter the paths to the ISO and its associated
.datfile. - Save the configuration and choose Stop in VentoyPlugson.
- Boot the relevant ISO and select the persistence option when offered.
The report’s specific example is persistence_ext4_4GB_casper-rw.dat. It should remain an example, not a blanket recommendation for every Ubuntu release or Ubuntu-derived distribution. The filesystem, internal label, and configuration must suit the particular live system; the evidence here does not establish a universal image-and-label combination for all releases.
Capacity is a separate choice from the size of the USB drive. The walkthrough’s selected image provides a fixed amount of space for saved changes. Having additional free space elsewhere on the Ventoy partition does not mean that the selected persistence file automatically expands to use it.
Success also needs to be checked at the operating-system level. Seeing “Boot with persistence” confirms that a boot option is available, not that every intended application, setting, or file has been retained correctly. Before relying on this arrangement, confirm that the changes you need remain after an orderly shutdown and another boot into the same persistent environment.
The persistence file introduces data-handling obligations. MakeUseOf warns that its example is unencrypted, that removing the drive during use can corrupt it, and that a slow USB device can make the session sluggish. Those are reasons to avoid placing sensitive credentials in that unencrypted example, shut down cleanly, and retain a separate copy of important persistent data.
Persistence mappings also deserve attention when replacing ISOs. The configuration associates a particular image path with a particular storage file. Changing the ISO’s filename or location can therefore require a corresponding configuration update, and carrying old state into a different release should not be assumed safe merely because both images boot. Treat persistence as part of the live system’s configuration, rather than another file that can be forgotten after setup.
Choose Ventoy for a changing toolkit, with a tested fallback
Use Ventoy when you repeatedly switch among supported installers, live environments, and rescue tools, and when the target computers permit its boot path. A user making one installer for one machine has less to gain than a technician maintaining several environments. The payoff comes from repeated reuse, not from winning an argument about which utility should replace every other utility.
For administrators, the adoption decision should come before drive preparation. A technically bootable toolkit can still be unsuitable if it requires an unauthorized enrollment, a change in boot policy, or an unsupported deployment method. Conversely, a personally owned test PC can be a reasonable place to evaluate the workflow without pretending that the result establishes compatibility across an enterprise fleet.
A useful readiness check separates the layers. Confirm that the computer starts the drive, that Ventoy lists the intended image, that the image reaches its working environment, and—where configured—that persistence retains the required state. This is a recommendation for validating the assembled toolkit, not a claim that WindowsForum has performed those tests.
The concrete decisions are these:
- Use Ventoy for a frequently changing collection of supported ISO images, rather than repeatedly replacing the contents of a single-purpose drive.
- Back up the USB before the first installation, verify the selected device, and use Update rather than Install when maintaining an existing Ventoy drive.
- Test the actual images on the computers where they will be needed; a visible menu entry is not a compatibility result.
- Treat Secure Boot enrollment and Ventoy’s boot-policy behavior as separate security decisions, especially on managed PCs.
- Configure persistence only for a supported live-system combination, and treat an unencrypted persistence file as accessible data.
- Keep conventional imaging available for images that fail, vendor-prescribed workflows, and computers where Ventoy’s boot path is inappropriate.
Rufus and direct imaging still have a clear job
The strongest counterexample in MakeUseOf’s account is Tails. Its author reports having needed a different media maker because of boot problems and says the Tails project does not support Ventoy as the installation path for its intended encrypted Persistent Storage arrangement. That claim remains attributed to MakeUseOf here; the material available for this report does not independently establish the full Tails support policy.
The same report credits Ventoy 1.1.06 with addressing boot problems for Tails 6.13 and later. That older compatibility claim is not verified by the current release-history extract examined here, so it should not be used as a deployment guarantee. More importantly, even a confirmed ability to reach a desktop would not by itself establish support for the distribution’s persistent-storage design.
The general decision follows without turning this into a claim that Ventoy is unsafe. If a particular operating system prescribes a specific USB-image workflow for its storage or security model, convenience is a weak reason to replace that workflow without support. A general-purpose multiboot drive and a deliberately single-purpose operating-system drive solve different problems.
Likewise, a failed image is a reason to retain an alternative, not proof that the entire Ventoy approach is flawed. MakeUseOf’s author still keeps Rufus for single-purpose media and cases where the multiboot path is unsuitable. No comparative benchmark in the reporting establishes a universal winner for boot speed or reliability, and none is necessary to explain the value of either choice.
Ventoy earns a place in a Windows repair kit by making image replacement an ordinary file operation after the initial setup. The sensible next step is to build and validate that reusable toolkit on the machines it must serve, while keeping an approved direct-imaging path for the exceptions. Repeated flashing becomes optional for much of the work—not obsolete for all of it.
References
- I haven't flashed an ISO to a USB drive in years, and I don't know why anyone still does MakeUseOf · 2026-09-22T10:30:14+00:00
- secure . Ventoy ventoy.net
- Install Ventoy on Windows and Linux | ventoy.io ventoy.io