

Windows audio problems in 2026 are usually fixed first by selecting the correct output device, checking app volume and permissions, running Microsoft’s Get Help audio troubleshooter, and only then moving to Bluetooth repair, sound-format changes, driver refreshes, services, and Windows Update. That order matters because most “no sound” cases are not driver disasters. They are routing, muting, permissions, or post-update state problems masquerading as broken hardware. Microsoft’s own support guidance now points Windows 11 users toward Get Help and Settings-based troubleshooters, leaving the old MSDT era behind.
For years, Windows audio advice had a familiar rhythm: open Device Manager, uninstall Realtek, reboot, hope. That reflex is understandable, but it is increasingly the wrong first move on a modern Windows 11 PC. Today’s audio stack is crowded with HDMI monitors, USB docks, Bluetooth headsets, virtual meeting devices, graphics-driver audio endpoints, browser permissions, and per-app routing.
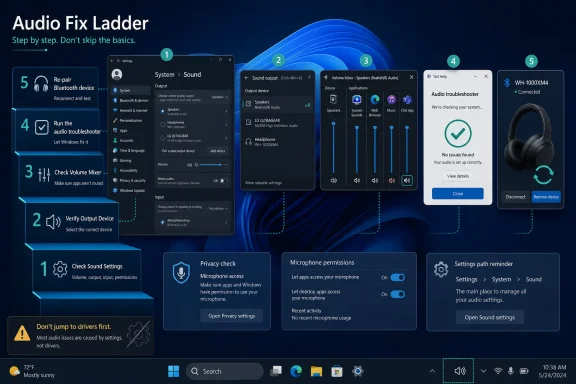
The most useful first test is almost insultingly simple: click the speaker icon on the taskbar, open the output picker, and confirm that Windows is sending sound to the device you are actually using. A monitor, television, headset, or Bluetooth speaker can quietly become the default output after a reboot, driver update, dock reconnection, or Teams call. The operating system may show audio activity while the human in front of the PC hears nothing.
Microsoft’s current support page for Windows audio problems starts in the same place: check the selected speaker output, then check hardware and volume controls. That is not glamorous troubleshooting, but it reflects the reality of Windows 11. Audio now fails as often because Windows has made a reasonable but unwanted choice as because something is technically broken.
The same logic applies inside Settings. Start > Settings > System > Sound remains the central place to confirm the selected output device, raise the output volume, and make sure the device is not muted. If Windows repeatedly picks the wrong device, the older “More sound settings” panel still has a role: under Playback, right-click the device you actually use and set it as the default.
The path is straightforward: Start > Settings > System > Sound > Volume mixer. From there, check System volume and then the individual app entry. If only one app is silent, resist the temptation to reinstall drivers. Confirm that the app is not muted, its volume is raised, and its output device is the one you expect.
This is especially important on machines used for video calls. A headset selected in Zoom or Teams, a monitor selected by Windows, and a browser tab using site-level permissions can create a three-layer mismatch. Users often describe the result as “Windows has no sound,” but Windows may be doing exactly what it was told to do.
Hardware still deserves a glance before software surgery begins. A half-seated 3.5 mm plug, powered speakers switched off at the back, a headset mute button, or a USB dongle in a failing hub can waste an afternoon. The point is not that users are careless; it is that Windows audio failures often sit at the border between physical device state and software routing.
That shift matters for two reasons. First, it changes the practical instruction users should follow. The current route is to open Get Help, search for “audio troubleshooter,” grant diagnostic consent if prompted, and follow the guided scan. A Settings route also exists under System > Sound, where “Troubleshoot common sound problems” can run checks for output or input devices.
Second, it signals Microsoft’s broader direction. Troubleshooting is being pulled away from older local wizard infrastructure and pushed into a more centralized help surface. As Computerworld has noted in its coverage of Windows 11 troubleshooting, the Get Help model is part of a larger transition away from legacy tools that long-time Windows users may still know by muscle memory.
That does not mean Get Help is magic. Community complaints about the new troubleshooting experience are easy to find, and some users prefer the older, more direct wizards. But for a 2026 fix guide, recommending MSDT commands as a primary step is no longer responsible. The supported route is Get Help and Settings first, with manual repair steps after that.
The sane sequence is to verify that Bluetooth is on, Airplane mode is off, and the headset or speaker appears under Bluetooth & devices. If it still misbehaves, remove the device and pair it again. That is not a defeat; it is often the fastest way to clear a bad state between Windows and the accessory.
Windows also includes a Bluetooth troubleshooter under Start > Settings > System > Troubleshoot > Other troubleshooters. Use it after the obvious toggles and re-pairing step, not before. Troubleshooters are best at detecting service and configuration problems, not at guessing that your headphones are still connected to a phone in the next room.
Bluetooth audio also reinforces the central lesson of Windows sound repair: “connected” and “playing” are not synonyms. A headset can be paired, connected, selected for calls, ignored for media, muted in one app, or superseded by a monitor output. The fix is less about one heroic reset than about walking the chain in order.
In Windows 11, open Settings > System > Sound, select the output device, and turn Audio enhancements off. Then open the Advanced options for the device and test a different default format. This is particularly useful when audio works but sounds wrong after an update, after installing headset software, or after switching between docks and speakers.
Enhancements are not inherently bad. Vendors use them for noise reduction, virtual surround, loudness equalization, and microphone cleanup. But each extra processing layer is another place for latency, clipping, or compatibility issues to appear. When sound is distorted rather than absent, simplifying the chain is the fastest test.
The same principle applies to companion utilities from PC makers and headset vendors. Dell, HP, Lenovo, Realtek, Intel, Dolby, Waves, and gaming-headset vendors may all have software in the path. Turning off enhancements inside Windows gives you a baseline before you decide whether the vendor layer is helping or hurting.
Device Manager remains the central repair surface. Expand “Sound, video and game controllers,” right-click the audio device, choose Update driver, and let Windows search automatically. If the device is missing, use View > Show hidden devices and Action > Scan for hardware changes. If the device is disabled, enable it before assuming the driver is corrupt.
Reinstallation is the next escalation. Uninstall the device, restart, and let Windows rebuild the device entry. If the failure began after a driver update, the Driver tab’s Roll Back Driver button may restore the previous working version, though it only appears when Windows has something to roll back to.
For stubborn laptop and desktop issues, the best driver often comes from the PC maker rather than from a random driver site. Dell, HP, Lenovo, Acer, Asus, and other OEM support pages can provide model-specific audio packages tuned for that machine’s codec, amplifier, microphone array, and enhancement stack. The important phrase is exact model: grabbing a generic driver for “Realtek audio” is not the same as installing the package built for your laptop.
The services path is old-school but still useful: open
Windows Update belongs in the same pragmatic category. Install available updates, reboot when prompted, and do not ignore “Update and restart” if it is sitting in the power menu. Audio bugs can live in drivers, cumulative updates, firmware, and device metadata; refusing updates while troubleshooting hardware is a good way to chase ghosts.
That said, updates can also be the trigger. If audio broke immediately after a driver update, rollback is fair game. If it broke after a Windows feature update, OEM driver packages and known-issue checks become more important. The correct stance is neither “updates always fix it” nor “updates always broke it,” but a timeline-based diagnosis.
Start at Settings > Privacy & security > Microphone. Turn on Microphone access, allow apps to access the microphone, and confirm that the specific app is permitted. For classic desktop applications, the “Let desktop apps access your microphone” switch also matters.
Then test the input under Settings > System > Sound. Select the microphone, start a test, speak normally, stop the test, and play it back. Adjust input volume after the test rather than guessing. If Windows hears you but the app does not, the fault has moved from the device to the app or website.
Browsers add another permission layer. In Microsoft Edge, site permissions determine whether a calling site can use the microphone. In Chrome, the site prompt and the browser’s microphone settings play the same gatekeeper role. A web meeting that cannot hear you may be blocked by the site even while Windows itself is receiving input.
On managed work or school PCs, policy can override the user. If microphone toggles are locked, missing, or revert after you change them, the next stop is not Device Manager. It is the IT administrator who controls device privacy policy.
Repair should be tried first when it is available. Reset is more aggressive and can remove app data or settings, so it belongs after Repair fails or when the app is clearly stuck in a bad configuration. If neither option exists, uninstalling and reinstalling from the Microsoft Store or the vendor’s official site is the cleaner route.
This app-first approach is especially useful for media players, browsers, communication tools, and games. Many of them have their own audio device selectors, mute controls, codecs, exclusive-mode settings, or voice-processing features. A Windows-wide fix will not help if the app is simply pointed at the wrong microphone or headset.
The guiding test is simple: can other apps play sound or record input? If yes, stop treating the PC as broken. The narrower the failure, the narrower the fix should be.
 The First Suspect Is No Longer the Driver
For years, Windows audio advice had a familiar rhythm: open Device Manager, uninstall Realtek, reboot, hope. That reflex is understandable, but it is increasingly the wrong first move on a modern Windows 11 PC. Today’s audio stack is crowded with HDMI monitors, USB docks, Bluetooth headsets, virtual meeting devices, graphics-driver audio endpoints, browser permissions, and per-app routing.The most useful first test is almost insultingly simple: click the speaker icon on the taskbar, open the output picker, and confirm that Windows is sending sound to the device you are actually using. A monitor, television, headset, or Bluetooth speaker can quietly become the default output after a reboot, driver update, dock reconnection, or Teams call. The operating system may show audio activity while the human in front of the PC hears nothing.
Microsoft’s current support page for Windows audio problems starts in the same place: check the selected speaker output, then check hardware and volume controls. That is not glamorous troubleshooting, but it reflects the reality of Windows 11. Audio now fails as often because Windows has made a reasonable but unwanted choice as because something is technically broken.
The same logic applies inside Settings. Start > Settings > System > Sound remains the central place to confirm the selected output device, raise the output volume, and make sure the device is not muted. If Windows repeatedly picks the wrong device, the older “More sound settings” panel still has a role: under Playback, right-click the device you actually use and set it as the default.
The Volume Mixer Is Where “Broken” Apps Go to Hide
A silent browser tab, game, meeting app, or media player does not prove Windows audio is down. It may only prove that one app has been muted, routed elsewhere, or left at a low volume after a previous session. The Windows 11 Volume mixer is now one of the most important diagnostic screens for ordinary sound failures.The path is straightforward: Start > Settings > System > Sound > Volume mixer. From there, check System volume and then the individual app entry. If only one app is silent, resist the temptation to reinstall drivers. Confirm that the app is not muted, its volume is raised, and its output device is the one you expect.
This is especially important on machines used for video calls. A headset selected in Zoom or Teams, a monitor selected by Windows, and a browser tab using site-level permissions can create a three-layer mismatch. Users often describe the result as “Windows has no sound,” but Windows may be doing exactly what it was told to do.
Hardware still deserves a glance before software surgery begins. A half-seated 3.5 mm plug, powered speakers switched off at the back, a headset mute button, or a USB dongle in a failing hub can waste an afternoon. The point is not that users are careless; it is that Windows audio failures often sit at the border between physical device state and software routing.
Microsoft Has Moved the Troubleshooter, and That Is the Story
The old troubleshooting advice built around Control Panel wizards,msdt.exe commands, and downloadable “Fix it” tools is aging out. Microsoft says Windows 11 users should start the automated audio troubleshooter in the Get Help app, and its documentation on MSDT deprecation makes clear that legacy inbox troubleshooters and the Microsoft Support Diagnostic Tool are being retired or redirected in newer Windows experiences.That shift matters for two reasons. First, it changes the practical instruction users should follow. The current route is to open Get Help, search for “audio troubleshooter,” grant diagnostic consent if prompted, and follow the guided scan. A Settings route also exists under System > Sound, where “Troubleshoot common sound problems” can run checks for output or input devices.
Second, it signals Microsoft’s broader direction. Troubleshooting is being pulled away from older local wizard infrastructure and pushed into a more centralized help surface. As Computerworld has noted in its coverage of Windows 11 troubleshooting, the Get Help model is part of a larger transition away from legacy tools that long-time Windows users may still know by muscle memory.
That does not mean Get Help is magic. Community complaints about the new troubleshooting experience are easy to find, and some users prefer the older, more direct wizards. But for a 2026 fix guide, recommending MSDT commands as a primary step is no longer responsible. The supported route is Get Help and Settings first, with manual repair steps after that.
Bluetooth Audio Is a Pairing Problem Until Proven Otherwise
Bluetooth headphones that “connect” but produce no sound are one of Windows 11’s most common modern annoyances. The device may be paired, but not selected. It may be selected, but connected in the wrong mode. It may be remembered by Windows, but stuck in a stale pairing state after firmware, driver, or OS changes.The sane sequence is to verify that Bluetooth is on, Airplane mode is off, and the headset or speaker appears under Bluetooth & devices. If it still misbehaves, remove the device and pair it again. That is not a defeat; it is often the fastest way to clear a bad state between Windows and the accessory.
Windows also includes a Bluetooth troubleshooter under Start > Settings > System > Troubleshoot > Other troubleshooters. Use it after the obvious toggles and re-pairing step, not before. Troubleshooters are best at detecting service and configuration problems, not at guessing that your headphones are still connected to a phone in the next room.
Bluetooth audio also reinforces the central lesson of Windows sound repair: “connected” and “playing” are not synonyms. A headset can be paired, connected, selected for calls, ignored for media, muted in one app, or superseded by a monitor output. The fix is less about one heroic reset than about walking the chain in order.
Crackling Audio Points to Processing Before Hardware Failure
Crackling, distortion, hollow sound, and strange spatial effects are a different class of problem from total silence. They often implicate audio enhancements, signal processing, sample-rate mismatches, or device-specific software layers. The practical fix starts in device properties, not with a screwdriver.In Windows 11, open Settings > System > Sound, select the output device, and turn Audio enhancements off. Then open the Advanced options for the device and test a different default format. This is particularly useful when audio works but sounds wrong after an update, after installing headset software, or after switching between docks and speakers.
Enhancements are not inherently bad. Vendors use them for noise reduction, virtual surround, loudness equalization, and microphone cleanup. But each extra processing layer is another place for latency, clipping, or compatibility issues to appear. When sound is distorted rather than absent, simplifying the chain is the fastest test.
The same principle applies to companion utilities from PC makers and headset vendors. Dell, HP, Lenovo, Realtek, Intel, Dolby, Waves, and gaming-headset vendors may all have software in the path. Turning off enhancements inside Windows gives you a baseline before you decide whether the vendor layer is helping or hurting.
Drivers Still Matter, but They Belong in the Second Half of the Playbook
Drivers are still the right answer when Windows does not detect the audio device, when sound dies immediately after an update, or when the basic Settings and Volume mixer checks fail. They are just not the right first answer. Premature driver surgery can create new problems, especially on laptops where audio depends on chipset, firmware, and OEM-tuned packages.Device Manager remains the central repair surface. Expand “Sound, video and game controllers,” right-click the audio device, choose Update driver, and let Windows search automatically. If the device is missing, use View > Show hidden devices and Action > Scan for hardware changes. If the device is disabled, enable it before assuming the driver is corrupt.
Reinstallation is the next escalation. Uninstall the device, restart, and let Windows rebuild the device entry. If the failure began after a driver update, the Driver tab’s Roll Back Driver button may restore the previous working version, though it only appears when Windows has something to roll back to.
For stubborn laptop and desktop issues, the best driver often comes from the PC maker rather than from a random driver site. Dell, HP, Lenovo, Acer, Asus, and other OEM support pages can provide model-specific audio packages tuned for that machine’s codec, amplifier, microphone array, and enhancement stack. The important phrase is exact model: grabbing a generic driver for “Realtek audio” is not the same as installing the package built for your laptop.
Services and Updates Are the Boring Fixes That Often Work
When sound drops out after Windows has been running for a while, the Windows Audio service and Windows Audio Endpoint Builder service deserve attention. Restarting those services can restore a broken audio session without rebooting the entire PC. Remote Procedure Call, better known as RPC, should also be running because core Windows services depend on it.The services path is old-school but still useful: open
services.msc, restart Windows Audio, restart Windows Audio Endpoint Builder, and confirm RPC is healthy. This is not a cure for every audio failure, but it is a practical step when audio disappears mid-session or when the troubleshooter reports that audio services are not responding.Windows Update belongs in the same pragmatic category. Install available updates, reboot when prompted, and do not ignore “Update and restart” if it is sitting in the power menu. Audio bugs can live in drivers, cumulative updates, firmware, and device metadata; refusing updates while troubleshooting hardware is a good way to chase ghosts.
That said, updates can also be the trigger. If audio broke immediately after a driver update, rollback is fair game. If it broke after a Windows feature update, OEM driver packages and known-issue checks become more important. The correct stance is neither “updates always fix it” nor “updates always broke it,” but a timeline-based diagnosis.
Microphone Failures Are Often Permission Failures
Microphone troubleshooting has its own trap: users assume input hardware is broken when Windows privacy settings or browser site permissions are blocking access. Since Windows 10 and Windows 11 put microphone access behind privacy controls, an app can be installed correctly and still be unable to hear anything.Start at Settings > Privacy & security > Microphone. Turn on Microphone access, allow apps to access the microphone, and confirm that the specific app is permitted. For classic desktop applications, the “Let desktop apps access your microphone” switch also matters.
Then test the input under Settings > System > Sound. Select the microphone, start a test, speak normally, stop the test, and play it back. Adjust input volume after the test rather than guessing. If Windows hears you but the app does not, the fault has moved from the device to the app or website.
Browsers add another permission layer. In Microsoft Edge, site permissions determine whether a calling site can use the microphone. In Chrome, the site prompt and the browser’s microphone settings play the same gatekeeper role. A web meeting that cannot hear you may be blocked by the site even while Windows itself is receiving input.
On managed work or school PCs, policy can override the user. If microphone toggles are locked, missing, or revert after you change them, the next stop is not Device Manager. It is the IT administrator who controls device privacy policy.
App Repair Beats System Repair When Only One Program Is Broken
If one Windows app has audio trouble and the rest of the system works, treat it as an app problem. Windows 11 provides Repair and Reset options for many Microsoft Store and packaged apps under Settings > Apps > Installed apps. Those options are less destructive than system-wide resets and more targeted than driver changes.Repair should be tried first when it is available. Reset is more aggressive and can remove app data or settings, so it belongs after Repair fails or when the app is clearly stuck in a bad configuration. If neither option exists, uninstalling and reinstalling from the Microsoft Store or the vendor’s official site is the cleaner route.
This app-first approach is especially useful for media players, browsers, communication tools, and games. Many of them have their own audio device selectors, mute controls, codecs, exclusive-mode settings, or voice-processing features. A Windows-wide fix will not help if the app is simply pointed at the wrong microphone or headset.
The guiding test is simple: can other apps play sound or record input? If yes, stop treating the PC as broken. The narrower the failure, the narrower the fix should be.
The 2026 Audio Fix Is a Ladder, Not a Panic Button
The best Windows audio repair process is ordered from least invasive to most invasive. That keeps users from turning a muted app into a driver mess and helps administrators separate ordinary endpoint confusion from genuine fleet-wide defects.- Check the taskbar output picker first, because Windows may be playing audio to a monitor, TV, dock, Bluetooth speaker, or headset you are not using.
- Use Volume mixer when only one app is silent, because per-app mute, volume, and output routing can mimic a system-wide failure.
- Run Microsoft’s Get Help audio troubleshooter on Windows 11 instead of relying on old MSDT commands or retired Easy Fix-era advice.
- Re-pair Bluetooth devices before reinstalling drivers, because stale pairing state is common and easy to clear.
- Turn off audio enhancements and test another default format when sound is distorted, crackling, or strangely processed.
- Move to Device Manager, OEM drivers, services, and Windows Update only after the routing, permissions, and app-level checks have failed.
References
- Primary source: Technobezz
Published: 2026-07-07T17:10:15.850054
Loading…
www.technobezz.com - Official source: support.microsoft.com
Loading…
support.microsoft.com - Official source: learn.microsoft.com
Troubleshooting audio problems in Windows 11 - ARTICLE - Microsoft Q&A
Technical Level: Intermediate. Applies to: All Windows 11 editions. Revision: 1.0. In this community guide, I will show you various methods to troubleshoot, in case if audio is not working properly on your system. The common audio problems you might see…learn.microsoft.com - Related coverage: windowscentral.com
How to manage sound settings on Windows 11 | Windows Central
On Windows 11, you can customize various settings to customize the sound experience whether you have one or multiple output devices, and in this guide, I’ll show you how.www.windowscentral.com - Related coverage: computerworld.com
Loading…
www.computerworld.com - Official source: answers.microsoft.com
Audio troubleshooter doesn’t work. - Microsoft Q&A
When I try to troubleshoot my audio it says “this file does not have an app associated with it for preforming this action.” And I wanted to know how I could download an app like the one it’s talking about and I also wanted to know to associate it with…answers.microsoft.com
- Related coverage: techradar.com
Microsoft kills off Windows 11's troubleshooters - so where can you turn for help? | TechRadar
Microsoft’s plan to evolve its troubleshooterswww.techradar.com - Related coverage: cceboston.org
- Official source: techcommunity.microsoft.com