Check TPM, Secure Boot, and Device Encryption Readiness in Windows 10/11
Difficulty: Beginner | Time Required: 10 minutesKeeping your Windows PC secure starts with knowing whether key hardware-based security features are available and enabled. TPM, Secure Boot, and Device Encryption help protect your sign-in credentials, block tampered boot software, and safeguard your files if your device is lost or stolen.
This beginner-friendly guide shows you how to quickly check your PC’s readiness for these features in Windows 10 and Windows 11. These checks are also useful if you are troubleshooting Windows 11 compatibility, BitLocker/Device Encryption availability, or Windows Security warnings.
Windows 10 note: Microsoft ended standard support for Windows 10 on October 14, 2025. The checks below still apply to Windows 10 PCs, but for ongoing security updates you should use a supported edition/program or consider moving to Windows 11 if your hardware supports it.
Prerequisites
Before you begin:Quick walkthrough
- Sign in with an account that can open Windows settings.
- Use an administrator account if you want to check Device Encryption support using System Information.
- Save any open work if you plan to enter firmware/BIOS settings later.
Warning: This tutorial focuses on checking readiness. Changing TPM, Secure Boot, or UEFI/BIOS settings incorrectly can affect startup. If you are unsure, check your PC manufacturer’s support site before making firmware changes.
What These Features Do
Before checking your PC, here is a quick explanation:- TPM (Trusted Platform Module): A security chip or firmware-based feature used for encryption keys, Windows Hello, BitLocker, and Windows 11 requirements. Windows 11 requires TPM 2.0.
- Secure Boot: A UEFI security feature that helps prevent unsigned or malicious boot software from loading before Windows.
- Device Encryption: A simplified BitLocker-based encryption feature that can automatically protect your Windows drive on supported devices, including many Windows Home systems.
Step 1: Check Your TPM Status Using TPM Management
The fastest way to check TPM status is with the built-in TPM Management tool.- Press Windows + R on your keyboard.
- Type:
tpm.msc - Click OK or press Enter.
- In the TPM Management on Local Computer window, look for Status.
What to Look For
If TPM is ready, you should see:The TPM is ready for use.Then check the lower-right area under TPM Manufacturer Information.
- Find Specification Version.
- Confirm it says:
2.0
What the Results Mean
- TPM is ready for use + Specification Version 2.0: Your TPM meets the Windows 11 TPM requirement.
- Compatible TPM cannot be found: TPM may be missing, disabled in UEFI/BIOS, or not supported.
- Specification Version 1.2: TPM exists, but it does not meet the Windows 11 TPM 2.0 requirement.
Tip: Some PCs list TPM under different firmware names, such as Intel PTT, Intel Platform Trust Technology, AMD fTPM, or Security Device Support.
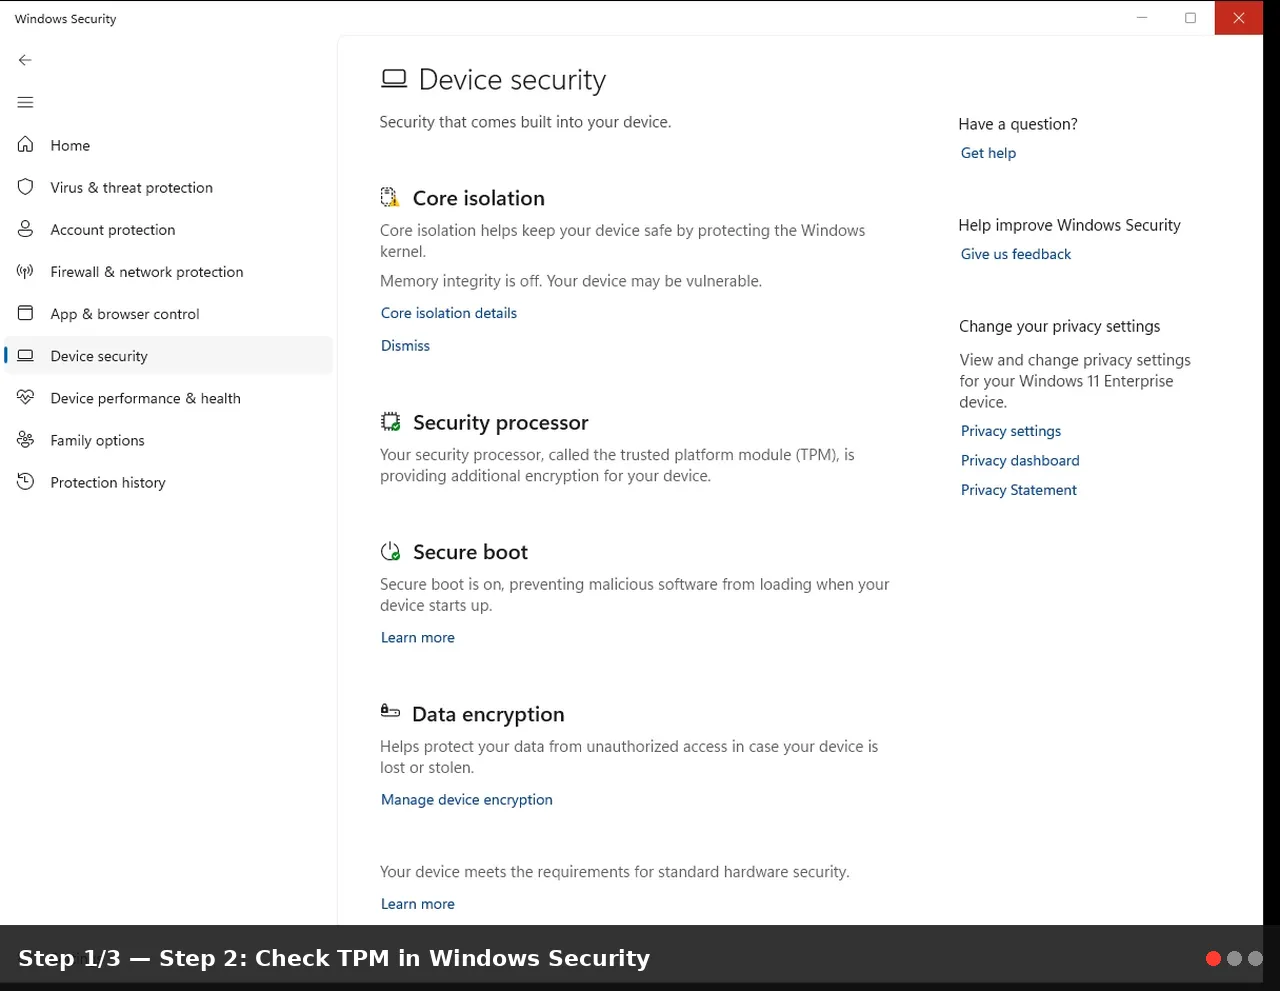
Step 2: Check TPM in Windows Security
You can also check TPM from the Windows Security app.
Windows 11
- Open Start.
- Type Windows Security.
- Open Windows Security.
- Select Device security.
- Look for Security processor.
- Click Security processor details.
Windows 10
- Open Settings.
- Go to Update & Security.
- Select Windows Security.
- Click Device security.
- Look for Security processor.
- Open Security processor details if available.
What to Check
Look for the Specification version. For Windows 11 readiness, it should be 2.0.Note: If you do not see a Security processor section, TPM may be disabled in firmware or unavailable on the device.
Step 3: Check Secure Boot Status
Secure Boot status is easiest to check using System Information.
- Press Windows + R.
- Type:
msinfo32 - Click OK.
- In the left pane, select System Summary.
- In the right pane, look for:
Secure Boot State
What the Results Mean
- On: Secure Boot is enabled.
- Off: Secure Boot is supported but currently disabled.
- Unsupported: Your current firmware mode or hardware configuration may not support Secure Boot.
BIOS ModeFor Secure Boot, this should usually be:
UEFIIf it says Legacy, Secure Boot may not be available until the system is converted/configured for UEFI boot.
Warning: Switching from Legacy/CSM boot to UEFI may require disk partition changes and can prevent Windows from booting if done incorrectly. Back up your data first and consult your manufacturer’s instructions.
Step 4: Check Device Encryption Availability in Settings
Device Encryption is available only on supported devices and Windows configurations.Windows 11
- Open Settings.
- Select Privacy & security.
- Click Device encryption.
- Check whether the option is available and whether it is On or Off.
Windows 10
- Open Settings.
- Select Update & Security.
- Look for Device encryption in the left menu.
- Check whether Device Encryption is available and enabled.
What the Results Mean
- Device encryption appears and is On: Your device is protected.
- Device encryption appears and is Off: Your device supports it, but it is not currently enabled.
- Device encryption does not appear: Your device may not meet requirements, you may be using a standard user account, or encryption may be managed another way.
Tip: On Windows Pro, Enterprise, and Education editions, you may also see full BitLocker Drive Encryption options in Control Panel.
Step 5: Check Device Encryption Support with System Information
If Device Encryption does not appear in Settings, System Information can often explain why.
- Open Start.
- Type System Information.
- Right-click System Information.
- Select Run as administrator.
- In System Summary, look for one of these entries:
Device Encryption Support
or
Automatic Device Encryption Support - Read the value shown next to it.
Common Messages
You may see:- Meets prerequisites: Device Encryption is supported.
- TPM is not usable: TPM is missing, disabled, or not working correctly.
- WinRE is not configured: Windows Recovery Environment is not properly configured.
- PCR7 binding is not supported: Secure Boot may be disabled, or certain boot-connected devices/peripherals may interfere.
Note: If you are using a local account, Device Encryption may not enable automatically. Microsoft accounts and work/school accounts are commonly used to back up the recovery key.
Tips and Troubleshooting
If TPM Is Missing
- Restart into UEFI/BIOS settings.
- Look for options such as:
- TPM
- Intel PTT
- AMD fTPM
- Security Device
- Trusted Computing
- Enable the setting if available.
- Save changes and restart.
If Secure Boot Is Off
Secure Boot is usually found in UEFI/BIOS under sections like:- Boot
- Security
- Authentication
- UEFI Firmware Settings
If Device Encryption Is Missing
Check the following:- Make sure you are signed in as an administrator.
- Confirm TPM is available and working.
- Confirm Secure Boot is enabled.
- Run System Information as administrator and read the Device Encryption Support reason.
- Check whether your Windows edition uses BitLocker instead.
Conclusion
Checking TPM, Secure Boot, and Device Encryption readiness takes only a few minutes and gives you a clear picture of your PC’s security foundation. These features help protect Windows during startup, secure encryption keys, and reduce the risk of data exposure if your device is lost, stolen, or tampered with.If everything checks out, your PC is in good shape for modern Windows security features. If something is missing or disabled, the results above will help you decide whether to adjust firmware settings, enable encryption, or contact your device manufacturer for model-specific guidance.
Key Takeaways:
- TPM 2.0 is required for Windows 11 and supports features like BitLocker and Windows Hello.
- Secure Boot helps block malicious software from loading before Windows starts.
- Device Encryption protects your files automatically on supported Windows 10/11 devices.
- Use
tpm.msc,msinfo32, Windows Security, and Settings to check readiness quickly. - Be careful when changing UEFI/BIOS settings, and back up important data first.
This tutorial was generated to help WindowsForum.com users get the most out of their Windows experience.
Last edited: