Create a Full PC Backup with Backup and Restore (Windows 7) in Windows 10/11
Difficulty: Intermediate | Time Required: 30–60 minutesA full PC backup (also called a system image) is one of the safest ways to protect your Windows installation. If your SSD fails, Windows won’t boot, or an update/driver causes serious problems, a system image lets you restore the entire PC—Windows, apps, settings, and files—to the exact state it was in when you made the backup.
Windows 10 and Windows 11 still include the classic tool labeled “Backup and Restore (Windows 7)”. It’s old, but it remains a practical, built-in option for creating a bare-metal restore image without installing extra software.
Prerequisites
Before you start, make sure you have:Quick walkthrough
- An external drive (USB HDD/SSD) with enough free space
- Rule of thumb: have at least the used space of your Windows drive, plus extra.
- A bit of downtime (backups can take a while).
- Admin access on the PC.
- (Recommended) A USB flash drive (8 GB or larger) if you plan to create recovery media.
Note (Windows 10/11): Microsoft has described this feature as legacy for years, but it still works in many setups. If it fails or you want more flexibility, consider third‑party imaging tools—but this guide focuses on the built-in method.
Step-by-step: Create a full system image backup
Step 1: Connect and prepare your backup drive
- Plug in your external USB drive.
- Confirm it shows up in File Explorer and has sufficient free space.
- (Optional but recommended) If the drive contains important files, copy them elsewhere first—system image folders can get large and you don’t want to run out of space mid-backup.
Tip: A dedicated external drive for backups reduces mistakes and makes restores simpler.
Step 2: Open “Backup and Restore (Windows 7)”
You can access it a few different ways (pick one):Windows 10/11 (fastest method)
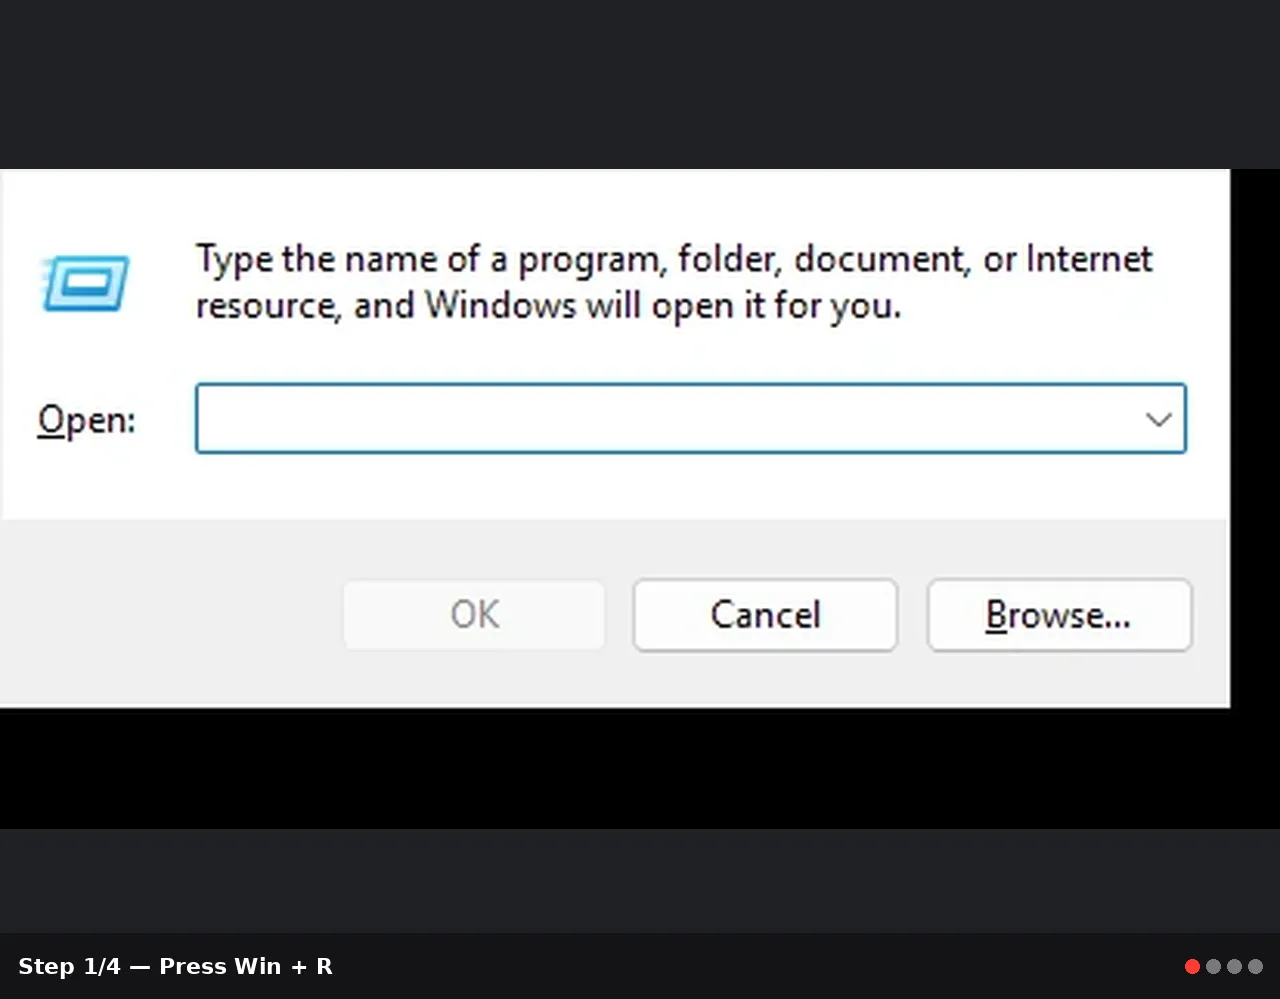
- Press Win + R
- Type:
control - Press Enter
- In Control Panel, set View by: Large icons (top-right)
- Click Backup and Restore (Windows 7)
Alternate method
- Open Start
- Type Control Panel
- Search for Backup and Restore (Windows 7)
Step 3: Start the system image wizard
- In Backup and Restore (Windows 7), click Create a system image (left pane).
- Wait a moment while Windows searches for backup devices.
Step 4: Choose where to save the backup
- Under Where do you want to save the backup?, choose:
- On a hard disk (recommended for most users)
- Select your external USB drive from the drop-down list.
- Click Next.
Warning: Network locations are sometimes available, but restores can be more complicated and slower. For the most reliable restore experience, use an external drive.
Step 5: Confirm which drives will be included
Windows will automatically select the partitions required to start Windows. Common examples:- EFI System Partition (UEFI boot)
- Recovery partition
- (C
") Windows partition
Windows partition - Review the selected drives.
- Click Next.
Important: You generally should not uncheck required system partitions. If they aren’t included, the restore may not boot.
Step 6: Start the backup
- Review the summary screen (backup location + included drives).
- Click Start backup.
- Let it run. This may take 15–60+ minutes depending on:
- Amount of data used on the drive
- External drive speed (HDD vs SSD)
- USB port (USB 2.0 vs 3.x)
- PC performance
- Avoid heavy disk activity (large downloads, game installs, etc..
- Keep the PC plugged in (especially laptops).
Step 7: Finish and verify the backup exists
When complete:- Windows will confirm the system image was created.
- Open the external drive in File Explorer and look for a folder named:
WindowsImageBackup
Warning: Don’t rename theWindowsImageBackupfolder if you want Windows’ recovery tools to find it automatically. Also avoid storing multiple images in confusing folder layouts unless you know how Windows detects images (it can be picky).
Step-by-step: Create recovery media (strongly recommended)
A system image is only half of the plan—you also need a way to boot into recovery if Windows won’t start.Option A: Use Windows Recovery Drive (Windows 10/11)
- Insert a USB flash drive (8 GB+).
- Open Start and type Recovery Drive.
- Launch Create a recovery drive.
- If prompted, allow admin access.
- (Recommended) Check Back up system files to the recovery drive (if available).
- Follow the prompts to create the USB.
This USB can boot your PC and access recovery tools, including restoring a system image.
Option B: Create a System Repair Disc (limited usefulness)
Some PCs (especially without optical drives) won’t use this. If you see the prompt to create a repair disc, you can skip it and use a Recovery Drive instead.Tip: Even if you don’t make a recovery USB right now, at least confirm you know how to reach recovery options: Settings → System → Recovery → Advanced startup (when Windows is still bootable).
How to restore the system image (overview)
You don’t need to restore immediately, but you should know the path in case of emergency.- Connect the external drive containing
WindowsImageBackup. - Boot into Windows Recovery Environment (WinRE) using either:
- Your Recovery Drive, or
- Advanced startup (if Windows still boots)
- Go to: Troubleshoot → Advanced options → System Image Recovery
- Select your Windows installation and choose the system image.
- Follow prompts to restore.
Warning: Restoring a system image typically overwrites the target drive/partitions. Any files added since the backup was made will be lost unless you copied them elsewhere.
Tips, notes, and troubleshooting
Tips for better backups
- Use an SSD external drive if possible—it’s much faster than a spinning HDD.
- Keep at least two backups (e.g., one monthly “baseline” + one recent).
- After creating an image, also back up personal files separately (OneDrive, File History, or manual copies). System images are great for full recovery, but they’re not ideal for grabbing one missing file.
Common issues and fixes
1) “Not enough space” on the backup drive- Delete old images (if you’re sure you don’t need them) or use a larger drive.
- Make sure the external drive isn’t using a restrictive quota or reserved space.
- Try a different USB port (prefer USB 3.x ports directly on the PC).
- Temporarily disable third-party antivirus that might block volume snapshots.
- Run a disk check:
- Open Command Prompt (Admin)
- Run:
chkdsk C: /scan
- Ensure the folder is exactly named
WindowsImageBackupand is at the root of the external drive. - Make sure the external drive is plugged in before entering System Image Recovery.
- If your Windows drive uses BitLocker, keep your recovery key accessible. In some scenarios, recovery tools may request it.
Conclusion
Creating a full system image with Backup and Restore (Windows 7) gives you a reliable “reset button” for worst-case scenarios—drive failure, boot problems, or major Windows corruption. Pair it with a Recovery Drive, and you’ll be able to restore your entire PC to a known-good state with minimal stress.Key Takeaways:
- Create a system image to back up Windows, apps, settings, and files in one recoverable package.
- Save the image to a dedicated external drive and avoid renaming
WindowsImageBackup. - Make a Recovery Drive USB so you can restore even if Windows won’t boot.
- Restoring a system image is powerful but destructive—plan separate backups for recent personal files.
This tutorial was generated to help WindowsForum.com users get the most out of their Windows experience.
Last edited: