

Chrome’s “DNS address could not be found” message—often paired with
Before changing Windows settings:
Also check Airplane mode:
If that does not resolve the issue, open an elevated Command Prompt:
Restart the PC after the commands complete.
For a problem that appears limited to stale DNS information—for example, a site recently moved to a new server—the smaller reset may be enough:
Windows should return a message confirming that it successfully flushed the DNS Resolver Cache.
Open Settings > Network & internet, then select the connected Wi‑Fi or Ethernet network. Find IP assignment and select Edit.
For a normal home network, use Automatic (DHCP) and save the change. This lets the router provide the IP address and DNS servers automatically.
If you intentionally use manual DNS, verify every entered address with the network administrator or DNS provider. On Windows 11, manual configuration also includes DNS over HTTPS options. An encrypted DNS setting that points to an unavailable or incorrectly configured service can prevent lookups. Set it to the appropriate option for the DNS service in use, or return the connection to automatic DHCP while testing.
Do not switch a work device or a network using a fixed IP address to DHCP unless you know it is supported. Static addressing may be required for printers, servers, remote access, or managed networks.
In Google Chrome, open:
Settings > Privacy and security > Security > Use secure DNS
If Chrome is set to a specific custom provider, switch it to the current service provider or temporarily turn off Secure DNS to test. Restart Chrome after changing the setting.
In Microsoft Edge, open:
Settings > Privacy, search, and services > Security > Use secure DNS
Use the same test: remove a custom resolver or temporarily disable the feature, then retry the site.
Also temporarily disconnect any VPN and inspect Windows proxy settings:
On Windows 11:
Settings > Network & internet > Status > Network reset
If the network adapter itself stopped working after an update, reinstalling its driver is another last-resort option. Download a current driver from the PC manufacturer first, preferably on another device and saved to a USB drive. Then open Device Manager, expand Network adapters, right-click the adapter, select Uninstall device, optionally select Attempt to remove the driver for this device, and restart Windows. Windows should reinstall the adapter automatically; use the saved manufacturer driver if it does not.
On work or school PCs, DNS, proxy, VPN, browser extensions, and Secure DNS may be controlled by organization policy. If settings are locked or immediately revert, record the failing site, browser, network name, and exact error message, then contact IT rather than removing managed profiles or security tools.
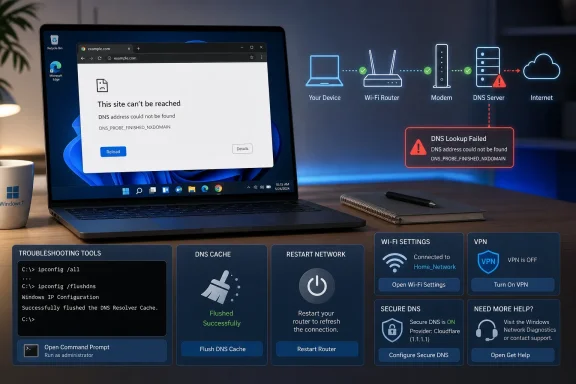
DNS_PROBE_FINISHED_NXDOMAIN—means the browser could not translate a site name such as example.com into an IP address. If one site fails while unrelated sites open normally, the domain or URL is probably the problem. If several sites fail, work through these Windows fixes in order.
 1. Rule out a bad address or site-side DNS failure
Before changing Windows settings:- Retype the address carefully in the browser’s address bar.
- Open several unrelated websites.
- Try the same site in another browser.
- Try it on a phone using cellular data rather than the same Wi‑Fi network.
2. Confirm that Windows has an active connection
Select the Network, Sound, or Battery icon at the right end of the taskbar. Confirm that Wi‑Fi is enabled and that Windows reports the expected network as connected.Also check Airplane mode:
- Open Settings.
- Select Network & internet.
- Open Airplane mode.
- Make sure it is turned off.
3. Restart the modem and router
A router can retain a bad DNS response, lose its connection to the ISP’s DNS servers, or assign unreliable settings to connected devices.- Unplug power from the router.
- Unplug power from the modem or fiber gateway.
- Wait at least 30 seconds.
- Reconnect the modem or gateway first.
- Wait until its normal connection lights return.
- Reconnect the router.
- Wait a few minutes, reconnect Windows to Wi‑Fi, and retry the affected site.
4. Run Windows network diagnostics and reset the DNS cache
Windows 11 includes network diagnostics through the Get Help app. Open Get Help, search for connect to network and internet, and run the suggested diagnostics.If that does not resolve the issue, open an elevated Command Prompt:
- Search for Command Prompt from the taskbar.
- Select Run as administrator.
- Approve the User Account Control prompt.
- Run these commands one at a time:
Code:
netsh winsock reset
netsh int ip reset
ipconfig /release
ipconfig /renew
ipconfig /flushdnsFor a problem that appears limited to stale DNS information—for example, a site recently moved to a new server—the smaller reset may be enough:
ipconfig /flushdnsWindows should return a message confirming that it successfully flushed the DNS Resolver Cache.
5. Forget and reconnect to the Wi‑Fi network
A saved Wi‑Fi profile can retain settings that no longer match the router, especially after a router replacement, security change, or network reconfiguration.- Open Settings > Network & internet > Wi‑Fi.
- Select Manage known networks.
- Select the affected Wi‑Fi network.
- Choose Forget.
- Return to the Wi‑Fi menu, select the network, and enter its password again.
6. Check DNS and DNS over HTTPS settings
Incorrect manually assigned DNS servers are a common reason that Windows can connect to Wi‑Fi but cannot open sites by name.Open Settings > Network & internet, then select the connected Wi‑Fi or Ethernet network. Find IP assignment and select Edit.
For a normal home network, use Automatic (DHCP) and save the change. This lets the router provide the IP address and DNS servers automatically.
If you intentionally use manual DNS, verify every entered address with the network administrator or DNS provider. On Windows 11, manual configuration also includes DNS over HTTPS options. An encrypted DNS setting that points to an unavailable or incorrectly configured service can prevent lookups. Set it to the appropriate option for the DNS service in use, or return the connection to automatic DHCP while testing.
Do not switch a work device or a network using a fixed IP address to DHCP unless you know it is supported. Static addressing may be required for printers, servers, remote access, or managed networks.
7. Disable browser-level DNS, VPN, proxy, and extension interference
If websites work in one browser but not another, the network itself is probably functioning. Focus on the affected browser.In Google Chrome, open:
Settings > Privacy and security > Security > Use secure DNS
If Chrome is set to a specific custom provider, switch it to the current service provider or temporarily turn off Secure DNS to test. Restart Chrome after changing the setting.
In Microsoft Edge, open:
Settings > Privacy, search, and services > Security > Use secure DNS
Use the same test: remove a custom resolver or temporarily disable the feature, then retry the site.
Also temporarily disconnect any VPN and inspect Windows proxy settings:
- Open Settings > Network & internet > Proxy.
- Turn off Use a proxy server unless you deliberately use one.
- Disconnect VPN software and test again.
8. Use Network Reset only after the earlier fixes fail
Windows Network Reset removes and reinstalls network adapters and restores their settings to defaults. It can resolve persistent configuration damage, but it is disruptive: VPN clients, Hyper-V virtual switches, custom adapters, and saved network behavior may need to be configured again. Windows can also classify known networks as Public afterward.On Windows 11:
- Open Settings > Network & internet.
- Select Advanced network settings.
- Choose Network reset.
- Select Reset now, then confirm.
- Let the PC restart.
Settings > Network & internet > Status > Network reset
If the network adapter itself stopped working after an update, reinstalling its driver is another last-resort option. Download a current driver from the PC manufacturer first, preferably on another device and saved to a USB drive. Then open Device Manager, expand Network adapters, right-click the adapter, select Uninstall device, optionally select Attempt to remove the driver for this device, and restart Windows. Windows should reinstall the adapter automatically; use the saved manufacturer driver if it does not.
On work or school PCs, DNS, proxy, VPN, browser extensions, and Secure DNS may be controlled by organization policy. If settings are locked or immediately revert, record the failing site, browser, network name, and exact error message, then contact IT rather than removing managed profiles or security tools.
References
- Primary source: Technobezz
Published: 2026-07-22T18:36:44.484000+00:00
DNS Address Could Not Be Found? 8 Fixes That Work | Technobezz
Fix dns address could not be found with clear Chrome, Windows, Mac, iPhone, Android, router, DNS, and browser steps.www.technobezz.com