Fix Windows 10/11 Search Not Finding Apps or Files by Rebuilding Search Components
Difficulty: Beginner | Time Required: 15 minutesWindows Search is one of those features you do not think about much until it stops working properly. If the Start menu search box is not finding apps, missing files you know are there, or returning incomplete results, the problem is often caused by a damaged search index, stuck search service, or corrupted system search components.
The good news is that in Windows 10 and Windows 11, you can usually fix this by rebuilding the search index and restarting the related services. This guide walks you through the safest beginner-friendly steps to restore search without advanced tools or risky changes.
What this fixes
This tutorial can help if you are seeing issues like:Quick walkthrough
- Search does not find installed apps
- Files appear in File Explorer but not in search results
- Start menu search is blank, slow, or incomplete
- Search results seem outdated
- Windows Search freezes or crashes
Prerequisites
Before you begin, make sure you have:- A Windows 10 or Windows 11 PC
- An account with administrator privileges
- A few minutes of free time while Windows rebuilds search components
Note: Rebuilding the search index does not delete your files or apps. It only makes Windows create a fresh searchable database.
Step 1: Confirm the problem is related to Windows Search
Before rebuilding anything, quickly test where the issue appears:- Press Windows + S to open Search.
- Type the name of an app you know is installed, such as Notepad or Calculator.
- Then search for a file you know exists in your Documents folder.
- Open File Explorer and manually verify the file is really present.
Tip: If only one specific folder is not searchable, the problem may be with indexing locations rather than the whole search system.
Step 2: Run the built-in Search troubleshooter
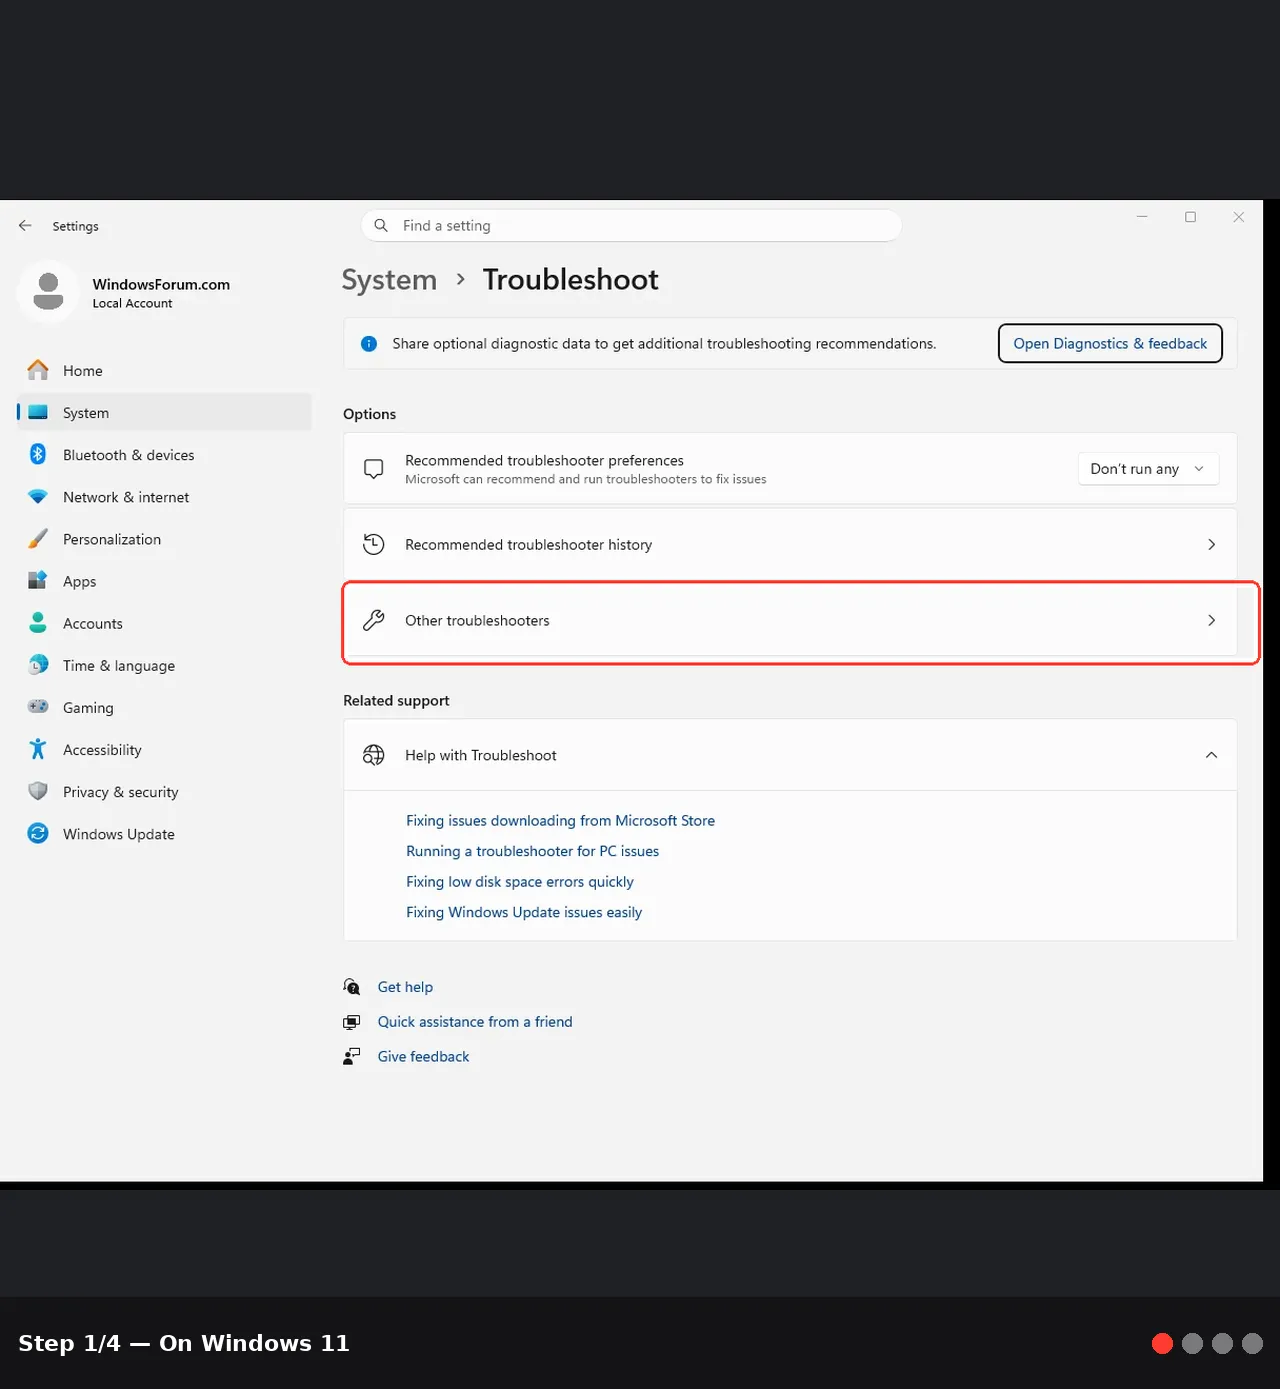
Windows includes a troubleshooter that can automatically detect and repair common search issues.On Windows 11
- Press Windows + I to open Settings.
- Go to System > Troubleshoot > Other troubleshooters.
- Find Search and Indexing.
- Click Run.
On Windows 10
- Press Windows + I to open Settings.
- Go to Update & Security > Troubleshoot.
- Click Additional troubleshooters.
- Select Search and Indexing.
- Click Run the troubleshooter.
- Check the problems that match your issue, such as:
- Files do not appear in search results
- Search or indexing is slowing down the computer
- Outlook search is not returning results, if applicable
- Click Next and follow the prompts.
- Apply any suggested fixes.
Note: Even if the troubleshooter says it fixed something, continue to the next steps if search is still unreliable.
Step 3: Restart the Windows Search service
A stuck or unresponsive search service can cause search to stop finding apps or files.- Press Windows + R to open the Run dialog.
- Type
services.mscand press Enter. - In the Services window, scroll down to Windows Search.
- Right-click Windows Search and choose Restart.
- Right-click Windows Search and choose Start.
- Double-click Windows Search.
- Make sure Startup type is set to Automatic (Delayed Start).
- Click Apply, then OK.
- Press Windows + S again.
- Search for an app and a file.
- Check whether results are now appearing correctly.
Warning: Do not disable the Windows Search service unless you specifically want search indexing turned off. Disabling it usually makes search worse, not better.
Step 4: Rebuild the Windows Search index
If the search database is corrupted or incomplete, rebuilding it is often the most effective fix.- Open Control Panel.
- You can press Windows + S, type Control Panel, and open it.
- Set View by to Large icons or Small icons.
- Click Indexing Options.
In the Indexing Options window:
- Review the number of included locations.
- If needed, click Modify to make sure folders like Users, Documents, Desktop, and other important locations are selected.
- Click Advanced.
- Click Rebuild under Troubleshooting.
- When prompted, click OK to confirm.
What to expect
- Search results may be incomplete while the rebuild is in progress
- On larger drives, rebuilding can take some time
- Your PC may feel slightly busier during indexing
Tip: Leave the PC on and plugged in for a while after rebuilding so indexing can finish properly.
Step 5: Check Enhanced vs Classic search settings
Windows 10 and 11 can use different search indexing modes. If your files are outside standard folders, they may not be indexed in Classic mode.On Windows 11
- Open Settings.
- Go to Privacy & security > Searching Windows.
On Windows 10
- Open Settings.
- Go to Search > Searching Windows.
- Find My Files
- Classic searches common folders and libraries
- Enhanced searches the entire PC
- If your files are stored outside common folders, select Enhanced.
- Review the Excluded folders list and remove any folder you want indexed.
Note: Enhanced mode can improve results, but it may use more system resources during the initial indexing period.
Step 6: Restart the Search process from Task Manager
If the search interface itself is broken, restarting its process can help.- Press Ctrl + Shift + Esc to open Task Manager.
- If needed, click More details.
- Look for one or more of the following processes:
- Search
- SearchHost.exe
- SearchApp.exe
- Select the process and click End task.
Windows should automatically restart the search process. After a few seconds:
- Press Windows + S
- Test search again
Tip: In newer Windows 11 builds, process names may vary slightly, but anything clearly related to Search can usually be safely restarted.
Step 7: Repair Windows system files if search still fails
If rebuilding the index does not help, some Windows system files may be damaged.- Right-click the Start button.
- Choose Windows Terminal (Admin) or Command Prompt (Admin).
- Run the following command:
sfc /scannow- Wait for the scan to complete.
- If it reports issues fixed, restart your PC.
Code:
DISM /Online /Cleanup-Image /RestoreHealth
sfc /scannowWarning: These scans can take some time. Do not close the window until the process finishes.
Step 8: Reboot and allow indexing to complete
After making repairs:- Restart your PC.
- Sign back in and leave the system idle for several minutes.
- Try searching again for:
- Installed apps
- Recent files
- Documents in common folders
Tips and troubleshooting notes
If Search finds apps but not files
Check Searching Windows settings and make sure your file locations are indexed. Rebuilding alone may not help if the folder is excluded.If Search finds files but not installed apps
Restart the Windows Search service and the search process from Task Manager. Also make sure Windows is fully updated.If indexing seems stuck
Open Indexing Options and check whether the number of indexed items is increasing. If not, restart the PC and the Windows Search service again.If the issue started after an update
Install the latest cumulative update, as Microsoft often fixes search-related bugs through Windows Update.For laptops
Keep the device plugged in during indexing. Some power-saving settings can slow background indexing.Helpful note: Search performance is usually best when important files are stored in standard indexed locations such as Desktop, Documents, Pictures, and Downloads.
Conclusion
When Windows Search stops finding apps or files, the cause is often a damaged index or a stuck search component rather than missing data. By running the Search troubleshooter, restarting the Windows Search service, rebuilding the index, and checking your indexing settings, you can usually restore fast and accurate results in just a few minutes.If needed, running SFC and DISM adds an extra layer of repair by fixing damaged Windows system files. Once everything is working again, Windows Search should feel faster, more complete, and much more reliable.
Key Takeaways:
- Rebuilding the Windows Search index can fix missing or incomplete search results
- Restarting the Windows Search service often resolves stuck or unresponsive search behavior
- Classic and Enhanced search settings affect which files Windows can find
- SFC and DISM can repair deeper system file problems that break search
- Allow time after rebuilding for indexing to fully complete
This tutorial was generated to help WindowsForum.com users get the most out of their Windows experience.
Last edited: