Creating a Windows ISO can be an essential task for IT professionals and enthusiasts. This guide will take you through the process step-by-step using UUPDump.
Step 1: Access UUPDump
1. Open your preferred web browser.
2. Go to the UUPDump website: UUPDump
3. Alternatively access or visit our API integration to list Windows builds here: Latest Windows Builds
Step 2: Choose Your Windows Build
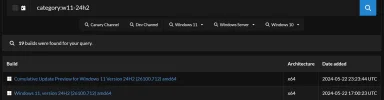
On the UUPDump homepage, you will see a list of available builds. These can include the latest Insider Preview builds, stable builds, and specific version releases. Use the search bar to find specific versions or click on one of the displayed builds.

Step 3: Select Edition and Language
After selecting the desired build, you will be directed to a page with more options. Choose the edition of Windows you want to download (e.g., Windows Home, Pro, Enterprise, etc.), then click on "Next."
Step 4: Choose Your Language
Select the language you want your Windows ISO to be in (e.g., English, German, etc.), and click on "Next."

Step 5: Select Download Options
You will be given options to select the architecture (x64, x86, ARM) and to include additional updates if available. Make your selections and click on "Next."


Step 6: Download the Script
UUPDump will generate a set of files and scripts necessary to download and create the Windows ISO. Click on "Download .zip" to download the script package to your computer.
Step 7: Extract the Script
Once the .zip file is downloaded, extract its contents to a folder on your computer.
Step 8: Run the Script
Open the extracted folder. Depending on your operating system, you will see scripts for different platforms (Windows, Linux, MacOS). For Windows, double-click the uup_download_windows.cmd file to run the script. For Linux or MacOS, use the appropriate script (e.g., uup_download_linux.sh for Linux).

The script will open a command prompt (or terminal) window and start downloading the necessary files. This process may take some time, depending on your internet speed.
Step 9: Create the ISO
Once the download is complete, the script will automatically begin to create the Windows ISO file. Wait for the process to complete. The command prompt (or terminal) will indicate when the ISO creation is finished.
Step 10: Locate Your ISO File
After the process completes, navigate to the folder where the script was run. You will find your newly created Windows ISO file in this folder.
Step 11: Verify the ISO (Optional)
It is a good practice to verify the integrity of your ISO file. You can use tools like SHA256 checksum to ensure the ISO file has been created correctly and is not corrupted.
Step 12: Use the ISO File
You can now use this ISO file to create a bootable USB drive using tools like Rufus or directly mount the ISO to upgrade or install Windows.
Troubleshooting Common Issues
1. Script Not Running or Errors:
- Make sure your antivirus or firewall isn’t blocking the script. Temporarily disable them if necessary and try running the script again.
- Ensure you are running the script with administrator privileges. On Windows, right-click the uup_download_windows.cmd file and select "Run as administrator."
2. Slow Download Speeds:
- Check your internet connection to ensure it's stable.
- Try running the script at a different time when network traffic might be lower.
- Use a wired internet connection for potentially faster and more reliable downloads compared to Wi-Fi.
3. ISO Creation Fails:
- Ensure there’s enough disk space on your computer before starting the download and ISO creation process.
- If you encounter errors during the ISO creation process, note any error messages and search for solutions specific to those errors. Often, community forums and UUPDump’s support section have solutions to common problems.
4. Corrupted ISO File:
- Verify the integrity of the ISO by comparing the downloaded file's checksum with the expected value. Use tools like HashTab on Windows to calculate checksums.
Advanced Tips for Power Users
1. Customizing Windows Installations:
- After creating the ISO, you can customize it further using tools like NTLite, which allows you to integrate updates, drivers, and software into the ISO file before installation.
2. Automating the Process:
- For IT professionals who frequently create ISOs, consider automating the process using batch scripts. This can save time, especially when dealing with multiple builds.
3. Creating USB Bootable Drives:
- Use Rufus, Media Creation Tool, or Windows USB/DVD Download Tool to create bootable USB drives from the ISO. These tools offer different options for UEFI, MBR, and other configurations.
4. Virtual Machine Testing:
- Before deploying the ISO on physical hardware, consider testing it on a virtual machine using software like VMware or VirtualBox. This allows you to ensure everything works correctly and customize settings as needed.
Is UUPDump Legal?
Yes, UUPDump is legal. UUPDump does not host or distribute any actual Windows ISO files or proprietary Microsoft software. Instead, it provides users with scripts and tools that utilize Microsoft's own UUP (Unified Update Platform) files, which are publicly available from Microsoft's servers. These files are used by Windows Update to deliver feature updates and new builds to Windows users. UUPDump simply automates the process of obtaining these updates and creating an ISO from them. Users are still subject to Microsoft's terms of service and must have a valid license for the Windows version they install.
By following these steps, you can successfully create a Windows ISO using UUPDump. If you encounter any issues or have questions, feel free to post them in the forum for assistance.
Step 1: Access UUPDump
1. Open your preferred web browser.
2. Go to the UUPDump website: UUPDump
3. Alternatively access or visit our API integration to list Windows builds here: Latest Windows Builds
Step 2: Choose Your Windows Build
On the UUPDump homepage, you will see a list of available builds. These can include the latest Insider Preview builds, stable builds, and specific version releases. Use the search bar to find specific versions or click on one of the displayed builds.
Step 3: Select Edition and Language
After selecting the desired build, you will be directed to a page with more options. Choose the edition of Windows you want to download (e.g., Windows Home, Pro, Enterprise, etc.), then click on "Next."
Step 4: Choose Your Language
Select the language you want your Windows ISO to be in (e.g., English, German, etc.), and click on "Next."
Step 5: Select Download Options
You will be given options to select the architecture (x64, x86, ARM) and to include additional updates if available. Make your selections and click on "Next."
Step 6: Download the Script
UUPDump will generate a set of files and scripts necessary to download and create the Windows ISO. Click on "Download .zip" to download the script package to your computer.
Step 7: Extract the Script
Once the .zip file is downloaded, extract its contents to a folder on your computer.
Step 8: Run the Script
Open the extracted folder. Depending on your operating system, you will see scripts for different platforms (Windows, Linux, MacOS). For Windows, double-click the uup_download_windows.cmd file to run the script. For Linux or MacOS, use the appropriate script (e.g., uup_download_linux.sh for Linux).
The script will open a command prompt (or terminal) window and start downloading the necessary files. This process may take some time, depending on your internet speed.
Step 9: Create the ISO
Once the download is complete, the script will automatically begin to create the Windows ISO file. Wait for the process to complete. The command prompt (or terminal) will indicate when the ISO creation is finished.
Step 10: Locate Your ISO File
After the process completes, navigate to the folder where the script was run. You will find your newly created Windows ISO file in this folder.
Step 11: Verify the ISO (Optional)
It is a good practice to verify the integrity of your ISO file. You can use tools like SHA256 checksum to ensure the ISO file has been created correctly and is not corrupted.
Step 12: Use the ISO File
You can now use this ISO file to create a bootable USB drive using tools like Rufus or directly mount the ISO to upgrade or install Windows.
Troubleshooting Common Issues
1. Script Not Running or Errors:
- Make sure your antivirus or firewall isn’t blocking the script. Temporarily disable them if necessary and try running the script again.
- Ensure you are running the script with administrator privileges. On Windows, right-click the uup_download_windows.cmd file and select "Run as administrator."
2. Slow Download Speeds:
- Check your internet connection to ensure it's stable.
- Try running the script at a different time when network traffic might be lower.
- Use a wired internet connection for potentially faster and more reliable downloads compared to Wi-Fi.
3. ISO Creation Fails:
- Ensure there’s enough disk space on your computer before starting the download and ISO creation process.
- If you encounter errors during the ISO creation process, note any error messages and search for solutions specific to those errors. Often, community forums and UUPDump’s support section have solutions to common problems.
4. Corrupted ISO File:
- Verify the integrity of the ISO by comparing the downloaded file's checksum with the expected value. Use tools like HashTab on Windows to calculate checksums.
Advanced Tips for Power Users
1. Customizing Windows Installations:
- After creating the ISO, you can customize it further using tools like NTLite, which allows you to integrate updates, drivers, and software into the ISO file before installation.
2. Automating the Process:
- For IT professionals who frequently create ISOs, consider automating the process using batch scripts. This can save time, especially when dealing with multiple builds.
3. Creating USB Bootable Drives:
- Use Rufus, Media Creation Tool, or Windows USB/DVD Download Tool to create bootable USB drives from the ISO. These tools offer different options for UEFI, MBR, and other configurations.
4. Virtual Machine Testing:
- Before deploying the ISO on physical hardware, consider testing it on a virtual machine using software like VMware or VirtualBox. This allows you to ensure everything works correctly and customize settings as needed.
Is UUPDump Legal?
Yes, UUPDump is legal. UUPDump does not host or distribute any actual Windows ISO files or proprietary Microsoft software. Instead, it provides users with scripts and tools that utilize Microsoft's own UUP (Unified Update Platform) files, which are publicly available from Microsoft's servers. These files are used by Windows Update to deliver feature updates and new builds to Windows users. UUPDump simply automates the process of obtaining these updates and creating an ISO from them. Users are still subject to Microsoft's terms of service and must have a valid license for the Windows version they install.
By following these steps, you can successfully create a Windows ISO using UUPDump. If you encounter any issues or have questions, feel free to post them in the forum for assistance.
Attachments
Last edited:


