Set Up Windows Defender Credential Guard in Windows 10/11 to Protect Saved Credentials
Difficulty: Intermediate | Time Required: 20 minutesWindows Defender Credential Guard is one of the most effective built-in protections in Windows 10 and Windows 11 for defending stored sign-in secrets against theft. It helps isolate credentials such as NTLM password hashes and Kerberos Ticket Granting Tickets using virtualization-based security, making it much harder for malware or attackers to extract them from memory.
If you use your PC for work, remote access, domain sign-ins, or just want stronger protection against credential theft, enabling Credential Guard is a smart security upgrade. In this guide, I’ll walk you through what you need, how to enable it, and how to confirm it’s working.
What Credential Guard Does
Credential Guard uses virtualization-based security (VBS) to separate and protect sensitive authentication data from the rest of the operating system. This means even if malicious software gains elevated access, it has a much harder time reading saved credentials from the LSASS process.This is especially useful against attacks such as:
Quick walkthrough
- Pass-the-Hash
- Pass-the-Ticket
- Credential dumping
- Some forms of lateral movement in business networks
Prerequisites
Before you begin, make sure the following requirements are met:- Windows 10 Enterprise, Education, or Pro
- Windows 11 Enterprise, Education, or Pro
- A 64-bit CPU with virtualization support
- UEFI firmware
- Secure Boot enabled
- Hardware virtualization enabled in BIOS/UEFI:
- Intel VT-x
- AMD-V
- Administrator access on the PC
Note: Credential Guard is best supported on modern hardware. Some older systems may support only partial virtualization-based security features.
Important: Windows Home editions generally do not provide the full policy management options used in this guide.
Before You Start
It’s a good idea to check whether virtualization is already enabled.Check virtualization status
- Press Ctrl + Shift + Esc to open Task Manager.
- Click the Performance tab.
- Select CPU.
- Look for Virtualization in the lower-right area.
Method 1: Enable Credential Guard Using Local Group Policy
This is the easiest method for most Windows Pro, Enterprise, and Education users.- Press Windows + R, type
gpedit.msc, and press Enter. - In Local Group Policy Editor, navigate to:
Computer Configuration > Administrative Templates > System > Device Guard - Double-click Turn On Virtualization Based Security.
- Set the policy to Enabled.
- Under Select Platform Security Level, choose:
- Secure Boot, or
- Secure Boot and DMA Protection if your hardware supports it
- Under Credential Guard Configuration, select:
- Enabled with UEFI lock for stronger protection, or
- Enabled without lock if you may want to disable it later without firmware-level changes
- If available, review the Virtualization Based Protection of Code Integrity options and leave them at default unless your organization specifically requires changes.
- Click Apply, then OK.
- Restart your PC.
Tip: Choose Enabled with UEFI lock for the strongest tamper resistance. However, removing it later may require additional configuration steps.
Method 2: Enable Credential Guard Using the Registry
If Group Policy Editor is unavailable or you prefer a manual approach, you can enable Credential Guard through the Windows Registry.Warning: Editing the registry incorrectly can cause system issues. Consider creating a restore point first.
Step 1: Open Registry Editor
- Press Windows + R, type
regedit, and press Enter. - Approve the UAC prompt.
Step 2: Configure virtualization-based security
Navigate to:
HKEY_LOCAL_MACHINE\SYSTEM\CurrentControlSet\Control\DeviceGuard- If needed, create or modify these DWORD (32-bit) values:
EnableVirtualizationBasedSecurity=1RequirePlatformSecurityFeatures=1
RequirePlatformSecurityFeatures=3
Step 3: Configure Credential Guard
Navigate to:
HKEY_LOCAL_MACHINE\SYSTEM\CurrentControlSet\Control\Lsa- Create or modify this DWORD (32-bit) value:
LsaCfgFlags=1for Enabled with UEFI lock2for Enabled without lock- Close Registry Editor.
- Restart your PC.
Method 3: Enable Credential Guard with PowerShell
Advanced users and administrators may prefer PowerShell, especially when configuring multiple systems.- Open Windows PowerShell or Terminal as Administrator.
- Run the following commands:
Code:
reg add "HKLM\SYSTEM\CurrentControlSet\Control\DeviceGuard" /v EnableVirtualizationBasedSecurity /t REG_DWORD /d 1 /f
reg add "HKLM\SYSTEM\CurrentControlSet\Control\DeviceGuard" /v RequirePlatformSecurityFeatures /t REG_DWORD /d 1 /f
reg add "HKLM\SYSTEM\CurrentControlSet\Control\Lsa" /v LsaCfgFlags /t REG_DWORD /d 1 /f- Restart your PC.
reg add "HKLM\SYSTEM\CurrentControlSet\Control\Lsa" /v LsaCfgFlags /t REG_DWORD /d 2 /fHow to Verify Credential Guard Is Enabled
After rebooting, confirm that Credential Guard is active.
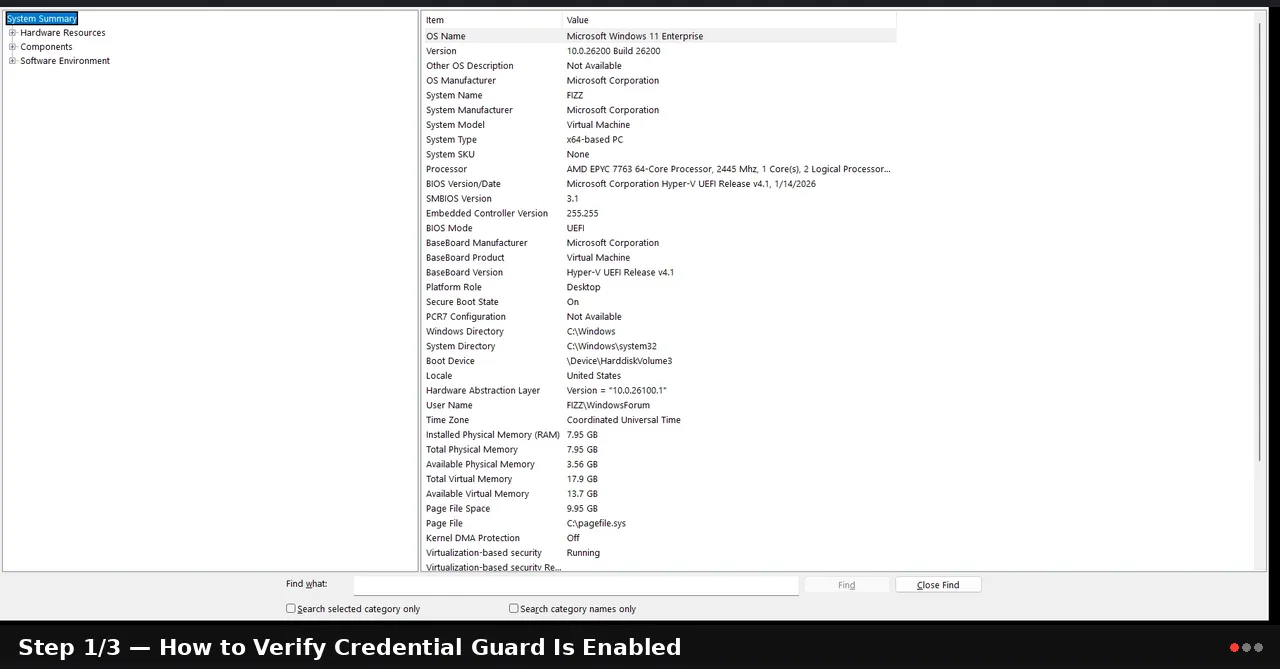
Option 1: System Information
- Press Windows + R, type
msinfo32, and press Enter. - In System Summary, look for:
- Device Guard Security Services Running
- Virtualization-based security
- You should see entries indicating that Credential Guard is running.
Option 2: PowerShell
Open PowerShell as Administrator and run:Get-CimInstance -ClassName Win32_DeviceGuard -Namespace root\Microsoft\Windows\DeviceGuardLook for values showing that virtualization-based security and security services are enabled.
Tip: On some systems, the output may be more technical than user-friendly. The msinfo32 method is usually easier for most users.
Windows 10 and Windows 11 Notes
- On Windows 11, virtualization-based security features are more common on newer devices and may already be partially enabled.
- On Windows 10 version 2004 and later, Credential Guard support is generally improved on compatible hardware.
- On business-class laptops and desktops, Secure Boot and TPM are often already enabled, making setup easier.
- Some OEM systems may use BIOS labels like SVM Mode, Intel Virtualization Technology, or Virtualization Extensions.
Tips and Troubleshooting
1. Group Policy setting is missing
If you don’t see the Device Guard policy path, you may be using an unsupported edition of Windows or a device with limited policy tools.2. Virtualization is disabled
If Task Manager shows virtualization as disabled:- Restart your PC.
- Enter BIOS/UEFI setup.
- Enable:
- Intel Virtualization Technology (VT-x) or
- AMD-V / SVM Mode
- Save changes and boot back into Windows.
3. Secure Boot is not enabled
Credential Guard works best with Secure Boot.To check:
- Press Windows + R
- Type
msinfo32 - Look for Secure Boot State
4. Incompatibility with older security tools
Some older endpoint security, anti-cheat, debugging, or virtualization tools may conflict with VBS features.Note: If you rely on older low-level software, test Credential Guard carefully before deploying it across multiple PCs.
5. Domain or enterprise environment considerations
In business environments, Credential Guard may also be deployed through:- Group Policy in Active Directory
- Microsoft Intune
- Mobile device management solutions
6. How to disable Credential Guard
If needed, reverse the Group Policy setting or change/remove the registry values you created. Then restart the PC.If you enabled UEFI lock, disabling may require extra steps and possibly firmware-related changes. For that reason, home and small-business users may prefer Enabled without lock unless maximum tamper protection is required.
Conclusion
Windows Defender Credential Guard is a valuable security feature that helps protect one of the most sensitive parts of your system: your stored authentication secrets. By isolating credentials using virtualization-based security, it reduces the risk of credential dumping and other common attack techniques.If your PC supports it, enabling Credential Guard is a worthwhile step toward a more secure Windows setup, especially for users who handle work accounts, remote access, or sensitive data.
Key Takeaways:
- Credential Guard helps protect saved credentials from theft by isolating them from the main OS
- It uses virtualization-based security and works best with Secure Boot and UEFI
- The easiest setup method for most users is through Local Group Policy
- You can verify it’s running using msinfo32 or PowerShell
- It is especially useful on business systems or any PC where account security matters
This tutorial was generated to help WindowsForum.com users get the most out of their Windows experience.
Last edited: