

A microphone problem is rarely as simple as a broken microphone. In most cases, the hardware is working but the operating system, browser, meeting app, privacy permission, or an overlooked mute control is preventing it from being heard. The fastest way to isolate the cause is to test the microphone in layers: first at the device level, then in the app or website where the problem occurs.
That approach avoids a common troubleshooting trap. If a microphone works in Windows Sound settings, Voice Memos, or a built-in recorder, replacing the headset will not solve a Zoom, Teams, Chrome, or Discord configuration problem. Conversely, if a system-level test cannot record a clear voice sample, changing browser permissions is unlikely to help.
This guide covers practical microphone testing on Windows PCs, Macs, iPhones, iPads, Android phones, Samsung Galaxy devices, Chromebooks, web browsers, and popular meeting apps. It also explains what each result means, where permissions can fail, and when a seemingly dead microphone is actually muted.
Before opening a meeting app, think of microphone troubleshooting as three separate checks.
The goal is not simply to see an input meter move. A reliable microphone test should confirm that the correct device is selected, audio is intelligible during playback, and the app that matters can access it.
This test is especially helpful when several devices appear in the input list, such as:
In Windows 11, go to:
Start > Settings > Privacy & security > Microphone
Confirm that these controls are enabled where appropriate:
On Windows 10, the comparable page is:
Start > Settings > Privacy > Microphone
Apple menu > System Settings > Sound > Input
Select the intended microphone, then speak at a normal volume. The input level indicator should react consistently to your voice. Adjust the input volume slider if the signal is unusually low.
If the meter does not move, confirm that the correct microphone is selected. Macs may show several possible sources, including the internal microphone, an external display, AirPods, a USB microphone, a webcam, or an audio interface.
Apple menu > System Settings > Privacy & Security > Microphone
Enable microphone access for the affected app. If the app does not appear in the list, it may not have requested access yet, or it may need to be restarted before the permission prompt appears again.
A Mac can also direct audio to an unexpected source when external devices are connected. Disconnecting a display, dock, headset, or audio interface temporarily can quickly reveal whether macOS has selected the wrong input.
This test is useful because it checks the microphone commonly used in everyday recordings and phone calls. However, modern iPhones contain multiple microphones, and a successful Voice Memos recording does not prove that every microphone used for speakerphone, video, or noise reduction is functioning correctly.
Before assuming hardware failure, remove bulky cases, screen protectors, films, or accessories that may partially cover a microphone. Carefully clear visible debris from openings without inserting sharp objects into the device.
Settings > Privacy & Security > Microphone
Enable access for the affected app. If an app is not listed, reinstalling it or triggering a new microphone request may be necessary.
The orange privacy indicator that appears when an app accesses the microphone is also useful. It does not prove the app is receiving good audio, but it does confirm that iOS or iPadOS recognizes microphone activity.
Android also includes a global microphone control in Quick Settings on supported versions. Swipe down twice and look for the Microphone tile. If microphone access has been turned off globally, apps cannot record sound even when their individual permission is set to Allow.
This is an important privacy feature, but it can be easy to activate accidentally. A globally disabled microphone often creates the appearance of a hardware fault.
Settings > Security & privacy or Privacy > Privacy dashboard > Microphone
The dashboard shows which apps accessed the microphone recently. Depending on the Android version, the history may cover the last 24 hours or the previous seven days.
This is helpful for two reasons. First, it can identify an app that is unexpectedly using the microphone. Second, it can confirm that a target app never reached the microphone at all, making an app permission or browser permission issue more likely.
Settings > Privacy and security > Privacy controls
Turn on Microphone access. If this global setting is disabled, apps and websites cannot use the microphone regardless of their own permissions.
Some Chromebooks also have physical privacy switches or keyboard controls. Check those before changing deeper settings. A hardware microphone switch overrides software permissions.
Managed school and work Chromebooks may have controls enforced by an administrator. If the settings are locked, unavailable, or accompanied by a managed-device notice, local troubleshooting may not be enough.
More > Settings > Privacy and security > Site settings > Microphone
From there, choose the default microphone and review websites that are allowed or blocked. Remove outdated exceptions, especially if a site was accidentally denied in the past.
When a website asks for microphone access, choose Allow only if you trust the site and expect it to use voice input. If a site does not prompt, click the controls near the address bar to inspect its current microphone permission.
On Android, Chrome’s site settings can also block microphone use independently of the Android app permission. Check both Chrome’s permission and Android’s system permission when browser voice features fail.
Settings and more > Settings > Cookies and site permissions > Microphone
Ensure that Ask before accessing is enabled. Then review whether the affected website is blocked or whether Edge is pointed at the wrong default input device.
Safari > Settings > Websites > Microphone
Set the relevant website to Ask, Allow, or Deny. If a meeting service has been denied previously, change the setting to Ask or Allow and reload the page.
Menu > Settings > Privacy & Security > Permissions > Microphone > Settings
Review the sites listed there. A website set to Block will not be able to request microphone access until its stored permission is changed or removed.
On mobile, Zoom’s test meeting can provide an end-to-end check of the phone’s speaker and microphone permissions.
During a call, open More options > Settings > Audio to change the microphone. If Meet is receiving sound but participants still cannot hear you, verify that the meeting’s microphone button is not muted and that the browser has permission.
Preferences > Audio & video
Choose the microphone from the available device list and speak. The input indicator should react. If it does not, revisit system permissions and ensure Slack is not set to an old USB or Bluetooth device that is no longer connected.
Common examples include:
Also examine microphone openings on phones, laptops, webcams, and headsets. Dust, lint, cosmetic skins, thick cases, and poorly aligned accessories can significantly degrade audio quality. Never use pins or excessive force to clear an opening; a soft brush or gentle air cleaning is safer.
Skype Echo is no longer a current consumer microphone-testing path. Likewise, old instructions centered on Cortana microphone setup do not reflect the current Windows experience.
For modern Windows voice features, use one of these instead:
Reliable microphone testing is ultimately about separating input detection, recording quality, and app access. Test from the bottom up, confirm playback rather than relying only on a moving meter, and check permissions before replacing equipment. That method resolves the majority of microphone failures without unnecessary purchases, driver hunting, or last-minute meeting disruptions.
That approach avoids a common troubleshooting trap. If a microphone works in Windows Sound settings, Voice Memos, or a built-in recorder, replacing the headset will not solve a Zoom, Teams, Chrome, or Discord configuration problem. Conversely, if a system-level test cannot record a clear voice sample, changing browser permissions is unlikely to help.
This guide covers practical microphone testing on Windows PCs, Macs, iPhones, iPads, Android phones, Samsung Galaxy devices, Chromebooks, web browsers, and popular meeting apps. It also explains what each result means, where permissions can fail, and when a seemingly dead microphone is actually muted.
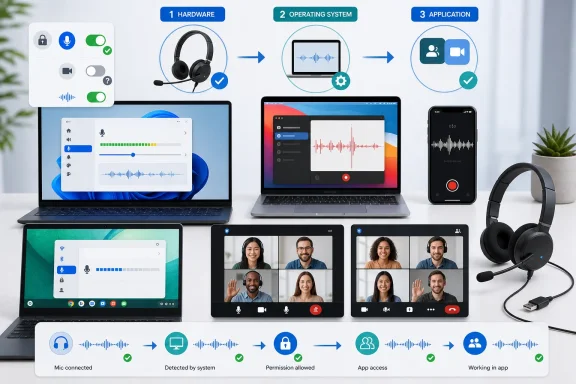 Start With a Three-Layer Microphone Test
Before opening a meeting app, think of microphone troubleshooting as three separate checks.- Hardware layer — Is the microphone connected, powered, unmuted, and physically unobstructed?
- Operating system layer — Can Windows, macOS, iOS, Android, or ChromeOS detect and record audio?
- Application layer — Has the specific app or website selected the correct microphone and received permission to use it?
The goal is not simply to see an input meter move. A reliable microphone test should confirm that the correct device is selected, audio is intelligible during playback, and the app that matters can access it.
Test a Microphone on Windows 11 and Windows 10
Windows includes one of the most useful built-in microphone tests because it records a short sample and plays it back. That is more meaningful than an input meter alone: a meter can react to noise, while playback tells you whether the microphone is capturing understandable speech.Use Windows Sound Settings First
On a Windows 11 PC:- Open Start > Settings > System > Sound.
- Scroll to Input.
- Select the microphone you want to test.
- Open its Properties page.
- Under Input settings, choose Start test.
- Speak normally for several seconds.
- Select Stop test, then choose Play to hear the recording.
This test is especially helpful when several devices appear in the input list, such as:
- A laptop’s built-in microphone array
- A USB microphone
- A Bluetooth headset
- A webcam microphone
- An HDMI display or docking-station audio device
- Virtual audio drivers installed by recording, streaming, or noise-cancellation software
Check Windows Microphone Privacy Settings
When the Windows test works but an app cannot hear you, the next likely issue is privacy access.In Windows 11, go to:
Start > Settings > Privacy & security > Microphone
Confirm that these controls are enabled where appropriate:
- Microphone access
- Let apps access your microphone
- Let desktop apps access your microphone
On Windows 10, the comparable page is:
Start > Settings > Privacy > Microphone
When Windows Sees the Microphone but Records Nothing
A visible microphone is not necessarily an active microphone. If Windows lists the device but the test produces no meaningful recording, work through these checks:- Unplug and reconnect wired USB microphones and headsets.
- Try a different USB port, preferably one directly on the PC rather than a hub.
- Charge Bluetooth devices and reconnect them through Bluetooth settings.
- Disable any physical mute switch on the headset, microphone body, keyboard, or laptop.
- Ensure the microphone is not selected as a disabled or inactive input device.
- Close apps that may have exclusive control over professional audio hardware.
- Check audio-control utilities from headset or laptop manufacturers for mute, sidetone, noise reduction, or profile settings.
Test a Microphone on a Mac
macOS offers two complementary microphone tests: an input-level check in System Settings and a simple recording test in Voice Memos. Use both when possible.Check the Input Meter in macOS
Open:Apple menu > System Settings > Sound > Input
Select the intended microphone, then speak at a normal volume. The input level indicator should react consistently to your voice. Adjust the input volume slider if the signal is unusually low.
If the meter does not move, confirm that the correct microphone is selected. Macs may show several possible sources, including the internal microphone, an external display, AirPods, a USB microphone, a webcam, or an audio interface.
Record a Sample in Voice Memos
For a real-world check, open Voice Memos:- Select the Record button.
- Speak normally for several seconds.
- Stop the recording.
- Play it back through headphones or speakers.
Allow an Individual Mac App to Use the Microphone
If Voice Memos works but Safari, Zoom, Teams, Discord, or another app does not, open:Apple menu > System Settings > Privacy & Security > Microphone
Enable microphone access for the affected app. If the app does not appear in the list, it may not have requested access yet, or it may need to be restarted before the permission prompt appears again.
A Mac can also direct audio to an unexpected source when external devices are connected. Disconnecting a display, dock, headset, or audio interface temporarily can quickly reveal whether macOS has selected the wrong input.
Test an iPhone or iPad Microphone
On iPhone and iPad, the most dependable basic test is a local recording. It avoids relying on cellular coverage, call routing, or a particular app’s settings.Use Voice Memos for the Primary Test
Open Voice Memos and follow these steps:- Tap Record.
- Speak near the bottom of the iPhone or iPad.
- Stop the recording.
- Play it back.
This test is useful because it checks the microphone commonly used in everyday recordings and phone calls. However, modern iPhones contain multiple microphones, and a successful Voice Memos recording does not prove that every microphone used for speakerphone, video, or noise reduction is functioning correctly.
Test Video and Speakerphone Microphones With Camera
To test microphones involved in video recording and speakerphone behavior:- Open the Camera app.
- Record a short video while speaking near the top of the iPhone.
- Switch to the other camera.
- Record another short video while speaking normally.
- Play both clips back.
Before assuming hardware failure, remove bulky cases, screen protectors, films, or accessories that may partially cover a microphone. Carefully clear visible debris from openings without inserting sharp objects into the device.
Check iPhone and iPad App Permissions
When recording works but a single app cannot hear you, open:Settings > Privacy & Security > Microphone
Enable access for the affected app. If an app is not listed, reinstalling it or triggering a new microphone request may be necessary.
The orange privacy indicator that appears when an app accesses the microphone is also useful. It does not prove the app is receiving good audio, but it does confirm that iOS or iPadOS recognizes microphone activity.
Test a Microphone on Android and Samsung Galaxy Devices
Android device menus vary by manufacturer, but the core troubleshooting pattern is consistent: test with a recorder or diagnostic utility, then verify global microphone access and per-app permission.Use the Android Privacy Indicators
On Android 12 and later, a green indicator appears at the top-right of the screen while an app is using the microphone. Swipe down and tap the indicator to identify the app or service using the mic. Tapping again provides a path to relevant permission controls.Android also includes a global microphone control in Quick Settings on supported versions. Swipe down twice and look for the Microphone tile. If microphone access has been turned off globally, apps cannot record sound even when their individual permission is set to Allow.
This is an important privacy feature, but it can be easy to activate accidentally. A globally disabled microphone often creates the appearance of a hardware fault.
Review Android App Permissions
To check a specific app:- Open Settings.
- Select Apps or See all apps.
- Choose the affected app.
- Open Permissions.
- Select Microphone.
- Choose the appropriate option, such as Allow only while using the app.
Use Privacy Dashboard to Find Recent Mic Activity
On Android 12 and later, open:Settings > Security & privacy or Privacy > Privacy dashboard > Microphone
The dashboard shows which apps accessed the microphone recently. Depending on the Android version, the history may cover the last 24 hours or the previous seven days.
This is helpful for two reasons. First, it can identify an app that is unexpectedly using the microphone. Second, it can confirm that a target app never reached the microphone at all, making an app permission or browser permission issue more likely.
Samsung Galaxy Microphone Tests
Samsung Galaxy phones often provide an additional diagnostic route through Samsung Members:- Open Samsung Members.
- Go to the Discover tab.
- Select Diagnostics.
- Choose Phone diagnostics.
- Select Mic.
- Follow the on-screen test instructions.
Test a Microphone on a Chromebook
Chromebooks combine Chrome browser permissions, ChromeOS privacy controls, and—in some cases—Android app permissions. That layered design is secure, but it means there are multiple points where microphone access can be blocked.Check Input and Run the Chromebook Mic Test
- Select the time in the bottom-right corner.
- Open Audio settings beside the volume control.
- Under Input, choose the desired microphone.
- Adjust the microphone slider.
- Use Mic test and speak normally.
Enable ChromeOS Microphone Access
Open:Settings > Privacy and security > Privacy controls
Turn on Microphone access. If this global setting is disabled, apps and websites cannot use the microphone regardless of their own permissions.
Some Chromebooks also have physical privacy switches or keyboard controls. Check those before changing deeper settings. A hardware microphone switch overrides software permissions.
Managed school and work Chromebooks may have controls enforced by an administrator. If the settings are locked, unavailable, or accompanied by a managed-device notice, local troubleshooting may not be enough.
Fix Browser Microphone Permissions
A microphone may pass every operating system test but still fail on a website. Browsers maintain their own site-level permission records, device selectors, and privacy safeguards.Google Chrome
In Chrome on desktop, open:More > Settings > Privacy and security > Site settings > Microphone
From there, choose the default microphone and review websites that are allowed or blocked. Remove outdated exceptions, especially if a site was accidentally denied in the past.
When a website asks for microphone access, choose Allow only if you trust the site and expect it to use voice input. If a site does not prompt, click the controls near the address bar to inspect its current microphone permission.
On Android, Chrome’s site settings can also block microphone use independently of the Android app permission. Check both Chrome’s permission and Android’s system permission when browser voice features fail.
Microsoft Edge
In Edge, open:Settings and more > Settings > Cookies and site permissions > Microphone
Ensure that Ask before accessing is enabled. Then review whether the affected website is blocked or whether Edge is pointed at the wrong default input device.
Safari on Mac
In Safari, open:Safari > Settings > Websites > Microphone
Set the relevant website to Ask, Allow, or Deny. If a meeting service has been denied previously, change the setting to Ask or Allow and reload the page.
Mozilla Firefox
In Firefox, go to:Menu > Settings > Privacy & Security > Permissions > Microphone > Settings
Review the sites listed there. A website set to Block will not be able to request microphone access until its stored permission is changed or removed.
Browser-Specific Failure Patterns
When browser microphone access fails, these symptoms often reveal the cause:- No permission prompt appears: The site may already be blocked.
- Permission is allowed but no audio reaches the site: The browser may have selected the wrong microphone.
- The input meter moves but others cannot hear you: The meeting page may be muted, connected to the wrong audio mode, or using aggressive processing.
- The microphone works in one browser but not another: The issue is almost certainly browser settings, extensions, or site permissions rather than microphone hardware.
Test the Microphone in Zoom, Teams, Meet, Discord, and Slack
Once the operating system test succeeds, use the built-in test in the communication app. This confirms that the app is receiving the right microphone rather than merely recognizing a microphone.Zoom
In the Zoom desktop app:- Sign in.
- Select your profile picture.
- Open Settings > Audio.
- Under Microphone, select Test microphone.
- Speak and watch the input-level meter.
- Listen to the automatic playback.
On mobile, Zoom’s test meeting can provide an end-to-end check of the phone’s speaker and microphone permissions.
Microsoft Teams
In the Teams desktop app:- Open Settings and more.
- Select Settings > Devices.
- Under Audio settings, choose the correct microphone.
- Select Make a test call.
- Record a short message when prompted and listen to the playback.
Google Meet
Before joining a Google Meet call, use the device controls in the meeting preview. Select the intended microphone, then speak and watch for movement in the microphone activity indicator.During a call, open More options > Settings > Audio to change the microphone. If Meet is receiving sound but participants still cannot hear you, verify that the meeting’s microphone button is not muted and that the browser has permission.
Discord
On Discord desktop or in a supported browser:- Open User Settings.
- Select Voice & Video.
- Find Mic Test.
- Choose Let’s Check.
- Speak and listen to playback.
- Select Stop Testing when finished.
Slack
In Slack desktop, select your profile picture and open:Preferences > Audio & video
Choose the microphone from the available device list and speak. The input indicator should react. If it does not, revisit system permissions and ensure Slack is not set to an old USB or Bluetooth device that is no longer connected.
Check Hardware Mutes and Physical Obstacles
A physical mute control can make a fully functional microphone look completely dead. These controls should be checked early, before reinstalling drivers or considering replacement hardware.Common examples include:
- A mute slider or switch on a headset cable
- A microphone mute button on a USB headset
- A hardware privacy switch on a laptop or Chromebook
- A dedicated microphone mute key on a laptop keyboard
- A dock, monitor, webcam, or conferencing speakerphone mute control
- Touch controls on wireless earbuds or headphones
- A boom microphone that is raised into its mute position
Also examine microphone openings on phones, laptops, webcams, and headsets. Dust, lint, cosmetic skins, thick cases, and poorly aligned accessories can significantly degrade audio quality. Never use pins or excessive force to clear an opening; a soft brush or gentle air cleaning is safer.
Avoid Outdated Microphone Troubleshooting Advice
Many older guides still point to retired or replaced features. That can waste time and send users into menus that no longer exist.Skype Echo is no longer a current consumer microphone-testing path. Likewise, old instructions centered on Cortana microphone setup do not reflect the current Windows experience.
For modern Windows voice features, use one of these instead:
- The Windows Sound recording test
- Sound Recorder
- Voice typing
- Voice access
- A meeting app’s built-in test call or microphone preview
A Fast Decision Tree for Microphone Problems
Use this sequence to avoid repeating the same checks in different menus.- Check hardware mute controls and connections.
- Run the operating system’s built-in microphone test.
- Record and play back a short local sample.
- Confirm the correct microphone is selected in the target app.
- Review operating system microphone permissions.
- Review browser and website permissions if the problem occurs online.
- Disconnect unused audio devices and retest.
- Restart the app or device after major permission changes.
- Test the microphone in a second app or browser.
- Consider driver, firmware, or hardware service only after the earlier layers fail.
Reliable microphone testing is ultimately about separating input detection, recording quality, and app access. Test from the bottom up, confirm playback rather than relying only on a moving meter, and check permissions before replacing equipment. That method resolves the majority of microphone failures without unnecessary purchases, driver hunting, or last-minute meeting disruptions.
References
- Primary source: Technobezz
Published: 2026-07-24T16:25:35.739000+00:00
Loading…
www.technobezz.com