

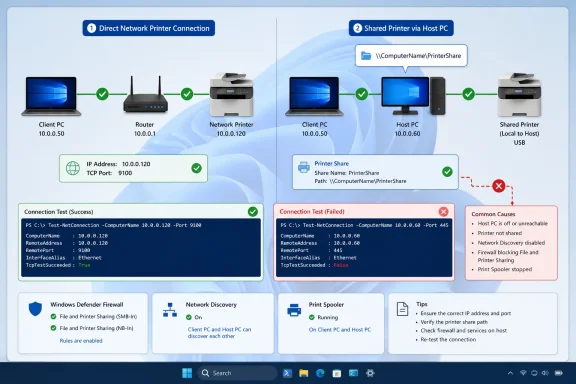
Microsoft Support’s current guidance covers both Windows 10 and Windows 11, but its separate instructions for network printers and shared printers expose the important distinction: a direct printer uses its own address and print protocol, while a shared printer relies on a host PC, its share configuration, Windows networking, and SMB access. Identify which one you have before changing anything.
 Identify the connection Windows is actually using
Open Settings > Bluetooth & devices > Printers & scanners in Windows 11, or Settings > Devices > Printers & scanners in Windows 10. Select the affected printer, open Printer properties, and then open the Ports tab. The checked entry is Windows’ current route to that printer.
A port that includes an IPv4 address, printer hostname, or “Standard TCP/IP Port” normally means the PC prints directly to the printer. A port beginning with a computer name or a printer path such as \\RECEPTION-PC\HP-LaserJet means the printer is shared from another Windows device. A WSD port indicates that Windows discovered the device automatically; that can be convenient, but it also means that discovery services and network visibility are part of the connection.
Write down the checked port, printer name, address, and—if present—its configured protocol. Do not change it yet. This record is what lets you distinguish an address problem from a Windows configuration problem after troubleshooting.
For a direct network printer, compare the address on the Ports tab with the address reported by the printer itself. Most business printers can print a network configuration page from their front panel, and many expose the same information in a browser-based management page. If Windows is aimed at 192.168.1.45 but the printer now reports 192.168.1.73, the printer has likely received a new DHCP lease and Windows is sending jobs to the old device.
The durable fix is to reserve the printer’s current address in the router or DHCP server using the printer’s MAC address. A manually configured static address can work, but it must be outside the DHCP pool or formally excluded from it, and it must use the correct subnet mask, gateway, and DNS settings. An address conflict can make a printer appear intermittently reachable, which is worse than a clean failure because jobs may vanish into an unrelated device or fail without a useful Windows error.
Test the network path before reinstalling the printer
For a direct TCP/IP printer, open PowerShell and test the actual destination port rather than relying only on whether the printer appears in Settings. Microsoft documents Test-NetConnection as a way to test a TCP connection to a specified remote port.
For a Standard TCP/IP printer configured for RAW printing, port 9100 is the normal default:
Test-NetConnection -ComputerName 192.168.1.73 -Port 9100
Replace the example address with the printer’s verified address. A result of TcpTestSucceeded : True proves that this PC can establish a TCP connection to that port. It does not guarantee that the driver, paper settings, authentication, or printer hardware will complete a job, but it removes the basic network route from the list of suspects.
Do not assume every printer listens on 9100. Microsoft’s Standard TCP/IP Port Monitor can use RAW or LPR. LPR normally uses destination port 515; IPP-capable devices may use another protocol and port specified by the manufacturer. Check the port’s Configure Port settings first, then test the port Windows is configured to use. Guessing ports and adding firewall exceptions around each guess adds risk without producing a diagnosis.
A failed TCP test has a more useful meaning than “Windows cannot print.” Check the printer’s display and network status, confirm the PC is connected to the intended wired or Wi-Fi network, and compare IP subnets. A guest Wi-Fi SSID, wireless client isolation, separate VLAN, router access-control list, or an outdated printer address can all block direct access. A failed ping by itself is weaker evidence because many printers and firewalls ignore ICMP echo requests; a failed test against the active print port is the stronger signal.
If the port test succeeds but Windows reports the printer as offline or jobs remain stuck, check the queue before replacing a driver. Open the printer’s queue and cancel old jobs. Then print a Windows test page from Printer properties > General. A test page reaches the installed print path without involving a particular application’s document, add-in, or rendering behavior.
Microsoft still recommends restarting the Print Spooler when jobs are trapped. In services.msc, restart Print Spooler first. If the queue will not clear, stop the service, remove the files in %WINDIR%\System32\spool\PRINTERS, and start the service again. This deletes pending jobs, so save or reprint anything important before clearing the folder.
Network Discovery affects shares, not every network printer
A directly addressed printer does not need Windows Network Discovery to receive a job once the correct TCP/IP port has been configured. Discovery helps Windows find devices, but it is not the same thing as the route used to print to a known IP address. If a direct printer works when added manually by address, leave it that way rather than weakening security settings merely to make it appear in the automatic discovery list.
A printer shared from a Windows PC is different. Microsoft Support says the host must be powered on, connected to the same network, configured to share the printer, and reachable by the client PC. On the host, open the printer’s Printer properties, select the Sharing tab, and confirm that Share this printer is enabled. Record the exact share name.
From the client, test the host by entering this in File Explorer’s address bar:
\\HostComputerName
If the host cannot be opened, stop troubleshooting the printer driver. The failure is connectivity, name resolution, credentials, or firewall policy on the PC that hosts the printer. If the host opens but the printer share is missing, return to the host and verify the printer is installed, online, and marked as shared.
On a trusted home or small-office network, verify that Windows classifies the active connection as Private. In Windows 11, open Settings > Network & internet, select the current Wi-Fi or Ethernet connection, and check Network profile type. Windows 10 presents the equivalent profile setting from the current network’s properties. Do not mark a hotel, airport, café, or unknown network Private simply to make printer sharing work.
Then open Advanced sharing settings and enable Network discovery and File and printer sharing under the Private profile. Microsoft’s shared-printer documentation specifically identifies both settings as necessary for shared-printer use. In a domain-managed environment, these controls may be locked or reset through Group Policy; that is a reason to ask the administrator for the applied policy, not to work around it on an individual PC.
Fix firewall rules without turning the firewall off
Windows Defender Firewall is often blamed for printer errors, but the direction of traffic matters. Microsoft Learn states that Windows Defender Firewall allows outbound traffic by default unless an outbound rule blocks it. For a PC printing directly to a network printer, the client normally makes an outbound connection; creating a broad inbound rule for TCP 9100 on that client does not fix that path.
For a Windows-shared printer, the host PC accepts inbound file-and-printer-sharing traffic. Microsoft documents that Windows Firewall opens the required rules when file and printer sharing or network discovery is enabled. Verify the built-in rules rather than disabling the firewall:
Quick walkthrough

- Press
Win + R, typewf.msc, and press Enter. - Select Inbound Rules.
- Find the rules in the File and Printer Sharing group and ensure the applicable rules are enabled for the Private or Domain profile.
- Check the Network Discovery group if clients cannot locate the host or shared devices through browsing.
- Leave the Public profile disabled for these sharing rules unless a managed network policy explicitly requires it.
Avoid creating a blanket “allow all local ports” rule or turning off Windows Defender Firewall to test a printer. Microsoft’s firewall guidance warns against exposing file and print sharing on Internet-facing or untrusted networks. A short-lived firewall test can also give a misleading result when a third-party endpoint suite, router policy, VLAN ACL, or printer-side access list is the real blocker.
If the PC uses a third-party antivirus or security suite with its own firewall, its rules can supersede or supplement the Windows interface. Review that product’s network controls separately. In business environments, firewall settings can also be delivered through Intune, Group Policy, or endpoint-management software; a local change that immediately reverts is evidence of policy enforcement.
Reconnect using a stable path
After confirming the network route, remove only the broken printer connection from the client. In Printers & scanners, select the printer and choose Remove device. Restarting the PC is sensible when the old queue or driver instance remains loaded, but do not remove the working printer installation from the host merely because a client cannot connect.
For a direct printer, choose Add device, then select the option to add a printer manually. Select Add a printer using a TCP/IP address or hostname, enter the verified address or stable DNS name, and allow Windows to create the correct port. Microsoft’s Windows installation guidance supports manual installation when automatic discovery fails. Use the vendor driver only when it is current and necessary for the printer’s features; the Windows-supplied driver may be sufficient for basic output.
For a shared printer, choose Select a shared printer by name and enter the path in this form:
\\HostComputerName\PrinterShareName
Use the host’s actual computer name and the precise share name recorded earlier. An IP-based host path can help isolate a name-resolution problem temporarily, but a stable hostname is generally the better long-term connection if local DNS is functioning.
Finish by printing a Windows test page, then a small document from the application that first showed the error. If the test page works but the application does not, the network and printer connection are restored; investigate the application, document format, account permissions, or its own print settings instead. If the test page fails even though the direct port test succeeds, capture the queue status and the selected port configuration before changing drivers—those details will identify whether the remaining fault is in Windows printing, the driver, or the printer itself.