

Winre.wim file may be gone. On Windows 10 and Windows 11, the built-in reagentc.exe utility is the supported way to inspect and repair that registration without reinstalling Windows.This is worth checking before a boot failure. WinRE supplies Advanced startup, Startup Repair, Command Prompt, update removal, System Restore, and Reset this PC. Microsoft Support also notes that BitLocker-protected devices can require the recovery key before many of those tools will open, so collect that key and back up active work before changing recovery settings.
Open Windows Terminal (Admin), Command Prompt (Admin), or PowerShell (Admin). The commands below use an elevated prompt even when they do not visibly say so.
Windows 10 remains compatible with this procedure, but Microsoft ended Windows 10 support on October 14, 2025. A working WinRE configuration is particularly important for systems that remain in service without current security support.
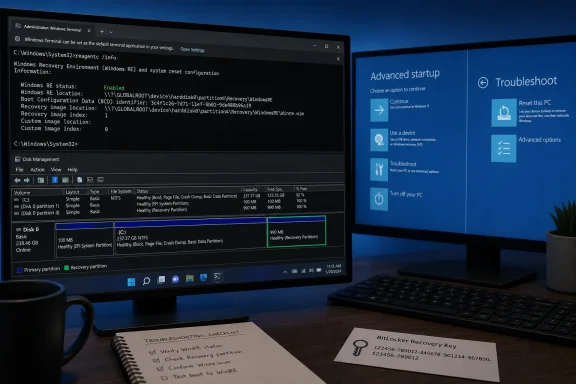 Check the current WinRE registration
Start with the one command that exposes the configuration Windows is actually using:
reagentc /info
A healthy result includes these lines:
Windows RE status:         Enabled
Windows RE location:       \\?\GLOBALROOT\device\harddisk0\partition4\Recovery\WindowsRE
Boot Configuration Data (BCD) identifier: {GUID}
The partition number will vary. Do not assume that partition4 is right for your computer; the important parts are Enabled and a nonblank Windows RE location that ends in \Recovery\WindowsRE.
Microsoft Learn documents reagentc /info as the status check for the active Windows installation. Its deployment guidance also says a valid configuration should have WinRE enabled, located in \Recovery\WindowsRE, and associated with a BCD identifier. A blank location, a status of Disabled, or an error from reagentc means Windows does not currently have a usable local recovery registration.
Do not confuse the “Recovery image location” lines with the Windows RE location. On Windows 10 and later, reagentc /setosimage is no longer used for the normal Reset this PC workflow. An empty custom or recovery image entry is therefore not, by itself, evidence that Reset this PC is broken.
Before repairing anything, preserve the output:
reagentc /info > "%USERPROFILE%\Desktop\WinRE-info-before.txt"
That file gives you a record of the device and partition Windows was targeting before the repair.
Repair a disabled WinRE configuration first
If reagentc /info says Windows RE status: Disabled, try the least invasive repair:
reagentc /enable
reagentc /info
/enable tells Windows to activate the registered WinRE image. If no custom image location has been configured, Microsoft Learn says Windows attempts to enable the default Winre.wim stored under C:\Windows\System32\Recovery.
If the command succeeds and /info now shows Enabled with a valid location, stop there. There is no benefit in repartitioning a disk or manually assigning a recovery-partition letter merely because WinRE had been disabled.
If /enable fails with a message that Windows cannot find the recovery environment, proceed to the file and partition checks below. That error usually means the problem is no longer simply an on/off setting: Windows cannot locate a usable Winre.wim at its registered or default location.
Confirm that the WinRE image is actually available
The default staging location is:
C:\Windows\System32\Recovery\Winre.wim
Check it with:
dir /a C:\Windows\System32\Recovery\Winre.wim
If Winre.wim exists, retry:
reagentc /enable
reagentc /info
If it does not exist, do not download a random Winre.wim from the internet or copy one from a different PC. WinRE is tied to the installed Windows release and servicing state; an arbitrary image can lack needed components, drivers, security updates, or a matching configuration.
Instead, first repair the running Windows component store and system files:
DISM /Online /Cleanup-Image /RestoreHealth
sfc /scannow
Restart after both commands complete, then check again:
dir /a C:\Windows\System32\Recovery\Winre.wim
reagentc /enable
reagentc /info
DISM and System File Checker are not guaranteed to reconstruct every missing recovery setup, but they are the safer first response when the default Windows copy of Winre.wim is absent or damaged. If they do not restore it, use Windows installation media that matches the installed edition, language, and release to access Repair your computer, or plan a repair installation. reagentc can register an existing recovery image; it cannot manufacture a missing valid image or create a recovery partition from nothing.
Re-register a valid recovery partition
When /info shows a stale location, or when you know the recovery partition still contains Winre.wim, manually register its folder with /setreimage.
First, identify the partition carefully. In an elevated terminal, run:
diskpart
list disk
select disk 0
list volume
Look for a small volume identified as Recovery, generally without a drive letter. Do not select a volume based only on its size. Systems can have multiple recovery partitions after upgrades, OEM factory-image partitions, or remnants from a disk migration. Compare what you see with the disk and partition number reported by the original reagentc /info output whenever that location was present.
After identifying the correct recovery volume, temporarily assign it a letter. This example uses R; substitute the actual volume number:
select volume 4
assign letter=R
exit
Now verify the expected directory and image exist:
dir /a R:\Recovery\WindowsRE
dir /a R:\Recovery\WindowsRE\Winre.wim
The second command must find Winre.wim. If it does not, stop. You may have selected the wrong partition, or the partition no longer contains the WinRE tools. Do not point reagentc at an empty folder simply to make the command succeed.
When the file is present, register the folder, not the .wim file itself:
reagentc /disable
reagentc /setreimage /path R:\Recovery\WindowsRE
reagentc /enable
reagentc /info
Microsoft Learn specifies /setreimage /path as the command for setting the location of a Windows RE boot image. The path must be the directory containing Winre.wim, such as R:\Recovery\WindowsRE. The disable-and-enable sequence clears the active association and rebuilds it against the location you supplied.
A successful repair should show Enabled and a location similar to this:
\\?\GLOBALROOT\device\harddisk0\partition4\Recovery\WindowsRE
Windows normally reports the final location through a device path rather than the temporary R: drive letter. That is expected. It means the configuration is bound to the partition, not dependent on a drive letter that could later change.
Remove the temporary letter after verification:
diskpart
select volume 4
remove letter=R
exit
Leaving a letter assigned is not usually fatal, but it makes a normally hidden recovery partition visible in File Explorer and increases the chance that someone will alter or delete its files. Microsoft’s WinRE deployment documentation explicitly calls for recovery partitions to be concealed after configuration.
Test Advanced startup without simulating a failure
A clean reagentc /info result verifies the registration, but it does not prove that the machine can boot the recovery image. Test it while Windows is still healthy:
reagentc /boottore
shutdown /r /t 0
/boottore directs the computer to enter WinRE on the next restart. It is a controlled test; do not test recovery by repeatedly interrupting startup or powering off a working machine. Microsoft Support documents forced shutdowns as a way to invoke automatic repair after failed boots, not as routine maintenance.
On the blue recovery screen, choose Continue to exit and boot Windows normally. Confirm that the expected choices are available under Troubleshoot and Advanced options, including Startup Repair and Command Prompt. Depending on the installed version, device configuration, and available restore points, you may also see Reset this PC, Uninstall Updates, System Restore, or newer recovery options.
If BitLocker or Device Encryption is enabled, verify that the recovery key is accessible from another device or from your organization’s key escrow before treating this test as complete. The WinRE menu may be available, but decryption-dependent recovery steps can still stop at the BitLocker prompt.
What reagentc cannot fix
reagentc repairs the relationship between Windows, BCD, and a WinRE image. It does not repair a failing SSD, recreate a deleted recovery partition, recover an OEM factory image, or guarantee that Startup Repair can solve a particular boot problem.
A missing recovery partition calls for a broader recovery plan: bootable Windows installation media, an OEM recovery image where hardware-specific restoration matters, or a repair/reinstall of Windows. Microsoft Support identifies installation media and recovery drives as alternate paths into recovery when the local environment cannot be used.
For managed Windows 11 fleets, this check has a newer operational consequence. Microsoft’s Quick Machine Recovery feature uses a connected WinRE to seek Windows Update remediations after widespread boot failures; it is available on Windows 11 version 24H2 build 26100.4700 and later. Enterprise-managed devices have different default cloud-remediation behavior, so administrators should validate their policy configuration separately rather than assuming an enabled WinRE automatically permits cloud recovery.
A final reagentc /info showing Enabled, a successful /boottore test, and a securely stored BitLocker recovery key turn WinRE from a partition you hope is there into a recovery path you have actually verified.


