

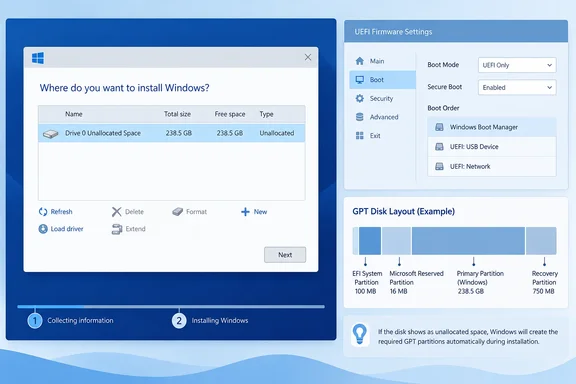
 Identify the error before changing the disk
The wording in Windows Setup matters because it usually identifies a boot-mode mismatch.
- “Windows cannot be installed to this disk. The selected disk is not of the GPT partition style.”
- Setup was booted in UEFI mode, but the target disk is currently MBR.
- The normal solution is to keep UEFI mode and convert or recreate the target disk as GPT.
- “Windows cannot be be installed to this disk. The selected disk has an MBR partition table. On EFI systems, Windows can only be installed to GPT disks.”
- This is the same UEFI-to-MBR mismatch, expressed differently.
- “Windows cannot be installed to this disk. The selected disk is of the GPT partition style.”
- Setup was booted in Legacy BIOS/CSM mode, but the target disk is GPT.
- Reboot the installation media in UEFI mode where possible. Converting a modern GPT disk to MBR is usually the wrong direction.
- “We couldn’t create a new partition or locate an existing one.”
- This can appear when Setup cannot create the required boot partitions or when the target drive has a problematic existing layout. Disconnecting extra storage and recreating the target disk as unallocated GPT space is the most reliable clean-install fix.
Do not convert a disk merely because it has an unfamiliar collection of recovery, EFI, OEM, or data partitions. First confirm which physical drive is supposed to receive Windows.
Before you delete or convert anything
A clean installation erases the chosen Windows disk. Copy documents, photos, browser exports, application data, BitLocker recovery information, and any files not already backed up to separate storage before continuing.
Warning: The DiskPart clean command removes all partitions and volume formatting from the disk currently in focus. Selecting the wrong disk can erase the wrong drive. Do not proceed until you can identify the target by its capacity and, if applicable, its existing partitions.
Prepare the following:
- A working Windows installation USB for the version and edition you intend to install.
- The PC’s power adapter, especially for a laptop.
- A backup of files on the installation drive.
- Your BitLocker recovery key if the existing Windows installation or data drives are encrypted.
- The approximate capacity of the target drive, such as 512 GB, 1 TB, or 2 TB.
- If the PC has multiple internal drives, temporarily disconnecting non-target drives is strongly recommended for a clean install. This prevents accidental deletion and reduces the chance that Setup places boot files on a different disk.
For Windows 11, the PC must use UEFI firmware and be Secure Boot capable. Windows 11 also has separate CPU, TPM 2.0, memory, and storage requirements. Do not switch to Legacy BIOS mode as a workaround for a Windows 11 installation problem.
Boot the Windows installer in UEFI mode
The same USB device can often appear twice in a computer’s boot menu: once as a UEFI boot option and once as a legacy or BIOS option. Choosing the wrong entry causes the partition-style error even when the installation media itself is fine.
- Shut down the PC completely.
- Insert the Windows installation USB.
- Turn the PC on and open its one-time boot menu. Common keys include
Esc,F12,F11,F10,F2, orDelete, but the correct key depends on the computer manufacturer. - Look for two entries referring to the USB drive. Select the one labeled similarly to:
UEFI: <USB drive name>
Do not select an entry labeled BIOS, Legacy, CSM, or one that lacks the UEFI prefix when a UEFI entry is available. - Start Windows Setup normally. Select language and keyboard options, then choose Install now.
- When prompted for installation type, select Custom: Install Windows only (advanced).
If the installer was previously booted in Legacy mode, restart and choose the UEFI USB entry before changing the disk. There is no benefit to converting the disk to GPT if the installer continues starting in Legacy mode.
Confirm whether Setup is running in UEFI or Legacy mode
If the boot-menu labels were unclear, Windows Setup can report the firmware mode from its Command Prompt.
- At any Windows Setup screen, press:
Shift+F10
A Command Prompt window opens. - Run:
reg query HKLM\System\CurrentControlSet\Control /v PEFirmwareType - Interpret the return value:
0x1means Setup is running in BIOS/Legacy mode.0x2means Setup is running in UEFI mode.
- Type the following to close Command Prompt:
exit
For a standard Windows 11 installation or a current clean installation on UEFI-capable hardware, continue only when the result is 0x2.
Use Windows Setup to recreate the disk automatically
If you are performing a full clean installation and Windows Setup allows you to delete the existing partitions, this is safer and simpler than manually creating partitions.
Warning: Delete partitions only from the disk you identified as the Windows target. Partition names such as Recovery, System, Primary, OEM, or MSR do not make a drive safe to delete. The disk number and capacity are what matter.
- On the Where do you want to install Windows? screen, locate the intended destination disk.
- Check its total capacity against the drive you planned to erase.
- Select the first partition on that disk and choose Delete.
- Confirm the deletion when Setup warns that files will be lost.
- Repeat the process for every partition on that same target disk.
- Stop when the disk displays one entry similar to:
Drive 0 Unallocated Space - Select the unallocated space and choose Next.
When Setup was booted in UEFI mode, it creates the required GPT-based Windows layout automatically, including the system partitions Windows needs. Do not manually create a primary NTFS partition first unless you have a specific deployment design that requires it.
The PC will restart several times during installation. After the first restart, remove the USB only if the computer returns to the installer instead of continuing Windows setup. Otherwise, let it remain connected until installation is clearly underway.
Use DiskPart when Setup cannot select, delete, or create the partition
Use DiskPart if Setup refuses to delete a partition, does not show the drive as usable after deletion, or continues reporting a GPT/MBR mismatch.
Warning: This procedure destroys the partition layout on the selected disk. Verify the disk number, capacity, and target drive before you run clean. Do not use clean all; that command writes zeros to every sector and can take a very long time. Standard clean is sufficient for recreating the installation layout.
- At the Windows Setup partition-selection page, press:
Shift+F10 - Start DiskPart:
diskpart - List detected disks:
list disk - Identify the target disk by its Size column. The
Gptcolumn shows an asterisk (*) for GPT disks. A blankGptcolumn indicates MBR.
Example:
In this example, Disk 0 is MBR and Disk 1 is GPT.Code:Disk ### Status Size Free Dyn Gpt -------- ------------- ------- ------- --- --- Disk 0 Online 476 GB 0 B Disk 1 Online 931 GB 0 B * - Select the target disk. Replace
0with the actual disk number:
select disk 0 - Recheck DiskPart’s confirmation. It should state that the selected disk is now the disk you intended to erase.
- Remove its partition and volume formatting:
clean - Convert it to GPT for a UEFI installation:
convert gpt - Leave DiskPart, then close Command Prompt:
Code:exit exit - Back in Windows Setup, select Refresh if it appears. The drive should now appear as a single unallocated-space entry.
- Select that unallocated space and choose Next. Let Setup create the partitions automatically.
Do not issue convert mbr for a Windows 11 installation. MBR is relevant only for a genuine Legacy BIOS/CSM deployment on older hardware, and Windows 11 requires UEFI-capable system firmware.
Verify the installation used GPT and UEFI
After Windows reaches the desktop, verify that the firmware mode and disk layout are correct.
- Press
Windows+R. - Type:
msinfo32 - Press
Enter. - In System Summary, find BIOS Mode.
- UEFI confirms Windows was installed in UEFI mode.
- Legacy means the installation did not use UEFI mode.
- To check the disk partition style, right-click Start and select Disk Management.
- Right-click the disk label on the left side, such as Disk 0, then select Properties.
- Open the Volumes tab and check Partition style.
- GUID Partition Table (GPT) is the expected result for a UEFI installation.
- Master Boot Record (MBR) indicates a legacy-style layout.
A normal UEFI/GPT Windows installation shows several small system partitions in addition to the main Windows partition. Leave them intact; they support booting and recovery.
Troubleshoot the remaining partition-selection failures
The USB drive does not show a UEFI boot option
The installation media may not have been created correctly, or the firmware may have UEFI boot disabled.
- Recreate the installation USB using Microsoft’s current Windows installation-media process.
- Enter firmware setup and look for an option related to UEFI boot, Legacy Boot, CSM, or Boot Mode.
- Prefer UEFI boot mode. If both UEFI and Legacy are available, disable Legacy/CSM only if the device and its other installed operating systems support that change.
- Firmware menu wording varies by manufacturer. Do not reset firmware settings to defaults unless you know the consequences for RAID, storage-controller, virtualization, or boot settings.
The target SSD or hard drive does not appear in DiskPart
If list disk does not show the target device, Windows Setup cannot install to it.
- Shut down and check the physical connection if the drive is removable or recently installed.
- Disconnect external drives, memory-card readers, and unnecessary USB storage.
- In firmware setup, confirm that the drive is detected.
- If the computer uses a specialized storage-controller configuration, Setup may require the storage driver supplied by the PC or motherboard manufacturer. Do not load a random driver for a different model or controller.
Setup still says it cannot create or locate a partition
- Disconnect every drive except the intended Windows target where practical.
- Use DiskPart to
cleanthe correct target disk, thenconvert gpt. - Confirm Setup is booted in UEFI mode using
PEFirmwareType; it should return0x2. - Return to the disk-selection page, select the unallocated space, and choose Next without manually creating partitions.
The disk is GPT but Setup says it needs MBR
This is evidence that the installer was booted in Legacy BIOS/CSM mode. Do not convert the disk to MBR first. Restart, open the boot menu, and choose the UEFI entry for the installation USB.
You need to preserve the existing Windows installation and its files
Stop before using clean, deleting partitions, or performing a clean installation. A non-destructive conversion of an existing Windows system disk from MBR to GPT is a separate procedure using MBR2GPT, and it requires the device to support UEFI. After conversion, firmware must be switched to UEFI before Windows can boot. Back up the device first; this is not the same task as preparing an empty disk for a clean install.
You accidentally cleaned the wrong disk
Stop using that drive immediately. Do not create new partitions, format it, install Windows to it, or copy files onto it. These actions can overwrite recoverable data. Reconnect any backup drive and restore from a verified backup if available; otherwise, seek professional data-recovery assistance before further changes.