

Windows Package Manager (winget) can install the Build Tools bootstrapper, while the Visual Studio installer command-line options select the C++ workload and its recommended components. That distinction matters: installing Build Tools alone is not necessarily the same as installing the MSVC compiler, the Windows SDK, and the developer-shell setup needed to use them.
This guide installs the desktop C++ toolchain, opens the right command prompt, and performs two small compile tests: one for standard C++ and one for Windows SDK headers and libraries.
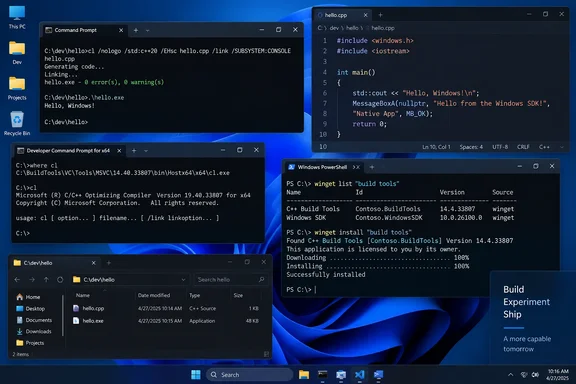 What this installs
The recommended configuration includes:
- MSVC — Microsoft’s C and C++ compiler, invoked with
cl.exe - MSBuild and supporting build utilities
- C++ standard libraries
- Windows SDK components required to compile native Windows code
- Developer Command Prompt shortcuts that configure
PATH,INCLUDE,LIB, and related environment variables
Microsoft documents the Desktop development with C++ workload as the appropriate selection for modern Windows C++ development. Its recommended components include the current x86/x64 MSVC tools and a Windows SDK.
Before you begin
You need:
- A supported Windows 10 or Windows 11 PC
- An internet connection
- An account that can approve administrator elevation
- Windows Package Manager available from a terminal
Open Command Prompt as Administrator or Windows Terminal (Admin), then check that Winget is available:
winget --info
If Windows reports that winget is not recognized, Windows Package Manager is missing, outdated, or restricted by your organization. On managed PCs, that may be an intentional IT policy rather than a broken installation.
Install the C++ Build Tools with Winget
In the elevated terminal, run:
winget install --id Microsoft.VisualStudio.BuildTools -e --source winget --override "--wait --passive --add Microsoft.VisualStudio.Workload.VCTools --includeRecommended"
Here is what the important pieces do:
| Option | Purpose |
|---|---|
--id Microsoft.VisualStudio.BuildTools | Selects Microsoft’s standalone Build Tools package |
-e | Requires an exact package-ID match |
--source winget | Avoids ambiguity if multiple package sources are configured |
--override | Passes options through to the Visual Studio installer |
--add Microsoft.VisualStudio.Workload.VCTools | Adds the Desktop development with C++ workload |
--includeRecommended | Includes recommended tooling, including the current MSVC x64/x86 toolset and Windows SDK selection |
--passive | Shows installation progress with minimal prompts |
--wait | Keeps the Winget command attached until setup completes |
Expect the download and installation to take several minutes. The exact time depends on your connection and whether the machine already has shared Visual Studio components installed. The installer has a certain “I’m just setting up a compiler” energy while quietly unpacking a fair amount of infrastructure. That is normal.
When the command completes, close the administrator terminal. Do not assume that the current ordinary Command Prompt suddenly knows where cl.exe lives. It does not; that is what the developer shell is for.
Open the correct developer command prompt
MSVC is not intended to run from a plain Command Prompt without environment setup. The compiler needs paths to its executable files, headers, libraries, linker, Windows SDK tools, and target-specific settings.
On Windows 11
- Open Start.
- Search for Developer Command Prompt.
- Open the result associated with the installed Visual Studio Build Tools version.
If available, choose x64 Native Tools Command Prompt when compiling standard 64-bit Windows desktop programs.
On Windows 10
- Open Start.
- Search for Developer Command Prompt.
- Select the result associated with Visual Studio Build Tools.
Microsoft’s documentation notes that the shortcut name and Start-menu location can vary between Visual Studio releases and installed workloads. Searching by name is more reliable than memorizing a folder path that may change after an update.
Verify that MSVC is ready
In the Developer Command Prompt, run:
cl
A healthy installation displays Microsoft C/C++ Optimizing Compiler information and a usage message. The version number will differ from one PC to another; that is expected.
Next, verify that Windows has located the compiler:
where cl
You should see a path under the Visual Studio Build Tools installation directories.
If cl is reported as “not recognized,” stop there. You are almost certainly using a regular Command Prompt, PowerShell window, or terminal profile that has not loaded the developer environment.
Quick environment check
Run:
echo %VSCMD_VER%
A developer command prompt normally returns a Visual Studio developer-command version value. An empty response is another sign that the command environment was not initialized.
Compile a simple C++ program
Create a folder for the test:
mkdir C:\Dev\msvc-test
cd /d C:\Dev\msvc-test
Open Notepad directly from the developer prompt:
notepad hello.cpp
If asked whether to create the file, select Yes, then paste:
#include <iostream>

int main()
{
    std::cout << "MSVC is ready." << std::endl;
    return 0;
}
Save the file and return to the developer prompt.
Compile it:
cl /nologo /EHsc hello.cpp /Fe:hello.exe
Then run it:
hello.exe
Expected output:
MSVC is ready.
The /EHsc switch enables the standard exception-handling model used by most ordinary C++ applications. The /Fe:hello.exe option explicitly names the output executable. MSVC also creates an object file, hello.obj, as part of the compile-and-link process.
Confirm the Windows SDK is usable
A standard-library “hello world” proves that MSVC can compile C++. It does not fully prove that Windows SDK headers and import libraries are available. For that, compile a tiny Windows API example.
Create another file:
notepad sdkcheck.cpp
Paste this code:
#include <windows.h>
#include <iostream>

int main()
{
    wchar_t systemDirectory[MAX_PATH];

    UINT length = GetSystemDirectoryW(systemDirectory, MAX_PATH);

    if (length == 0 || length >= MAX_PATH)
    {
        std::cerr << "Windows SDK test failed." << std::endl;
        return 1;
    }

    std::wcout << L"Windows system directory: "
               << systemDirectory << std::endl;

    return 0;
}
Compile and run it:
cl /nologo /EHsc sdkcheck.cpp /Fe:sdkcheck.exe
sdkcheck.exe
If it prints the Windows system directory, such as the system folder under C:\Windows, your C++ compiler, Windows SDK header files, and required Windows import libraries are working together. That is the real smoke test—not merely seeing cl.exe answer when called.
Common problems and fixes
winget is not recognized
First, verify that you opened a modern Windows terminal session and typed the command correctly:
winget --info
If it still fails, Windows Package Manager may not be installed or may be blocked by organizational policy. On work-managed devices, contact IT rather than installing developer tooling through an unapproved route.
cl is not recognized
You opened the wrong shell.
Close the window, search for Developer Command Prompt, and open the Build Tools-associated result. A normal Command Prompt does not automatically inherit MSVC paths, no matter how confidently it displays C:\>.
fatal error C1083: Cannot open include file
For a basic C++ header such as iostream, this usually indicates an incomplete C++ workload installation or an improperly initialized developer shell.
For windows.h, it commonly indicates that the Windows SDK component was not installed. Open the Visual Studio Installer, choose Modify for Build Tools, and confirm that the Desktop development with C++ workload and a Windows SDK component are selected.
The wrong architecture is being built
For typical modern Windows desktop software, use an x64 Native Tools Command Prompt. A 32-bit target requires an x86-oriented shell or an explicitly configured developer environment. Build architecture affects the compiler, linker, library paths, and output binary—not merely a checkbox hidden in a project file.
What success looks like
You are ready to develop or build native Windows C++ code when all of the following work from a developer command prompt:
cl
where cl
cl /nologo /EHsc hello.cpp /Fe:hello.exe
hello.exe
cl /nologo /EHsc sdkcheck.cpp /Fe:sdkcheck.exe
sdkcheck.exe
At that point, your Windows 10 or Windows 11 PC has a functioning MSVC command-line toolchain with Windows SDK support—enough for straightforward C++ development, CMake-based projects, many package builds, and build-server duties without installing the complete Visual Studio IDE.