
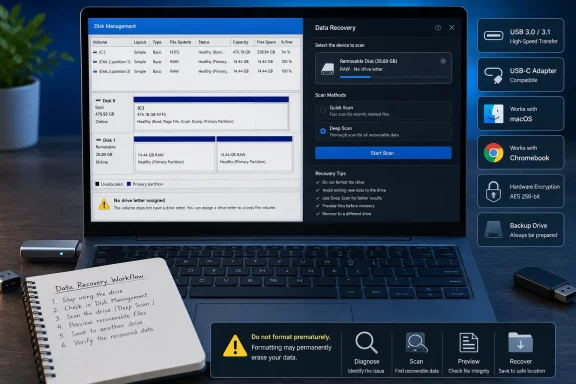
 Overview: Diagnose Before You “Fix”
The most common mistake when a USB flash drive stops working is accepting a prompt to format it immediately. Formatting can restore a usable volume, but it destroys the existing file system and can complicate data recovery. If the stick contains anything important, treat every write operation as a risk until files have been copied or recovered.
A good USB memory stick troubleshooting process separates the issue into six broad categories:
- Physical connection problems — damaged port, loose adapter, failed hub, insufficient power, or debris.
- Windows, macOS, ChromeOS, or mobile-device detection issues — the device is connected but not mounted or displayed.
- Partition and file-system damage — the stick appears, but the operating system cannot read its contents.
- File-format compatibility — the drive works on one platform but not another.
- Encryption or permissions — the storage is detected but locked, read-only, or restricted.
- Hardware failure — the USB controller or flash memory has deteriorated beyond practical repair.
The goal is not simply to make the drive reappear. It is to determine whether the USB stick is healthy, whether the data can still be saved, and whether a repair is appropriate.
Start With the Physical Checks
Before opening Disk Management, Device Manager, Terminal, or any recovery utility, rule out the simple causes. A USB device that is intermittently connected can look exactly like a corrupted or failed drive.
Test the USB Stick Directly
Disconnect the flash drive, wait a few seconds, and reconnect it firmly. Then try another USB port on the same computer.
If you are using a USB-C adapter, docking station, monitor hub, or front-panel port, bypass it. Connect the USB stick directly to a port on the computer whenever possible. Hubs and inexpensive adapters can introduce power, compatibility, and signal issues that are difficult to diagnose from software alone.
Work through this short checklist:
- Try at least two USB ports on the original device.
- Avoid passive USB hubs during testing.
- Remove other nonessential USB devices temporarily.
- Use the supplied adapter or a known-good certified adapter.
- Test the stick on another Windows PC, Mac, Chromebook, iPhone, or iPad where compatible.
- If the device is an external SSD rather than a basic flash drive, use its original cable and confirm that it has enough power.
A standard USB memory stick normally needs very little power. However, larger external drives, high-speed USB enclosures, and some multiport adapters can exceed what a mobile device or unpowered hub can provide.
Interpret the Result Correctly
The outcome of the cross-device test is valuable:
- Works on another computer: Focus on the original PC’s port, drivers, security policy, or operating system configuration.
- Works only through one adapter: Replace the adapter or cable.
- Appears intermittently everywhere: Assume a physical connection or hardware issue and copy important files immediately.
- Fails on every device: Stop trying to format or repair it repeatedly. The USB stick itself may be failing.
If the drive becomes unusually hot, repeatedly disconnects, appears with a size of 0 bytes, or causes the operating system to freeze whenever it is attached, hardware failure is increasingly likely. Continued use can make recovery harder.
Make Windows Report What It Sees
Windows may detect a USB device without assigning it a usable drive letter or mounting its file system. That distinction matters: a device can appear in Device Manager but remain absent from File Explorer.
Enable USB Notifications and Install Updates
On Windows 11, search for USB settings and enable connection notifications if they are available. Windows can then alert you when it believes an attached USB device has a connection, compatibility, or power problem.
Install current Windows updates before attempting aggressive repairs. Updates can include fixes for USB controllers, storage components, chipset drivers, and device compatibility. On Windows 11, open:
Settings > Windows Update > Check for updates
Also review optional driver updates:
Settings > Windows Update > Advanced options > Optional updates
Look specifically for updates related to:
- USB controllers
- Chipset components
- Storage controllers
- Manufacturer-specific device drivers
- Docking station firmware or drivers
Windows 10 reached end of support on October 14, 2025 for its mainstream Home and Pro lifecycle. Systems still running it may continue to function, but they no longer receive normal ongoing feature, quality, and security support unless they are covered by an applicable extended-support arrangement. A stubborn USB issue on an aging Windows 10 installation may be another reason to assess an upgrade path.
Check Device Manager
Right-click Start and open Device Manager. Expand these categories:
- Disk drives
- Universal Serial Bus controllers
- Portable Devices
A healthy USB flash drive may appear under Disk drives, often by its manufacturer name or as a generic USB storage device. A warning symbol, unknown device entry, or repeated appearance and disappearance suggests a driver or connection problem.
Try the least disruptive repair first:
- Right-click the related USB or storage device.
- Select Update driver.
- Choose Search automatically for drivers.
- If Windows offers a Windows Update option, follow it.
- Restart the PC after completing driver updates.
If the USB drive stopped working immediately after a recent driver update, open Properties > Driver and use Roll Back Driver when that option is available.
Reinstall a Problematic USB Device
Reinstalling a device entry can clear damaged driver associations without formatting the USB stick.
- In Device Manager, right-click the affected USB storage device.
- Select Uninstall device.
- Confirm the removal.
- Restart Windows.
- Reconnect the USB stick after the restart.
Windows should rediscover the hardware and reload the appropriate driver. Do not confuse this with formatting: reinstalling the device driver does not erase the files on the flash drive.
Older advice often recommends legacy troubleshooters and command-line diagnostic packages. Those routes are increasingly outdated as Windows retires older troubleshooting components. In practice, Windows Update, Device Manager, Disk Management, and Event Viewer are the more useful modern tools.
Use Disk Management When the Drive Is Missing From File Explorer
If Windows makes the familiar USB connection sound but no drive appears in File Explorer, Disk Management is the next essential stop.
Right-click Start and choose Disk Management. Wait a moment for Windows to scan disks and volumes.
What to Look For
A USB stick can appear in several states:
- Healthy with no drive letter
- Offline
- Unallocated
- RAW
- Not initialized
- No Media
- Unknown
- Healthy but with an unsupported or hidden partition layout
Each state has a different meaning. Do not use the same repair for all of them.
Assign a Missing Drive Letter
A drive may be fully functional but invisible in File Explorer because Windows did not assign a letter.
If the USB volume is marked Healthy and has a recognizable capacity:
- Right-click the volume.
- Select Change Drive Letter and Paths.
- Choose Add or Change.
- Select Assign the following drive letter.
- Pick an unused letter.
- Confirm with OK.
Disconnect and reconnect the drive if it does not appear immediately. In many cases, this is all that is required.
Bring an Offline USB Disk Online
If Disk Management lists the USB disk as Offline, right-click the disk label on the left side—not merely its volume—and choose Online.
This can happen after a disk-signature conflict, a removable device error, or a policy-related state. If Windows brings the disk online successfully, check whether the volume now has a drive letter and readable file system.
Be Extremely Careful With “Initialize Disk”
If Windows says the USB drive is Not Initialized, it may offer to initialize it as MBR or GPT. This can be appropriate for a brand-new, empty USB device, but it is not a safe first move for a stick that previously contained files.
Initialization changes partition metadata. While professional recovery tools may still locate data afterward, the safest course is to recover files first whenever the drive has data you need.
Only initialize a drive when one of these conditions applies:
- The USB stick is genuinely new and unused.
- You have already copied or recovered its contents.
- The data is unimportant.
- You deliberately want to reuse the drive from scratch.
Understand RAW and Unallocated States
A RAW USB drive means Windows recognizes the device but cannot identify a valid usable file system. An Unallocated drive has no currently recognized partition available for mounting.
Both conditions can stem from corruption, accidental formatting, damaged partition tables, or hardware problems. They are not automatically proof that the files are gone.
Avoid creating a New Simple Volume or formatting the drive until you have decided whether data recovery is necessary. Those actions are useful for returning an empty stick to service, but they are not recovery actions.
Repair File-System Damage Without Making It Worse
When Windows assigns a drive letter but reports errors such as “You need to format the disk,” “The parameter is incorrect,” or “The file or directory is corrupted and unreadable,” the drive may have file-system damage.
Copy Readable Files First
If any folders remain accessible, copy the most important data to a different physical drive before attempting repairs. Prioritize documents, photos, project files, and anything that cannot be replaced.
Do not copy recovered data back to the same failing USB stick. A recovery destination must be another storage device, ideally a reliable internal drive or separate external drive with sufficient free space.
Use CHKDSK Carefully
For a drive that is readable enough to mount but has directory or file-system errors, Windows includes chkdsk.
Open Command Prompt as administrator and run:
chkdsk X: /f
Replace X: with the flash drive’s actual letter.
The /f switch tells Windows to correct file-system errors. That can restore access to a damaged FAT32, exFAT, or NTFS volume, but it also writes changes to the drive. It may remove damaged directory entries, convert fragments into recovered files, or discard information it cannot reconcile.
That makes chkdsk useful for a drive whose data is already backed up, but risky for a drive containing the only copy of essential files. If the flash drive is degrading physically, repeated repairs can further stress it.
When Not to Run CHKDSK
Avoid chkdsk as the first response if:
- The drive disconnects during reads.
- Windows reports 0 bytes capacity.
- The USB device is not consistently detected.
- The drive appears as No Media.
- You hear repeated connection sounds.
- The contents are business-critical or irreplaceable.
- The flash drive has become unusually slow or hot.
These symptoms point beyond a simple logical file-system problem. At that stage, recovery should be performed cautiously, preferably by copying what is readable first rather than rewriting the file system.
Unlock Encryption and Check Access Restrictions
A USB flash drive can be physically healthy and still remain inaccessible because it is encrypted or blocked by policy.
BitLocker To Go on Windows
A removable drive protected with BitLocker To Go may appear in File Explorer but require a password or recovery key before its contents can be opened.
Search for Manage BitLocker and look under removable drives. If the drive is encrypted, unlock it with the correct password or recovery key.
There is no legitimate technical shortcut around forgotten BitLocker encryption. If the password and recovery key are unavailable, the files remain encrypted. Formatting can make the device reusable, but it will not recover the protected data.
The full BitLocker management experience is generally associated with Windows Pro, Enterprise, and Education editions. Some Windows Home systems may support certain device-encryption capabilities, but users should not assume that every Home installation can manage BitLocker To Go in the same way.
Workplace and School Policies
On managed work or school devices, administrators may restrict:
- USB mass-storage devices
- Removable-drive write access
- External-storage encryption requirements
- Mobile wired-access permissions
- Chromebook external-storage access
- Specific USB vendor IDs or device classes
If the same USB stick works on a personal computer but fails on a managed machine, do not assume the drive is defective. A policy may be blocking it intentionally. Contact the organization’s IT administrator rather than attempting to bypass the restriction.
Fix USB Flash Drive Problems on a Mac
macOS handles external storage differently from Windows, but the same principles apply: establish whether the device is detected, protect any recoverable data, then repair only when justified.
Check Finder and Disk Utility
Connect the USB stick directly to the Mac or through a known-good compatible adapter. Open Finder and look under Locations.
If the drive does not appear there, open Disk Utility. Then select:
View > Show All Devices
This is important because Disk Utility may otherwise show only volumes rather than the underlying physical device, container, and partition structure.
Run First Aid in the Correct Order
If the USB stick appears in Disk Utility, use First Aid before considering an erase.
Apple’s recommended repair order is deliberate:
- Select the individual volume.
- Choose First Aid > Run.
- Repeat for every volume.
- Repair the container if one exists.
- Finally, run First Aid on the physical storage device.
First Aid can correct certain directory and formatting problems, but it cannot repair every failure. If Disk Utility warns that the drive is failing, prioritize backup and replacement rather than repeated repair attempts.
Solve a Read-Only Drive on macOS
A USB stick that opens but will not accept new files may not be damaged at all. Check the drive in Finder:
- Select the drive.
- Press Command-I or choose File > Get Info.
- Review the Format field.
- Check Sharing & Permissions.
The file system often explains the problem:
- APFS and Mac OS Extended are designed for Apple platforms.
- exFAT is usually the best practical choice for broad modern Windows and Mac compatibility.
- FAT32 is widely supported but has a maximum individual file size of 4 GB.
- NTFS is commonly writable on Windows but may be read-only in macOS without additional software.
Ownership settings can also affect write access on certain volumes. If macOS offers Ignore ownership on this volume, enabling it can resolve access issues for a removable drive that is otherwise compatible.
Erase Only After Recovery or Backup
To erase and reformat a USB stick in Disk Utility:
- Choose View > Show All Devices.
- Select the physical USB device, not merely a listed volume.
- Click Erase.
- Choose a name and suitable format.
- Select an appropriate partition scheme when prompted.
- Confirm the erase.
For a flash drive shared mainly between modern Windows PCs and Macs, exFAT is usually the most sensible choice. For a Mac-only drive, APFS or Mac OS Extended may be appropriate. For older devices, cameras, game consoles, or car stereos, FAT32 may still be required.
Get a USB Drive Working With iPhone or iPad
Modern iPhones and iPads can access external USB storage through the Files app, but mobile devices impose stricter limits on power, connectors, partitions, and formats.
Confirm the Drive Meets iPhone and iPad Requirements
The external storage device should have:
- A compatible USB-C or Lightning adapter
- One data partition
- A supported format
- Enough power for the attached device
- An unlocked iPhone or iPad during connection
Supported formats include:
- APFS
- APFS (Encrypted)
- Mac OS Extended
- exFAT
- FAT32
- FAT
To find the attached drive, open Files > Browse and look under Locations. If Locations is missing, tap Browse again to expand the sidebar.
Solve Power and Security Problems
An external hard drive or high-power USB accessory may need an external power source. With USB-C iPhone and iPad models, a powered USB hub can solve this. On Lightning devices, a Lightning to USB 3 Camera Adapter connected to USB power is often necessary.
If the accessory remains blocked, review:
Settings > Privacy & Security > Wired Accessories
The exact choices vary by device and operating system version, but accessory access can be configured to ask before allowing new devices, permit access while unlocked, or require more restrictive approval.
Unlocking the iPhone or iPad before connecting the USB stick remains essential. A secure mobile device may reject a newly attached accessory until the user authenticates.
Chromebook USB Storage Troubleshooting
ChromeOS usually mounts standard USB storage automatically in the Files app. If a drive does not appear or ChromeOS reports that a partition cannot be mounted, start by updating the Chromebook.
Open:
Settings > About ChromeOS > Check for updates
Keep the Chromebook connected to power during the update process.
Format Errors and Recovery Media
Messages such as “your device was not recognized” or “at least one partition could not be mounted” may indicate an unsupported or corrupted partition. Back up any recoverable files first, then open Files, right-click the external storage device, and select Format device.
A USB stick previously used as Chromebook recovery media often requires an additional erase step before it behaves like normal storage again. Open the Chromebook Recovery Utility, use its settings menu, select Erase recovery media, choose the correct USB drive, and confirm the erase. Then format it with ChromeOS, Windows, or macOS.
Use a Hardware Reset as a Last Resort
If multiple USB devices behave unexpectedly on the Chromebook—not just one flash drive—a hardware reset can refresh the controller state.
For many Chromebook models:
- Turn off the Chromebook.
- Press and hold Refresh.
- Tap Power.
- Release Refresh after the Chromebook starts.
This is not the same as a factory reset, but it can affect hardware state and may place files in the Downloads folder at risk on some devices. Use it only after checking the drive, port, and ChromeOS update status.
Recover Files, Reformat the Drive, and Know When to Replace It
When a USB stick is detected but unusable, recovery and reformatting are two separate decisions.
Recover Before Formatting
If deleted, formatted, or corrupted files matter, recover them to a different drive. On Windows, Microsoft’s Windows File Recovery tool can attempt recovery from USB devices and external drives.
For FAT32 and exFAT flash drives, or for a corrupted or reformatted volume, the more thorough recovery mode is generally the appropriate starting point. The command structure follows this pattern:
winfr source-drive: destination-drive: /extensive
The destination must not be the same USB drive being scanned. Writing recovered files back to the source can overwrite data that has not yet been recovered.
Recovery success varies enormously. A recently deleted file on a healthy drive may be recoverable. A worn-out flash drive with failing memory cells, a fully overwritten volume, or a physically dead USB controller may not yield usable results.
Reformat for a Fresh Start
After files are safe—or if no files need saving—formatting can return a logical failure to normal use.
On Windows, use Disk Management to create a New Simple Volume from unallocated space, assign a drive letter, and format it. Alternatively, right-click the drive in File Explorer and choose Format.
Choose the file system based on the devices you actually use:
| File system | Best use case | Key limitation |
|---|---|---|
| exFAT | Modern Windows, macOS, many mobile devices | Not supported by every legacy device |
| FAT32 | Older hardware and broad legacy support | Individual files limited to 4 GB |
| NTFS | Windows-focused storage and large files | Mac writing support is limited by default |
| APFS | Mac and Apple-focused storage | Not practical for general Windows sharing |
For a general-purpose USB memory stick used across current Windows PCs, Macs, and many tablets, exFAT is normally the best balance.
Eject the Drive Properly
Improper removal can damage cached writes and file-system metadata, especially when copying files.
Use the operating system’s eject function:
- Windows: Use Safely Remove Hardware and Eject Media in the system tray.
- macOS: Click the eject icon beside the drive in Finder.
- ChromeOS: Click Eject beside the device in Files.
- iPhone and iPad: Finish file transfers, close active file operations, and disconnect only after activity has stopped.
If macOS refuses to eject a drive, close open files and Finder windows using it. Logging out and back in can clear a persistent lock. Shutting down the Mac before disconnecting is safer than forcibly pulling the drive during active use.
When a USB Memory Stick Is Beyond Repair
A USB flash drive is inexpensive, but data stored on it may be irreplaceable. The right moment to stop troubleshooting is when the symptoms indicate failing hardware rather than an ordinary software problem.
Replace the USB stick if it:
- Disconnects repeatedly on multiple devices.
- Reports the wrong capacity or 0 bytes.
- Shows No Media in Disk Management.
- Cannot be initialized, formatted, or mounted after data recovery.
- Runs excessively hot.
- Requires constant repositioning to connect.
- Returns read or write errors after a clean format.
- Works only intermittently despite testing different ports and systems.
Formatting can repair a damaged file system. It cannot repair worn flash memory, a broken USB connector, a failed controller, or counterfeit storage hardware reporting a false capacity.
The practical lesson is simple: test the connection first, verify how the operating system sees the device, protect data before writing changes, and treat formatting as a final restoration step rather than a first response. A USB memory stick that works again after a drive-letter assignment or file-system repair may be perfectly serviceable—but one that keeps failing deserves retirement before it takes important files with it.
Update: Additional details (July 29, 2026)
Technobezz’s newer Windows 11 guide adds two non-format repair options: File Explorer’s Properties > Tools > Error checking > Check, and PowerShell’s Repair-Volume -DriveLetter E -Scan for a scan-only check or Repair-Volume -DriveLetter E -OfflineScanAndFix to repair detected errors. It also notes that chkdsk E: /r performs a deeper physical-error scan and recovery attempt, but can take substantially longer than chkdsk /f.
The guide further recommends scanning unfamiliar removable media through the drive’s right-click Scan with Microsoft Defender option before opening suspicious files. It identifies AutoPlay at Settings > Bluetooth & devices > AutoPlay as a convenience setting only—not evidence that a USB drive has failed if no prompt appears.
