

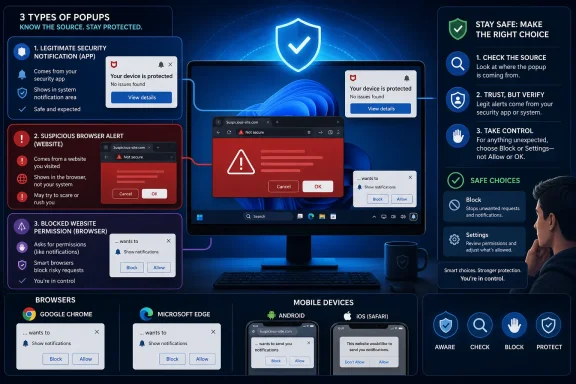
That distinction matters. Turning off Windows notifications can silence a genuine McAfee alert, but it will not revoke a website’s permission to send deceptive browser notifications. Conversely, removing a suspicious website from Chrome or Microsoft Edge will not stop reminders generated by an installed McAfee product. Treating every McAfee-branded warning as a software problem can also lead users to click scam links, enter payment details on a fake renewal page, or install unwanted software.
For Windows users, the practical goal is simple: block the nuisance without accidentally suppressing important security warnings. That means removing fake browser alerts first, reducing real product marketing where appropriate, and uninstalling McAfee only if it is no longer wanted.
Background: Why “McAfee Pop-Ups” Can Mean Several Different Things
The word pop-up has become a catch-all term, but modern systems display interruptions through several separate mechanisms. They look similar on screen, yet they are controlled in different places.
A McAfee-branded message can be one of the following:
- A real McAfee desktop notification from McAfee Security, LiveSafe, Total Protection, WebAdvisor, or another installed component.
- A Windows notification banner delivered through the Windows notification system.
- A browser push notification from a website that was allowed to send alerts.
- A browser pop-up or redirect that opens a tab, overlay, or separate window.
- A fake virus alert made to resemble McAfee branding, often paired with an urgent renewal offer or a countdown timer.
- A mobile app notification from McAfee Security, Chrome, Safari, or a separate unwanted app.
- A browser extension or search-engine change tied to McAfee WebAdvisor or McAfee Secure Search.
The visual design can be deceptive. A fake alert may use familiar red shields, warning triangles, antivirus terminology, and phrases such as “Your subscription has expired” or “Viruses detected.” None of those elements proves that the message came from McAfee.
A trustworthy security alert should be verifiable independently. Instead of using buttons, phone numbers, or links inside an unexpected warning, open the McAfee application directly or visit the official McAfee account portal manually in a new browser tab. If the claimed issue is real, it should be visible there.
The First Step: Identify the Source Before Clicking Anything
The best indicator is not the logo. It is the surface on which the alert appears.
Signs the Message Comes From McAfee Software
A genuine application alert commonly appears while the McAfee app is installed, often with a visible McAfee icon in the notification area, taskbar overflow, or Windows notification center. Opening the McAfee app may reveal the same account, subscription, scan, firewall, or protection status referenced in the notification.
These may include:
- Subscription-renewal reminders
- Virus-definition or protection updates
- Scan results
- Firewall or web-protection events
- Identity-monitoring notifications
- Product tips and feature promotions
- PC optimization suggestions
A real alert can still be annoying, especially when it is promotional. But it is handled through McAfee settings or Windows notification settings, not through browser permission controls.
Signs the Message Comes From a Website
A browser-based fake McAfee warning may appear as:
- A notification toast that names a website or browser
- A message in Microsoft Edge, Chrome, Firefox, or Safari
- A tab that opens unexpectedly
- A page that claims the computer is infected
- A full-screen overlay with fake scan progress
- A pop-up that persists after closing the original page
- A warning shown even though McAfee is not installed
Website notifications can continue to appear after the browser window is closed because the browser has been granted permission to deliver them through the operating system. This behavior is often mistaken for a virus or a persistent antivirus application.
The crucial rule is straightforward: do not interact with a suspicious alert itself. Do not click “Remove Threats,” “Renew Now,” “Scan,” “Close,” or a displayed support number. Use the browser’s settings pages or Windows controls instead.
Block Fake McAfee Notifications in Google Chrome
Google Chrome separates notification permissions from pop-up and redirect controls. Both should be reviewed when McAfee-branded warnings appear in Chrome or as Chrome notifications.
Remove Suspicious Notification Permissions
On a Windows PC, open Chrome and follow this route:
- Select the three-dot More menu.
- Open Settings.
- Select Privacy and security.
- Choose Site settings.
- Open Notifications.
Review the websites listed under permissions that are allowed to send notifications. Remove or block any domain that is unfamiliar, misleading, or unrelated to a service deliberately used.
A deceptive notification source may use a generic or strange-looking domain rather than the McAfee name. It may also resemble a legitimate address at a glance while including extra words, numbers, or unusual spelling.
For a site that is already permitted:
- Find it in the allowed list.
- Select the menu beside the entry.
- Choose Block or Remove.
Block is usually preferable for a clearly malicious or abusive source because it prevents the site from prompting for permission again. Remove revokes current permission but may allow a future prompt if the site is revisited.
Keep Chrome Pop-Up and Redirect Blocking Enabled
Next, inspect Chrome’s separate pop-up control:
- Open Settings.
- Go to Privacy and security > Site settings.
- Select Pop-ups and redirects.
- Keep the default setting set to block pop-ups and redirects.
- Under allowed sites, block or remove anything that should not be there.
A website notification is not necessarily a conventional pop-up, and a conventional pop-up is not necessarily a notification. Checking both areas avoids leaving a second route open for the same nuisance.
Review Extensions and Search Settings
If Chrome repeatedly opens tabs, changes its search provider, or redirects searches, inspect installed extensions:
- Open Chrome’s three-dot menu.
- Select Extensions > Manage Extensions.
- Review extensions carefully.
- Remove extensions that are unneeded, unfamiliar, or associated with unwanted browsing behavior.
McAfee WebAdvisor and McAfee Secure Search can affect browsing separately from the primary McAfee security application. Removing an extension is appropriate if it is no longer wanted, but users should understand that it may remove related browsing-protection features.
If the default search engine has changed to McAfee Secure Search, open Chrome’s Settings > Search engine or Manage search engines and site search, then choose the preferred provider. A search-engine change is not inherently malicious, but it should always be intentional.
Stop McAfee-Branded Browser Alerts in Microsoft Edge
Microsoft Edge is particularly relevant for Windows users because website notifications can appear in the Windows notification center and resemble native system alerts. The browser may be closed when a permitted site sends the notification, which makes the source less obvious.
Block a Website’s Notifications in Edge
To revoke a site’s permission:
- Open Edge.
- Select Settings and more.
- Open Settings.
- Go to Privacy, search, and services.
- Select Site permissions > All sites.
- Choose the problematic website.
- Locate Notifications and change it to Block.
If the suspicious site is still open, the faster route is to select the site-information icon to the left of the address bar, find the notification permission, and set it to Block.
This approach is more targeted than disabling every browser notification. It preserves useful alerts from trusted services while cutting off the abusive permission.
Block Edge Pop-Ups and Redirects
For browser windows or tabs that open on their own:
- Open Settings in Edge.
- Navigate to Privacy, search, and services > Site permissions.
- Open Pop-ups and redirects.
- Confirm that Blocked is enabled.
- Remove or block suspicious sites listed as allowed.
Edge’s built-in pop-up blocker cannot stop every advertisement designed to imitate a dialog box inside a webpage. A page can draw a fake window as ordinary web content, complete with a fake close button. That is why browser permission reviews and avoiding interaction remain so important.
Check Edge Extensions
Open Extensions > Manage extensions and review anything that has permission to read or change website data. An unwanted extension can create redirects, alter search behavior, inject advertising, or restore settings after they are changed.
Remove only extensions that are unnecessary or untrusted. In a work or school environment, an extension or browser policy may be managed by an organization. In that case, settings can reappear because they are centrally enforced rather than because the device is infected.
Firefox and Safari: Revoke Permissions, Then Block Pop-Ups
The same principle applies across browsers: notifications, pop-ups, redirects, and extensions are distinct controls.
Firefox Notification and Pop-Up Settings
In Firefox:
- Open the application menu.
- Select Settings.
- Open Privacy & Security.
- Scroll to Permissions.
- Next to Notifications, select Settings.
- Remove suspicious websites or set their status to Block.
- Save the changes.
Firefox also provides a setting to block future notification requests. Enabling it is a sensible choice for users who do not rely on browser notifications.
For pop-ups, stay in Privacy & Security and ensure Block pop-up windows remains enabled. Review exceptions and remove any website that does not need permission to open extra windows.
Safari on Mac, iPhone, and iPad
On a Mac, Safari notification permissions and pop-up settings are handled separately.
For website notifications:
- Open Safari.
- Select Safari > Settings.
- Open the Websites tab.
- Select Notifications.
- Set suspicious sites to Deny.
For pop-up windows:
- Open Safari > Settings > Websites.
- Select Pop-up Windows.
- Choose Block or Block and Notify for unwanted sites.
On iPhone and iPad, open Settings > Apps > Safari and enable Block Pop-ups. Keeping Fraudulent Website Warning enabled adds another layer of protection against known deceptive pages.
Close a Trapped Browser Without Pressing a Fake “Close” Button
A malicious webpage may use a fake close button or an aggressive overlay designed to keep the user clicking. It may also trigger repeated dialog boxes or claim that the browser must not be closed.
That message has no authority over the operating system. If the webpage is clearly suspicious, close the browser through the operating system rather than interacting with its content.
On Windows
- Press Ctrl + Alt + Delete.
- Open Task Manager.
- Select the browser.
- Choose End task.
This closes the browser process and its active tabs. When reopening the browser, avoid restoring the previous session if the malicious page returns.
On a Mac
- Open the Apple menu.
- Select Force Quit.
- Choose the affected browser.
- Select Force Quit.
If Safari repeatedly restores a bad page, quit Safari and hold Shift while opening it. This can prevent previously open pages from immediately reloading.
A forced close is not a replacement for removing browser notification permissions afterward. It stops the immediate interruption, while browser settings address the condition that enabled it.
Reduce Genuine McAfee Notifications on Windows
If the alerts are confirmed to come from an installed McAfee product, there are two practical layers of control: the McAfee application itself and Windows notifications.
Adjust Settings Inside McAfee
Open the McAfee app and look for account, general, notification, alert, preference, or messaging settings. Current McAfee interfaces vary by product tier and region, so exact labels can differ, but the settings are generally found from an Account or General Settings area.
Look for categories related to:
- Informational messages
- Product tips
- Promotional offers
- Desktop messaging
- Scan or optimization reminders
- Subscription notifications
- Security alerts
It is wise to reduce marketing prompts and nonessential tips while retaining important protection, account, and threat notifications. Silencing every alert can make a system feel calmer, but it can also hide expiring protection, blocked threats, or a required sign-in action.
Some McAfee PC optimization components include their own hints, tips, or desktop-messaging settings. If the recurring message is specifically about cleaning, performance, storage, or optimization, check the relevant PC optimizer settings rather than assuming the core antivirus product is responsible.
Use Windows Notification Controls
Windows can suppress notification banners, notification-center entries, and sounds at the application level.
To adjust McAfee notifications in Windows:
- Open Start > Settings.
- Select System > Notifications.
- Find the relevant McAfee application under app notifications.
- Turn notifications off completely, or customize the behavior.
Windows provides useful middle-ground choices:
- Turn off Show notification banners to stop screen interruptions.
- Turn off Show notifications in notification center to remove stored alerts.
- Turn off Play a sound to retain visible alerts without audio.
- Adjust notification priority where the option is available.
This is often the best answer for users who want McAfee to remain installed and operational but no longer want it to interrupt games, meetings, streaming, or focused work.
Use Do Not Disturb for Temporary Silence
Windows Do not disturb is useful when notifications should be paused only temporarily. It can be enabled from the notification area or configured in Settings > System > Notifications.
The trade-off is broad: Do Not Disturb affects more than McAfee. It can suppress alerts from messaging, mail, collaboration tools, and other applications unless they are set as priority notifications. It is ideal for a temporary quiet period, not necessarily as a permanent solution to a single recurring alert.
Mobile Devices: Distinguish the App From the Website
Phone and tablet alerts can originate from a security app, a web browser, or a separate unwanted application. The same brand name does not guarantee the same source.
iPhone and iPad
To disable McAfee app notifications:
- Open Settings.
- Select Apps.
- Choose McAfee Security.
- Open Notifications.
- Turn off Allow Notifications or customize the alert style.
On older iOS versions, the path may appear as Settings > Notifications > McAfee Security.
If the warning appears in Safari, use Safari’s pop-up and fraud-warning controls instead of only turning off McAfee app notifications.
Android
To turn off notifications from the McAfee app:
- Open Settings.
- Go to Notifications > App notifications.
- Find McAfee Security.
- Disable all notifications or only specific notification categories.
A long press on a visible notification often offers a direct path to its settings. This is helpful when it is not clear whether the alert came from McAfee, Chrome, or another installed app.
For Chrome website notifications on Android:
- Open Chrome.
- Select the three-dot menu.
- Open Settings > Site settings > Notifications.
- Turn off notifications globally or block individual sites.
- Review Pop-ups and redirects and keep blocking enabled.
If Android continuously opens new tabs, delivers repeated virus warnings, or shows ads beyond the browser, inspect recently installed apps. Rebooting into safe mode and removing recent downloads one by one can identify an app responsible for intrusive behavior. Keep Google Play Protect enabled to maintain app scanning and harmful-app warnings.
When Uninstalling McAfee Is the Right Choice
Uninstalling McAfee is appropriate when the software is no longer wanted, when a trial has expired and will not be renewed, or when another security product has become the preferred solution. It is not the correct first response to a fake McAfee website alert.
Removing a legitimate security product in response to a scam can leave the real issue untouched while reducing device protection.
Uninstall McAfee in Windows
Use the normal Windows uninstallation process first:
- Open Start > Settings.
- Select Apps > Installed apps.
- Locate the McAfee product.
- Select the menu beside it.
- Choose Uninstall and follow the prompts.
The older Control Panel route can also work on some installations: open Programs and Features, select the McAfee product, and choose Uninstall.
If the standard uninstall fails, McAfee provides a dedicated consumer removal utility, commonly known as MCPR. It should be obtained only from McAfee’s official support resources. Third-party downloads claiming to be removal tools are a security risk, particularly when the user is already dealing with deceptive antivirus messaging.
After removal, restart Windows. Confirm that another reputable security solution is active. On modern Windows systems, Microsoft Defender Antivirus normally provides baseline protection when no third-party antivirus is installed and active.
Remove McAfee on Mac and Mobile Devices
On macOS, McAfee installations commonly include an uninstaller in the Applications folder. Use that dedicated uninstaller where available rather than dragging files to the Trash.
On Android, uninstall through Google Play Store or the system app-management page. On iPhone, touch and hold the McAfee Security app, choose Remove App, then select Delete App.
Uninstalling the mobile app does not necessarily revoke browser website permissions. If Chrome or Safari was allowed to send alerts from a deceptive site, those browser controls must still be reviewed.
Managed PCs, Work Devices, and Policy Restrictions
A business-managed computer may behave differently from a personal Windows PC. Browser notification rules, pop-up blocking, extensions, and Windows notification behavior can be enforced by administrators through device-management policies.
Common symptoms include:
- A setting is unavailable or grayed out.
- A blocked site reappears after restart.
- A browser says it is managed by an organization.
- An extension cannot be removed.
- McAfee is installed by corporate policy.
Do not attempt to bypass organizational controls on a work device. A legitimate company security tool may be required for endpoint protection, web filtering, compliance, or remote support. Report excessive or misleading notifications to the organization’s IT support team with a screenshot and the approximate time they appeared.
The important distinction is that a centrally managed McAfee alert may be intentional, while a scam using the McAfee name is never made trustworthy merely because it appears on a work PC.
A Safer Long-Term Strategy
The most effective solution is not simply turning everything off. It is reducing unnecessary noise while preserving the alerts that genuinely matter.
A balanced configuration includes:
- Blocking notifications from unfamiliar websites.
- Keeping browser pop-up and redirect protection enabled.
- Removing unwanted extensions and reviewing search-engine changes.
- Disabling promotional McAfee messaging where the product permits it.
- Using Windows settings to mute sounds or banners rather than every security alert.
- Retaining meaningful warnings about malware, account access, subscription status, and protection failures.
- Avoiding links, numbers, and payment forms inside unsolicited antivirus warnings.
- Keeping Windows, browsers, and security software updated.
Fake McAfee pop-ups succeed because they exploit urgency. They want the user to react before noticing that the message came from an unknown website, a browser tab, or an unwanted app. A methodical response removes that advantage: identify the source, block the correct permission or process, scan for unwanted software if symptoms persist, and verify account status only through trusted software or manually entered official addresses.
Once notifications are separated into their real sources, the problem becomes far less mysterious. Browser scams can be cut off at the permission level, legitimate McAfee alerts can be tuned rather than blindly dismissed, and Windows can remain both quieter and better protected.