
MSDT.exe commands or Control Panel troubleshooters that are now deprecated, redirected, or removed on current Windows 11 installations.
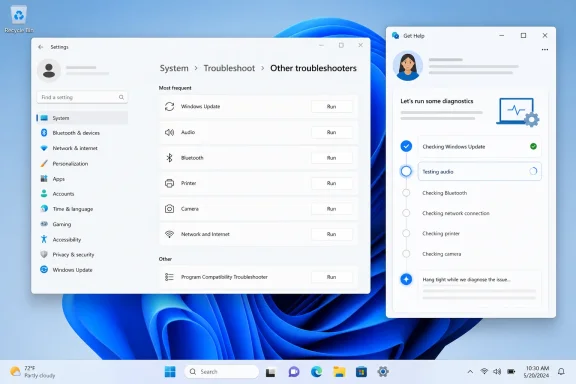 Overview: Where Windows 11 Troubleshooters Live Now
For most PC problems, Windows 11 offers two practical entry points:
- Settings, which provides the main troubleshooting hub and direct links for certain system categories.
- Get Help, Microsoft’s guided diagnostics app, which increasingly hosts the actual automated troubleshooters.
The simplest rule is to begin in Settings if the problem is broad or you are unsure which diagnostic tool applies. Open Get Help directly when you already know the affected category, such as Bluetooth, printer, camera, Windows Update, video playback, or program compatibility.
This is a significant departure from older Windows troubleshooting advice. In the past, users could open a particular wizard through Control Panel or run commands such as msdt.exe /id AudioPlaybackDiagnostic. Those legacy Microsoft Support Diagnostic Tool workflows are no longer the preferred route for Windows 11 troubleshooting.
On a modern Windows 11 PC, following outdated MSDT instructions can lead to a dead end, a redirection notice, or a tool that no longer exists. The dependable Windows 11 troubleshooting paths are now built around Settings and Get Help.
Open the Main Windows 11 Troubleshooter List
The main Settings page remains the best starting point when the issue is not immediately obvious. It offers a familiar central location and, depending on the Windows version and problem category, may either run a tool directly or hand off to a Get Help diagnostic flow.
To reach it:
- Select Start.
- Open Settings.
- Select System.
- Select Troubleshoot.
- Select Other troubleshooters.
- Find the category that best matches the problem.
- Select Run.
The Other troubleshooters page is useful because it prevents a common mistake: choosing a diagnostic tool based only on a vague symptom. A failed update, for example, can look like a network issue, a storage issue, or a corrupted system component issue. Starting with the Windows Update option is usually more effective than launching unrelated repairs.
What the Settings Hub Is Best For
The Settings troubleshooting page is especially useful for problems involving:
- Windows Update
- Audio devices and services
- Network connectivity
- Printers
- System configuration issues
- Device-related errors where Windows provides a visible diagnostic entry
Not every option on this page behaves identically. Some Windows 11 troubleshooters have been transitioned to Get Help, so selecting Run may open the newer app rather than displaying a classic wizard inside Settings.
That is normal behavior, not a failure. Windows is treating Settings as a navigation hub while Get Help handles the actual diagnostics.
Use Search for a Faster Route
Windows Search can shorten the trip if you do not want to move through Settings menus manually.
- Open Start or select Search on the taskbar.
- Type troubleshoot settings.
- Select Troubleshoot settings.
- Open Other troubleshooters.
- Select Run beside the relevant item.
This method is particularly handy on laptops, tablets, or systems where Settings is frequently used but the Troubleshoot page is buried several clicks deep.
Use the Run Command to Open Troubleshoot Settings
Windows 11 also supports a direct Settings URI for troubleshooting.
- Press Windows key + R.
- Type the following command:
ms-settings:troubleshoot
- Press Enter.
- Select Other troubleshooters.
- Choose Run next to the relevant troubleshooting category.
This does not launch a special repair utility by itself. It simply opens the same System > Troubleshoot page faster.
For experienced Windows users, this is a cleaner shortcut than relying on Control Panel search results. It also avoids the confusion caused by old web guides that instruct users to run MSDT commands manually.
Get Help Is the New Home for Many Windows 11 Diagnostics
The Get Help app is not merely a support chat interface. It has become a major delivery mechanism for automated Windows diagnostics. It can identify the affected hardware or service, request permission to inspect relevant settings, run targeted checks, and suggest corrective actions.
To open it:
- Select Start.
- Type Get Help.
- Select the Get Help app.
- Use the search field to enter the exact issue or troubleshooter name.
- Follow the on-screen prompts.
The exact wording matters. Searching with Microsoft’s preferred troubleshooting phrase often produces a more direct result than using a broad description such as “computer broken” or “my PC is slow.”
Useful Get Help Search Terms
Use specific phrases such as:
audio troubleshooterBluetooth troubleshootercamera troubleshooterprinter troubleshooterwindows update troubleshooterVideo playback troubleshooterWindows Media Player troubleshooterRun the Windows Program Compatibility troubleshooterBackground Intelligent Transfer Service troubleshooterconnect to network and internet
For network problems, the wording is slightly different. Search for connect to network and internet, then choose Run network diagnostics when that option appears.
Why Get Help Is Different From Legacy Troubleshooters
Older troubleshooters generally opened a small standalone window, ran a fixed set of checks, and produced a simple “fixed” or “not fixed” result. Get Help is more flexible because it can receive updated diagnostic flows and troubleshooting guidance without requiring the same old local packages.
That is a strength, but it also changes the user experience. The modern troubleshooting process may require an active internet connection, may request consent before collecting diagnostic information, and may guide users through several screens instead of completing every repair automatically.
The result is often more current guidance, especially for cloud-connected services, drivers, Windows Update, and Microsoft account-related issues. However, it is not a substitute for understanding the underlying problem when the diagnostic tool cannot resolve it.
Run the Windows Update Troubleshooter
Windows Update is one of the most important troubleshooting categories on any Windows 11 PC. Update failures can interfere with security patches, device driver updates, feature updates, and Microsoft Store components.
When an update stalls, repeatedly fails, or produces an error code, start with the dedicated Windows Update troubleshooter rather than immediately deleting update files or changing services manually.
Start Windows Update Troubleshooting From Settings
- Select Start.
- Open Settings.
- Select System.
- Select Troubleshoot.
- Select Other troubleshooters.
- Find Windows Update.
- Select Run.
- Continue in Get Help if Windows redirects you there.
You can also open Get Help, search for windows update troubleshooter, and follow the automated flow.
What the Windows Update Troubleshooter Can Check
The Windows Update diagnostic process may examine issues such as:
- Update services that are not running correctly
- Incomplete or damaged update components
- Basic configuration conflicts
- Download or installation problems
- Conditions that require a restart
- Errors that need more targeted follow-up
A successful troubleshooter run does not always mean the update will install immediately. The correct follow-up step is usually to restart the computer if prompted, then return to:
Settings > Windows Update > Check for updates
This sequence matters. Some update repairs do not fully take effect until Windows restarts and reinitializes its update services.
When the Troubleshooter Is Not Enough
The Windows Update troubleshooter is a good first-line repair, but it has limits. It may not solve a broken device driver, an incompatible application, insufficient storage, damaged system files, a failing disk, or an organization-managed update policy.
If the same update keeps failing, preserve the exact error code before trying aggressive repairs. Error codes can distinguish between a network interruption, driver conflict, servicing-stack issue, hardware incompatibility, and a problem tied to one specific cumulative or feature update.
Fix Audio and Microphone Problems From Sound Settings
Audio has one of the clearest dedicated troubleshooting routes in Windows 11. Instead of beginning with the general list, go to the Sound page when the issue involves speakers, headphones, monitor audio, microphones, Bluetooth headsets, or audio input.
- Select Start.
- Open Settings.
- Select System.
- Select Sound.
- Scroll to the advanced options area.
- Find Troubleshoot common sound problems.
- Choose Output devices for speaker, headphone, or display-audio problems.
- Choose Input devices for microphone problems.
- Follow the diagnostic prompts.
Choose Output Devices for Playback Issues
Use Output devices when Windows produces no sound through:
- Built-in laptop speakers
- Wired headphones
- USB speakers
- HDMI or DisplayPort monitor audio
- Bluetooth headphones
- External audio interfaces
The diagnostic flow can help identify whether Windows selected the wrong output, muted the device, disabled it, or lost access to the expected driver.
A surprisingly common Windows 11 audio problem is not a hardware failure at all. An external monitor, docking station, game controller, or Bluetooth device can become the default playback device, sending sound somewhere the user is not listening.
Choose Input Devices for Microphone Issues
Use Input devices when:
- A microphone is not detected
- Apps cannot hear you
- A headset microphone is silent
- Voice recording does not work
- Video-call apps show no input level
- Windows selects the wrong microphone
After running the troubleshooter, verify that the intended device is selected under Input in Sound settings. Also check microphone privacy permissions, because a correctly installed microphone can still appear unavailable if apps are not allowed to access it.
Audio Troubleshooting Has Practical Limits
The built-in audio diagnostic is helpful for settings, services, default devices, and common driver issues. It cannot repair damaged speakers, a defective headset cable, an unreliable USB port, a failing Bluetooth radio, or a manufacturer-specific audio enhancement conflict in every case.
If a specific audio device disappears entirely, inspect Device Manager, reconnect the device, test another port where applicable, and consider obtaining a current driver from the PC or hardware manufacturer. Avoid downloading drivers from unknown driver-updater utilities, which often add unnecessary software and can make a stable system less reliable.
Troubleshoot Printers Through Get Help
Printer problems are among the most varied Windows issues because they can involve USB connections, Wi-Fi networks, print queues, drivers, account permissions, print servers, and the printer’s own hardware condition.
For a Windows 11 printer problem, start with the automated Get Help flow.
- Select Start.
- Open Get Help.
- Select the search field.
- Type
printer troubleshooter. - Follow the prompts to scan for printers and review the configuration.
The printer troubleshooter can help with discovery issues, failed print jobs, queue problems, configuration errors, and common connectivity failures. It may also point to specific next steps if it cannot fix the problem automatically.
Check the Basics Before Removing a Printer
Before deleting and reinstalling a printer, confirm the simple factors that the troubleshooter may not be able to fix:
- The printer is powered on and not displaying a hardware error.
- Paper, toner, ink, and covers are in a valid state.
- A USB printer has a secure cable connection.
- A Wi-Fi printer is connected to the same network as the PC.
- The printer is not in offline mode.
- The correct printer is set as the default device.
- The print queue does not contain a stuck job.
Removing a printer is sometimes necessary, but it should not be the first reflex. On office PCs, deleting a managed network printer can remove a configuration installed by IT and may require a new deployment or administrator approval.
Restart the Print Spooler With Care
A stuck print queue is often associated with the Print Spooler service. Restarting it can clear temporary processing issues, but it also interrupts current print jobs.
- Press Windows key + R.
- Type
services.msc. - Press Enter.
- Find Print Spooler.
- Right-click it and select Restart.
This is a reasonable next step for a queue that refuses to clear, but it is not a replacement for checking the printer’s connection, driver status, and physical error messages.
Run Bluetooth, Camera, Video, and Compatibility Diagnostics
Get Help is also the primary route for several common device and application categories.
Bluetooth Troubleshooter
For pairing failures, missing Bluetooth devices, unreliable connections, or accessories that disconnect repeatedly:
- Open Get Help.
- Search for
Bluetooth troubleshooter. - Follow the diagnostic steps.
Bluetooth problems can stem from disabled radios, airplane mode, stale pairings, battery issues, driver failures, range limitations, or interference. The troubleshooter can address some software-side causes, but it cannot compensate for a weak adapter, depleted accessory battery, or a device that is simply out of range.
Camera Troubleshooter
For a webcam that does not work in video calls, Camera, Teams, browser conferencing, or other apps:
- Open Get Help.
- Search for
camera troubleshooter. - Complete the prompts.
Camera errors are frequently permission-related. If the hardware works in one app but not another, check the affected app’s permissions before reinstalling drivers. A privacy shutter or keyboard camera-disable key can also create symptoms that look like a Windows driver problem.
Video Playback Troubleshooter
For videos that refuse to play properly, show black screens, stutter, or fail in compatible apps:
- Open Get Help.
- Search for
Video playback troubleshooter. - Follow the instructions.
Video playback problems can be tied to media codecs, graphics drivers, browser acceleration, app-specific settings, streaming service restrictions, or damaged media files. A generic diagnostic can be useful, but it cannot resolve every digital-rights-management or subscription-related playback restriction.
Program Compatibility Troubleshooter
Older applications sometimes fail after a Windows 11 upgrade, show incorrect scaling, refuse to start, or behave as if they are running on unsupported hardware.
- Open Get Help.
- Search for
Run the Windows Program Compatibility troubleshooter. - Follow the recommended steps.
Compatibility mode can be useful for legacy software, but it should be treated as a targeted workaround rather than a universal fix. Running modern software in an older compatibility profile can occasionally introduce new problems, including display glitches, installer issues, or reduced access to current Windows features.
Use the Activation Troubleshooter Only When Activation Fails
Windows activation is handled differently from the general troubleshooting hub. The Activation troubleshooter appears only when Windows reports an activation problem.
To check:
- Select Start.
- Open Settings.
- Select System.
- Select Activation.
- If Windows is not activated, select Troubleshoot.
- Follow the prompts.
The option is generally unavailable once Windows is properly activated. This is expected behavior; it is not evidence that the troubleshooter is missing.
Important Activation Requirements
The activation route has several conditions:
- You must be signed in with an administrator account.
- Windows needs an internet connection to complete many activation checks.
- The installed Windows edition must match the available license.
- A significant hardware change, especially a motherboard replacement, can require reactivation.
- Organization-managed devices may use a business activation system rather than a personal digital license.
A troubleshooter cannot turn an invalid, reused, or edition-mismatched product key into a valid license. If Windows 11 Home is installed but the available entitlement is for Windows 11 Pro, or vice versa, the issue is one of edition matching rather than a routine configuration error.
Users who maintain a digital license should link the PC’s Windows activation to their Microsoft account where appropriate. That can make legitimate reactivation after a major hardware change more straightforward.
What to Do if Get Help Is Missing or Fails to Open
Get Help is built into current Windows 11 installations, but apps can occasionally become damaged, out of date, restricted, or unavailable because of organizational policies.
If Get Help is missing or does not launch correctly:
- Open Microsoft Store.
- Search for Get Help.
- Select Get, Install, Update, or Open, depending on what is displayed.
- Launch Get Help again.
- Search for the relevant troubleshooter.
Also check for Windows updates and Microsoft Store app updates. A newer troubleshooting flow may depend on an updated version of the app or its associated components.
On a work or school computer, the problem may be intentional. Administrators can manage diagnostics, permissions, support workflows, device configuration, and network access. If a corporate PC blocks a troubleshooter or repeatedly redirects to an organization support channel, use the approved IT support process rather than trying to bypass the restriction.
Why Old Control Panel and MSDT Advice Should Be Avoided
The Windows troubleshooting landscape contains a lot of outdated advice. Searches for a problem may still produce instructions to open Control Panel, use an old “Hardware and Devices” wizard, or launch MSDT.exe from Run.
Those instructions are increasingly unreliable on Windows 11 because Microsoft has retired or redirected many legacy inbox troubleshooters. The old MSDT platform is deprecated, and some classic tools have been removed rather than replaced one-for-one.
This has several implications:
- A command that worked on an older PC may fail on a current Windows 11 build.
- A classic troubleshooting shortcut may now redirect to Get Help.
- Some retired troubleshooters no longer have a direct equivalent.
- Control Panel may still expose older-looking settings, but it is not the primary diagnostic destination.
- Instructions written for Windows 10, Windows 8.1, or early Windows 11 releases may not match the current interface.
The safer approach is to begin with Settings and use Get Help for supported problem categories. This aligns with the direction Windows 11 is taking and reduces the chance of following obsolete repair steps.
The Strengths and Limits of Windows 11 Troubleshooters
Windows troubleshooters are valuable because they are low-risk first steps. They can spot common configuration mistakes, restore basic settings, restart services, identify missing permissions, and provide structured guidance without requiring users to edit the registry or run unsupported scripts.
Their main strengths include:
- Fast access to common repairs
- Built-in guidance for nontechnical users
- Better alignment with current Windows 11 components
- Diagnostics tailored to specific categories
- Reduced reliance on risky third-party repair tools
- Easier escalation when a problem requires more detailed support
However, a troubleshooter should not be mistaken for a full system repair engine. It cannot reliably solve every driver defect, hardware failure, firmware issue, corrupted Windows installation, malware infection, account problem, or enterprise policy conflict.
The most sensible workflow is straightforward:
- Run the relevant Windows 11 troubleshooter.
- Review its findings instead of dismissing them immediately.
- Restart if instructed.
- Test the original problem again.
- Check Windows Update and device-specific settings.
- Escalate to a focused repair step only when the automated tool does not resolve the issue.
That approach keeps troubleshooting methodical. It also avoids the common cycle of making multiple unrelated changes, losing track of what was altered, and creating a more difficult problem than the one that started the process.
A Modern First Response for Windows 11 Problems
For current Windows 11 PCs, the best answer to “How do I run the Windows troubleshooter?” depends on the problem, not on one universal control panel path. Start with Settings > System > Troubleshoot > Other troubleshooters when you need the broad hub, and use Get Help when you know the exact issue category.
Use the Sound page for speaker and microphone diagnostics, choose the dedicated Windows Update flow when updates fail, open Get Help for printer and Bluetooth problems, and look under Activation only when Windows explicitly reports that it is not activated.
The important change is conceptual as much as technical: Windows troubleshooting is no longer centered on legacy standalone wizards. Settings provides the entry point, Get Help increasingly supplies the diagnostic experience, and obsolete MSDT-based instructions should be left behind.
