
The key is to troubleshoot in the right order. Start with the checks that take seconds and do not alter the system. Then isolate whether the failure is affecting the hardware, Windows, one specific application, or one website. That structured approach prevents the familiar mistake of uninstalling drivers when the real issue is simply that Zoom, Teams, Chrome, or a privacy utility is pointing at the wrong camera.
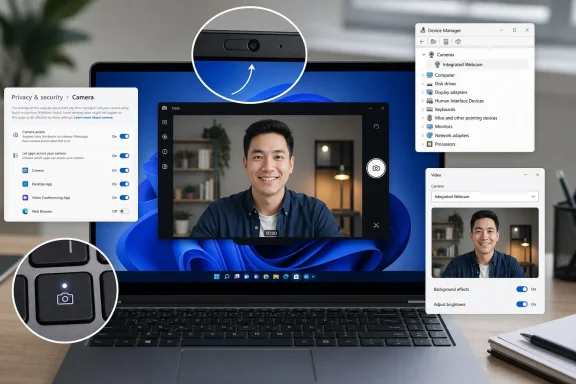 Overview: Why an Integrated Camera Stops Working
An integrated camera is part of the laptop display assembly or all-in-one PC chassis. Unlike a USB webcam, it has no cable to reseat, yet it can still be disabled at several distinct layers. Manufacturers have increasingly added camera shutters, keyboard shortcuts, BIOS controls, and privacy software to make disabling the sensor easier.
That is a security benefit, but it creates a diagnostic challenge. A closed shutter, for example, can look exactly like a driver failure: every application opens successfully but displays a uniformly black image. A hardware camera key can make Windows report that no camera is available at all. Microsoft specifically notes that a laptop’s camera switch or button may cause Windows not to recognize the device, or may display a camera icon with a slash through it. Microsoft Support
The most efficient way to fix an integrated webcam is to identify which of these four layers is failing:
- Physical layer: shutter, privacy switch, camera-toggle key, firmware or BIOS control.
- Operating-system layer: Windows camera permissions, disabled device entry, driver corruption, update regression.
- Application layer: Zoom, Microsoft Teams, Discord, OBS, or another program using the wrong device or keeping the camera busy.
- Website layer: browser-level site permissions, blocked exceptions, or a default camera that points to an external device.
A successful image in the Windows Camera app is the most useful dividing line. If Camera works but a meeting service does not, the built-in camera itself and its base Windows driver are generally functioning; the remaining problem is ordinarily the app’s device selection or its permissions.
Start With the Physical Privacy Controls
Before changing a Windows setting, inspect the hardware. This is the fastest fix and the step most likely to be missed after a laptop has been transported, cleaned, or handed to another person.
Open the camera shutter
Many modern laptops place a tiny sliding shutter directly beside the lens at the top of the display. It may be marked by a red indicator or a simple camera glyph. Slide it open until the lens is visible.
A shutter is intentionally independent of Windows. No driver update, permissions adjustment, or app reinstall can overcome a physical cover over the lens. If the camera activates but produces only darkness in every application, check this first.
Find the privacy switch or camera key
Some laptops use a physical side switch, while others use a dedicated key on the top keyboard row. The key may require Fn to work, depending on the keyboard’s function-key configuration. Microsoft advises checking for a keyboard button, Fn-key combination, side slider, or shutter located near the lens. Microsoft Support
Manufacturer-specific implementations can add confusion:
- Lenovo systems may expose camera privacy controls through a camera-icon key and Lenovo Vantage. On newer ThinkPads, the expected key behavior can differ from older models, so Vantage’s camera privacy setting is often the more reliable place to confirm the state.
- HP laptops may use a webcam privacy switch or shutter key. HP’s hardware diagnostics can also help determine whether Windows can see the sensor.
- Dell systems may expose an Enable Camera setting under Integrated Devices in BIOS or UEFI firmware. If that control is disabled, Windows cannot repair the issue by itself.
- Surface hardware typically has fewer vendor-specific switches, but a restart, Windows settings check, or the Surface app may still be needed for detection and driver issues. Microsoft Support
Do not randomly change BIOS settings if the integrated camera is already detected in Device Manager and works in another app. Firmware changes are useful only when the camera has been explicitly disabled there or does not appear to Windows at all.
Fix Windows 11 Camera Permissions
Windows camera privacy controls are not a single on/off switch. They include device-level access, general app access, Microsoft Store app controls, and a separate setting for classic desktop software. That distinction matters because web browsers, Teams, and many conferencing clients are classified as desktop apps rather than Microsoft Store apps.
Turn on the required permission layers
Open:
Start > Settings > Privacy & security > Camera
Then verify the following options:
- Camera access is turned on.
- Let apps access your camera is turned on.
- The specific Microsoft Store app has camera access if it appears in the app list.
- Let desktop apps access your camera is turned on for browsers, Teams, Zoom, and similar desktop programs.
Microsoft confirms that desktop apps cannot be individually toggled from the Store-app list, and specifically identifies browsers and apps such as Teams as software that relies on the desktop-app camera permission. Microsoft Support
Re-enable a disabled camera device
Windows may know that the camera exists but keep it disabled. Open:
Start > Settings > Bluetooth & devices > Cameras
If the device is listed in Disabled cameras, select it and choose Enable.
Then open Device Manager and expand Cameras. Right-click the internal camera. If the context menu says Enable device, select it. If it says Disable device, the camera is already enabled; do not click it.
This wording is useful diagnostic evidence. Microsoft notes that the presence of Disable device in the menu means the camera is enabled, while Enable device indicates that it is disabled. Microsoft Support
Use the Camera app as a baseline test
Open the Camera app from Start. This test is deliberately simple: it bypasses browser site permissions and most conferencing-app device selectors.
- If the image appears in Camera, move directly to the failing app or browser.
- If Camera cannot find the device, inspect Device Manager and drivers.
- If Camera reports access denied, return to the privacy page and check security software or organization policy.
- If Camera displays black video while the device is detected, recheck the shutter, camera key, lighting, and driver state.
For Windows 11 systems, Microsoft recommends starting with the automated camera troubleshooter in the Get Help app. It runs diagnostics and attempts common repairs automatically. Microsoft Support
Close the App That Is Using the Camera
A working camera is still a single resource. While modern software can sometimes share it, many applications and driver combinations cannot do so cleanly. A previous Teams call, Zoom session, browser tab, recording utility, virtual-camera tool, or background messaging client may keep the camera occupied.
Open Task Manager by right-clicking the taskbar and selecting it. Close programs that could plausibly be using video, including:
- Microsoft Teams
- Zoom
- Google Meet tabs in Chrome or Edge
- Discord
- OBS Studio
- NVIDIA Broadcast
- Logitech Capture
- Virtual camera utilities
- Camera-preview or manufacturer privacy applications
End only the relevant app processes rather than force-closing unfamiliar Windows services. Microsoft’s camera guidance specifically recommends using Task Manager to close a conflicting app when camera errors result from another process using the device. Microsoft Support
Restarting Windows is still valuable after closing a suspected conflict. It clears the camera session cleanly and also helps after a driver or permissions change.
Select the Built-In Camera in Zoom and Teams
A surprisingly large share of “integrated camera not working” reports are really wrong-camera selection reports. Docking stations, USB webcams, capture cards, virtual cameras, Android-phone webcam tools, and older inactive devices can all appear in a camera list.
Zoom: verify the preview before joining
In the Zoom desktop app, open Settings and then Video & effects. Confirm that the preview shows an image, then select the internal camera from the Camera menu. The label varies by manufacturer but commonly includes:
- Integrated Camera
- Integrated Webcam
- Built-in Camera
- Internal Camera
- The laptop maker’s camera device name
During a meeting, use the arrow beside Start Video or Stop Video, open Video Settings, and confirm the same selection. Zoom’s troubleshooting guidance also warns that device settings or security software can prevent the application from accessing the camera; reinstalling the current Zoom client is a later option if permissions and device selection are correct. Zoom Support
Microsoft Teams: check Devices and run a test call
In the Teams desktop app, open:
Settings and more > Settings > Devices
Choose the integrated camera, inspect the live preview, and select Make a test call. Microsoft documents the Devices settings page as the location for managing camera hardware and testing call quality. Microsoft Support
If Teams is the only application that fails, check Windows camera privacy settings again. The desktop-app camera permission must remain enabled. A functioning Camera app combined with a failing Teams preview usually means Teams is selecting an external or virtual device, lacks a needed permission, or is affected by a company-managed policy.
Virtual cameras can complicate the list
Software including OBS, NVIDIA Broadcast, Snap Camera remnants, phone-connectivity utilities, and vendor collaboration suites can create virtual camera entries. These may be useful for effects or background processing, but they can also become the default device after an update.
For critical calls, select the named built-in camera rather than Default or Automatic when multiple devices exist. That removes ambiguity and makes future troubleshooting easier.
Reset Browser Camera Permissions
When the integrated camera works in Windows Camera, Zoom, or Teams but not on a specific website, do not reinstall the camera driver. The issue is almost certainly in browser settings or site-level permission history.
Google Chrome
In Chrome, open:
More > Settings > Privacy and security > Site settings > Camera
Choose the correct default camera, review websites under the blocked list, and remove old exceptions or change the required site to Allow. Google’s documentation confirms that Chrome allows users to select a default camera, switch devices, and remove or modify individual site permissions from the Camera settings page. Google Chrome Help
Chrome also cannot simply begin recording because a different application is active. Google notes that a site cannot start recording if another Chrome tab or a different app is using the camera, reinforcing the need to close competing software before testing. Google Chrome Help
Microsoft Edge, Firefox, and Safari
In Microsoft Edge, allow the camera prompt on the site. If access was previously blocked, open the site’s permissions and change Camera from Block to Allow.
In Firefox, open:
Settings > Privacy & Security > Permissions > Camera > Settings
Change the site to Allow, or remove the entry so Firefox prompts again on the next visit.
On a Mac using Safari, open:
Safari > Settings > Websites > Camera
Then choose Ask or Allow for the relevant website. Apple confirms that Safari’s camera permission management is available under Safari > Settings > Websites > Camera. Apple Support
A permission reset is preferable to broadly allowing every site. Camera access should be granted only to a trusted meeting or recording service, particularly on personal laptops.
Update, Repair, or Reinstall the Camera Driver
Driver work should come after the physical, permissions, and app-level checks. It is powerful, but it carries more risk than toggling a privacy setting, especially on laptops that depend on tailored OEM camera drivers.
Start with Windows Update and optional drivers
Open:
Start > Settings > Windows Update > Check for updates
Then inspect Advanced options > Optional updates for driver updates. Install available camera-related updates, restart, and test the Camera app again.
For manufacturer-specific components, use the official support page for the exact laptop model. OEM updates may bundle camera fixes with chipset, firmware, BIOS, graphics, or system-management updates. Avoid generic driver-download websites: a mismatched camera driver can remove hardware-specific functions such as Windows Hello support or image-processing features.
Repair or reset the Windows Camera app
If Device Manager sees the camera but the Microsoft Camera app alone misbehaves, open:
Settings > Apps > Installed apps > Camera > Advanced options
Choose Repair first. If that does not resolve the fault, choose Reset. This affects the Camera app’s local settings rather than removing the underlying webcam hardware.
That is a sensible intermediate measure before driver removal, particularly if Zoom and Teams still access the camera normally. The broader step-by-step repair sequence, including updates and Camera app repair, is also reflected in the original troubleshooting coverage. Technobezz
Scan for hardware changes
Open Device Manager. Look for the webcam under:
- Cameras
- Imaging devices
- Sound, video and game controllers
If it is missing, select:
Action > Scan for hardware changes
Then restart and test again. Microsoft recommends this scan when the device is not listed, followed by a reboot and a Camera app test. Microsoft Support
Roll back a recently changed driver
If the integrated camera stopped working immediately after a Windows, driver, or manufacturer update, right-click the camera in Device Manager and choose:
Properties > Driver > Roll Back Driver
Restart once the rollback completes. This is safer than uninstalling because it restores the earlier driver Windows still retains. Microsoft recommends rollback specifically when the failure began after an update. Microsoft Support
Uninstall only when rollback fails or is unavailable
If rollback is unavailable, select:
Properties > Driver > Uninstall Device
When Windows presents the option, select Attempt to remove the driver for this device, confirm the uninstall, then use Action > Scan for hardware changes and restart. Windows should rediscover the camera and install an appropriate driver.
This can resolve corrupted device registration, but it is not a universal cure. On certain hardware, a generic fallback driver may restore basic video while losing advanced vendor functions. If the device is still absent after a scan and reboot, return to the PC maker’s support tools rather than repeatedly uninstalling it.
Important Surface Pro X exception
Microsoft explicitly warns against uninstalling camera drivers on Surface Pro X. On that model, removing the driver can require a full system reset to recover. For Surface devices with Intel(R) TGL AVStream Camera or Intel(R) AVStream Camera, Microsoft does document a controlled uninstall-and-restart process, but it should not be applied to Surface Pro X. Microsoft Support
Check Antivirus, Privacy Utilities, and Managed Policies
Third-party antivirus suites increasingly include webcam protection. The feature is well intentioned: it can block untrusted software from silently activating a camera. The downside is that a legitimate browser or conferencing app may be denied access without an obvious explanation.
Look for labels such as:
- Webcam Protection
- Camera Protection
- Privacy Guard
- SafeCam
- Application Control
- Video Protection
Allow the affected application or temporarily disable the specific camera-protection function long enough to test. Avoid disabling the entire security suite unless its vendor’s instructions specifically require it. Microsoft identifies antivirus and firewall controls as potential camera blockers and advises checking their settings. Microsoft Support
On work or school equipment, a greyed-out camera setting, a “managed by your organization” message, or a change that reverses itself points to policy rather than a local fault. Chrome documents that work or school administrators can control camera and microphone settings, while Windows may require an administrator to enable device-level camera access. Google Chrome Help Microsoft Support
The correct resolution in that situation is an IT support request. Attempts to bypass an organization’s policy may violate security requirements and usually do not survive the next management sync.
Mac and Chromebook Checks for Cross-Platform Users
The same logic applies outside Windows: check physical controls, system privacy permissions, app selection, and site permissions before assuming hardware failure.
Mac: approve the app and choose the built-in camera
On macOS, open:
Apple menu > System Settings > Privacy & Security > Camera
Enable access for the app that needs the camera. Apple explains that this panel lists installed apps that have requested camera access, while built-in apps such as FaceTime and Photo Booth receive access automatically. Apple Support
If an iPhone appears as the active video source through Continuity Camera, choose the Mac’s built-in camera in the app’s video menu. Apple documents that FaceTime, Photo Booth, and QuickTime can each select a camera through their own menus. Apple Support
Chromebook: system access can block everything
ChromeOS has a system-level Camera access control under:
Settings > Privacy and security > Privacy controls
When it is off, applications and websites cannot use the camera even if a particular website was previously allowed. Google states that disabling Camera access blocks access across levels and services; it also recommends checking any physical camera switch on the Chromebook. Google Chromebook Help
When the Problem Is Probably Hardware
After completing the physical, permissions, conflict, browser, update, and driver steps, a persistent failure may indicate a hardware issue. This becomes more likely when the camera is absent from Device Manager after a restart and hardware scan, does not work in the Windows Camera app, and is unaffected by OEM updates or firmware settings.
Common hardware-related scenarios include:
- Damage after a drop, display replacement, or hinge repair.
- A loosened internal display cable.
- Camera module failure.
- BIOS settings that remain disabled after being re-enabled.
- Motherboard or power-management faults affecting the camera bus.
At that stage, use the laptop manufacturer’s built-in diagnostics and official support channel. A repair technician can verify the camera assembly and display cable without resorting to unnecessary operating-system reinstallation.
Windows 10-era instructions and legacy webcam packages should also be approached carefully. Windows 10 support ended on October 14, 2025, so Windows 11-compatible drivers, current OEM update utilities, and supported operating-system builds are the relevant path for most consumer systems. Microsoft Support
The Best Order for a Lasting Fix
The strongest integrated camera troubleshooting workflow is not the one with the most aggressive repair action. It is the one that proves the problem’s location with the least disruption.
- Open the shutter and enable the physical camera control.
- Test Windows Camera to establish whether the hardware responds.
- Enable Windows camera and desktop-app permissions.
- Close competing apps through Task Manager.
- Select the integrated camera explicitly in Zoom, Teams, and other apps.
- Reset browser site permissions when the failure is website-specific.
- Run Get Help, Windows Update, and OEM updates.
- Roll back or reinstall the driver only when evidence points to a driver issue.
- Escalate to hardware diagnostics only after software and policy causes have been ruled out.
That sequence acknowledges both sides of modern laptop privacy design. Physical shutters, permission prompts, security tools, and managed policies make unauthorized camera access harder, which is a meaningful strength. But each protection layer can also create an apparent webcam failure. Once those layers are checked methodically, most integrated camera issues can be resolved without replacing hardware or reinstalling Windows.
