
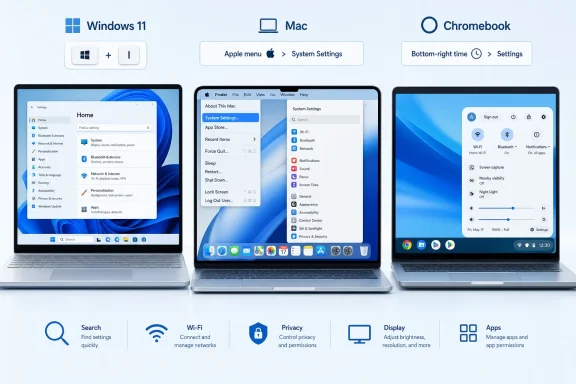
 The Core Difference: “Settings” Means Different Things on Different Computers
The term computer settings sounds universal, yet every major desktop platform organizes controls differently. Windows uses the Settings app as its main management hub. macOS uses System Settings, while older Mac documentation may still refer to System Preferences. Chromebooks use a browser-style Settings page within ChromeOS.
The distinction matters because a setting for Wi-Fi, display brightness, notifications, privacy, installed apps, or system updates may exist in a completely different location depending on the device.
A second complication is that there are several layers of settings:
- Operating system settings control the computer itself.
- App settings control a specific program, such as Microsoft Edge, Google Chrome, or Photoshop.
- Browser settings affect browser behavior, privacy, downloads, passwords, and extensions.
- Website permissions apply only to an individual website.
- Organization-managed settings may be controlled by an employer or school.
Understanding which layer is involved prevents a common troubleshooting mistake: changing a browser setting when the issue is controlled by Windows, or trying to alter a work-managed system policy that the local user cannot change.
Opening Settings on a Windows 11 PC
For most WindowsForum readers, the primary goal is to open Windows Settings quickly and reach the correct page with minimal clicking. Windows 11 places Settings at the center of routine PC administration, from display configuration and Bluetooth pairing to privacy controls and Windows Update.
Use the Windows Key + I Shortcut
The fastest way to open Windows Settings is:
- Press Windows key + I.
This shortcut works from the desktop, File Explorer, most applications, and many other parts of Windows. It is the most useful command to remember because it bypasses the Start menu and opens the Settings app immediately.
Once inside Settings, the left-side navigation normally includes categories such as:
- System
- Bluetooth & devices
- Network & internet
- Personalization
- Apps
- Accounts
- Time & language
- Gaming
- Accessibility
- Privacy & security
- Windows Update
The exact labels and ordering can change with Windows updates, device type, account configuration, and regional settings. However, the basic structure remains consistent: broad categories on the left and detailed controls on the right.
Open Settings from Start
The visual route is equally simple:
- Select Start on the taskbar.
- Select Settings.
If the Settings icon is not visible among pinned apps, use the Start menu search field instead. Type Settings, then choose the app from the results.
This approach is especially useful on touchscreen PCs, tablets, or systems where the Windows key is unavailable or mapped differently.
Use the Start Button’s Right-Click Menu
Windows 11 also includes a practical power-user menu:
- Right-click the Start button.
- Select Settings.
The same menu provides shortcuts to Device Manager, Disk Management, Terminal, Task Manager, and other administrative tools. It is an efficient alternative for people who regularly manage Windows hardware, software, storage, and networking.
Search for Settings from the Taskbar
Windows Search is often faster than navigating the Settings app manually.
- Select Search on the taskbar.
- Type Settings.
- Open the Settings app.
A more useful version of this technique is to search for the actual feature needed. Typing terms such as display, Bluetooth, printer, storage, notifications, activation, microphone, or Windows Update can lead directly to the relevant configuration page.
This is one of Windows 11’s strongest usability advantages. Rather than memorizing category paths, users can search for the outcome they want.
Search Inside the Settings App
After opening Settings, use the search box near the top of the window. Type a short phrase that describes the target control.
Useful examples include:
- Change resolution
- Night light
- Default apps
- Startup apps
- BitLocker
- Windows Hello
- Recovery
- Sound output
- Nearby sharing
- Clipboard history
- Optional features
- VPN
- Focus
Search is particularly valuable because Windows Settings has grown substantially over time. Many controls that were once obvious are now nested in cards, subpages, or categories that may not intuitively match the wording used in older tutorials.
Direct Ways to Reach Common Windows Settings Pages
Windows 11 provides contextual shortcuts from the desktop and taskbar. These are useful because they take users to the settings area most closely connected to the item they are already looking at.
Personalization and Wallpaper
To change the desktop background, theme, colors, or lock-screen appearance:
- Right-click an empty area of the desktop.
- Select Personalize.
This opens the Personalization section of Windows Settings. From there, users can manage:
- Desktop wallpaper
- Themes
- Accent colors
- Lock screen preferences
- Touch keyboard appearance
- Start menu layout
- Taskbar behavior
- Fonts
For a quick wallpaper adjustment, open Background after selecting Personalize.
Taskbar Settings
To customize taskbar alignment, app badges, system tray behavior, taskbar search, widgets, or multiple-monitor behavior:
- Right-click an empty section of the taskbar.
- Select Taskbar settings.
This route is preferable to searching for taskbar options because it opens the exact page immediately.
Run Command for Windows Settings
The Windows Run dialog offers another direct method:
- Press Windows key + R.
- Type
ms-settings: - Press Enter.
This opens the main Windows Settings app.
The ms-settings: protocol can also open specific Settings pages when used with a supported page identifier. That capability is useful for administrators, support personnel, shortcuts, scripts, and troubleshooting documentation. However, direct page names can change over time, and some settings may vary according to Windows edition, hardware, policy, or installed features.
For ordinary use, Windows key + I remains the safer shortcut to memorize.
Why Windows Settings Can Still Be Confusing
Windows 11 has steadily shifted more system controls into Settings, but the transition from the old Control Panel remains incomplete. That creates a dual-interface experience that can confuse even experienced users.
Settings vs. Control Panel
The modern Settings app is designed for current Windows features and everyday configuration. It provides a cleaner layout, better search, touch-friendly controls, account integration, and direct access to newer Windows capabilities.
The older Control Panel still exists primarily for compatibility. Certain legacy hardware tools, advanced networking options, classic administrative components, and third-party utilities may still point there.
A sensible rule is:
- Use Settings first for standard Windows 11 tasks.
- Use Control Panel only when a legacy guide, applet, driver utility, or advanced workflow specifically requires it.
This is not merely a cosmetic distinction. Settings is where Microsoft places the most current consumer-facing configuration work, including Windows Update, privacy permissions, accessibility features, account settings, recovery options, and the majority of device controls.
Older Tutorials Can Send Users to the Wrong Place
Many search results still describe Windows 10 navigation. The basic shortcut Windows key + I remains valid, but menus and category names may differ.
Windows 10 reached end of support on October 14, 2025 for standard Home and Pro editions. PCs running that operating system can still function, but ordinary consumer systems no longer receive the same level of ongoing security servicing as supported Windows releases. This makes Windows 11 guidance more relevant for most current home users.
There are important exceptions for specialized enterprise and long-term servicing editions, but they should not be confused with a typical consumer Windows 10 installation.
Opening System Settings on a Mac
Mac users will not find an app called simply Settings in the same way Windows users do. On current macOS releases, Apple calls the primary configuration app System Settings.
The name change is one of the main reasons older guides can be confusing. If a tutorial says System Preferences, it was written for older macOS versions, including macOS Monterey and earlier.
Use the Apple Menu
The standard Mac route is:
- Select the Apple menu in the upper-left corner.
- Select System Settings.
The System Settings window uses a sidebar, similar in concept to Windows 11 Settings. Categories commonly include Wi-Fi, Bluetooth, Network, Notifications, Sound, Focus, Screen Time, General, Accessibility, Privacy & Security, Desktop & Dock, Displays, Wallpaper, Keyboard, Trackpad, and Battery.
The layout can differ depending on whether the Mac is a laptop, desktop, Apple silicon model, Intel-based model, or managed business device.
Open System Settings from the Dock
Many Macs include the System Settings icon in the Dock. Selecting it opens the same control center without using the menu bar.
This is convenient for users who prefer mouse or trackpad navigation. It is also a useful visual landmark for people transitioning from Windows, where Settings is commonly pinned to Start rather than permanently displayed in a dock.
Use Spotlight Search
The fastest keyboard-oriented method is:
- Press Command-Space bar.
- Type System Settings.
- Press Return.
Spotlight is particularly effective when the settings icon has been removed from the Dock or when another app is in full-screen mode.
Once System Settings is open, use its search field to find a specific control. Searching for a term such as wallpaper, display, FileVault, login items, screen lock, or software update is usually faster than working through the sidebar.
Find System Information, Not Just Settings
Mac users sometimes need hardware details rather than configuration controls. For that, go to:
- Apple menu > System Settings
- Select General
- Select About
The About page provides basic details such as the macOS version, chip or processor, memory, serial number, storage, displays, and coverage information. For a deeper hardware and software inventory, use System Report from the About section.
This is comparable to opening System > About in Windows Settings, though the available information and terminology differ.
Finding Settings on a Chromebook
ChromeOS takes a simpler, browser-like approach. Chromebook Settings is closely integrated with the system tray and Chrome environment.
Open Chromebook Settings from the Time Menu
The standard method is:
- Select the time in the lower-right corner.
- Select Settings.
The time menu is also where users find quick controls for Wi-Fi, Bluetooth, brightness, volume, battery status, accessibility, notifications, and power options.
This design makes ChromeOS efficient for basic changes because common controls are available before the full Settings page even opens.
Use the Keyboard Shortcut
For keyboard users:
- Press Alt + Shift + S.
- Select Settings.
This opens the status area and allows access to the Settings option without using a mouse or trackpad.
Inside ChromeOS Settings, press Ctrl + F to focus the settings search field, then type a keyword. Searches such as Wi-Fi, update, display, accessibility, printer, Linux, or sync can rapidly locate the appropriate page.
Why Chromebook Settings Feels Different
ChromeOS is designed around cloud services, browser-based applications, and centralized Google account management. As a result, its settings structure may feel more limited than Windows or macOS in some areas, but it is often simpler for routine device administration.
The tradeoff is that advanced controls may be unavailable, hidden by device policy, or dependent on whether Linux development tools, Android apps, enterprise enrollment, or school management features are enabled.
Computer Settings, App Settings, and Browser Settings Are Not the Same
A common source of confusion is assuming that every problem can be fixed in the operating system’s main Settings app. In practice, app and browser settings are separate.
Windows App Settings
Most Windows apps expose their own controls through one of these options:
- A gear icon
- A three-dot menu
- A More button
- A Settings or Options entry
- A menu bar item under File, Edit, or the app’s name
For example, changing Microsoft Edge’s startup behavior, privacy protection, downloads folder, saved passwords, or appearance requires opening Microsoft Edge settings, not Windows Settings.
Windows can manage which app opens a file type or web link through Default apps, but it does not replace an app’s internal configuration.
Mac App Settings
On macOS, app-level controls are usually found in the menu bar:
- Open the application.
- Select the app’s name next to the Apple menu.
- Select Settings.
Older Mac software may use the label Preferences instead. The function is essentially the same.
For example, Safari settings, Mail settings, and many professional creative applications are accessed from their own menu-bar entries rather than from System Settings.
Browser Settings
Each browser retains its own settings area:
- Google Chrome: Select the three-dot menu, then Settings.
- Microsoft Edge: Select Settings and more, then Settings.
- Mozilla Firefox: Select the application menu, then Settings.
- Safari: Open Safari, then use the Safari menu and choose Settings.
Browser settings control browser-specific behavior. This can include:
- Home page and startup tabs
- Search engine selection
- Passwords and autofill
- Extensions
- Downloads
- Tracking protection
- Privacy controls
- Cookies and site data
- Notifications
- Appearance
- Performance settings
Changing a browser setting does not necessarily change Windows, macOS, or ChromeOS behavior. Likewise, changing a system setting may not automatically override the browser’s own privacy or permissions configuration.
Managing Website Permissions Safely
Website permissions form another separate layer. A site may request access to the camera, microphone, location, notifications, clipboard, Bluetooth devices, downloads, pop-ups, or other capabilities.
In Google Chrome, a site’s settings can be reviewed by:
- Opening the website.
- Selecting the site information icon to the left of the web address.
- Selecting Site settings.
- Changing the relevant permission.
This is more precise than changing the browser-wide default. It allows a trusted video-conferencing site to use the microphone, for example, while keeping microphone access blocked for most other websites.
A Practical Permission Rule
Permissions should be granted according to necessity, not convenience.
- Allow a camera only for sites that genuinely need video input.
- Allow location only when the service needs local results or navigation.
- Treat notification prompts cautiously.
- Review Bluetooth, USB, serial-port, and file-access prompts carefully.
- Reset permissions for websites that are no longer used or trusted.
A website permission can be technically valid while still being unnecessary. Limiting permissions reduces exposure to nuisance notifications, unwanted tracking, accidental device access, and social-engineering attempts.
Managed Work and School Computers
Settings may look different—or some options may be missing entirely—on a computer managed by an employer, university, or school district. This is usually intentional.
Windows Management Policies
Organizations can use management tools and policies to:
- Hide Settings pages
- Prevent account changes
- Enforce update schedules
- Configure security controls
- Restrict removable storage
- Require encryption
- Control browser settings
- Block personal cloud accounts
- Manage VPN and network profiles
If Windows reports that an option is managed by an organization, repeatedly changing local settings is unlikely to solve the issue. The device may be enrolled in a management platform, and the administrator’s policy can reapply after sign-in, restart, or synchronization.
Mac Device Management
On a managed Mac, installed profiles and device controls may appear under System Settings > General > Device Management. Depending on the organization’s configuration, users may see profiles for security certificates, Wi-Fi networks, VPNs, email accounts, restrictions, or management agents.
A profile that does not provide a removal option should not be bypassed. On company-owned hardware, removing management controls can violate policy, disrupt access to work services, or create security and compliance problems.
Managed Chromebooks
School and business Chromebooks can be controlled through centralized administration. In these cases, system preferences, browser settings, extensions, network access, and update behavior may be restricted.
The correct response is to identify whether the Chromebook is managed and contact the organization responsible for the device. A managed system is not necessarily malfunctioning simply because a menu option is unavailable.
Accessibility and Keyboard-First Navigation
Opening Settings should not depend on using a mouse. Windows, macOS, and ChromeOS all offer effective keyboard-driven paths.
Essential Shortcuts to Remember
| Platform | Fastest Settings Shortcut |
|---|---|
| Windows 11 | Windows key + I |
| macOS | Command-Space, type System Settings, then Return |
| Chromebook | Alt + Shift + S, then select Settings |
Windows Settings also works well with keyboard navigation after launch. Use Tab to move between controls, arrow keys to navigate menus and lists, and Enter or Spacebar to activate buttons and switches.
For users of screen readers, clear category labels and the built-in settings search field can be more efficient than manually exploring every section. Search remains the most accessible and least error-prone method when the desired control is known by name.
The Best Approach in 2026
The best way to open settings on a computer depends on the platform, but the overall strategy is consistent: use a direct shortcut first, then search for the exact feature needed.
For Windows 11 users, Windows key + I is the essential shortcut. It opens the primary control hub immediately and avoids outdated assumptions about Control Panel navigation. From there, search is often faster than browsing categories, especially for specialized controls such as recovery, notifications, default apps, storage, privacy permissions, or accessibility.
Mac users should use System Settings, not the older System Preferences terminology found in legacy documentation. Chromebook users should begin with the lower-right time menu or the Alt + Shift + S shortcut.
The important distinction is not simply how to open Settings, but which settings layer is responsible for the problem. System settings manage the computer, app settings manage individual software, browser settings manage browser behavior, and website permissions manage a single site’s access. Once that separation is clear, finding and changing the correct option becomes far less frustrating.
