
Guiding Tech’s August 21 walkthrough correctly points users to the Text input page and notes that custom themes can alter colors, transparency, key labels, and background images. Microsoft’s own Windows settings reference confirms the broader scope: Text input themes are shared across touch keyboard, voice typing, emoji, and related input interfaces. The practical takeaway is simple: treat this as an input UI theme, rather than a cosmetic setting for one keyboard window.
For people using a 2-in-1, pen-enabled PC, kiosk, or desktop where the touch keyboard is occasionally useful, the setting can improve legibility and make Windows’ floating input panels less visually jarring. It can also do the opposite if a high-transparency or busy-image theme makes keys and controls harder to distinguish.
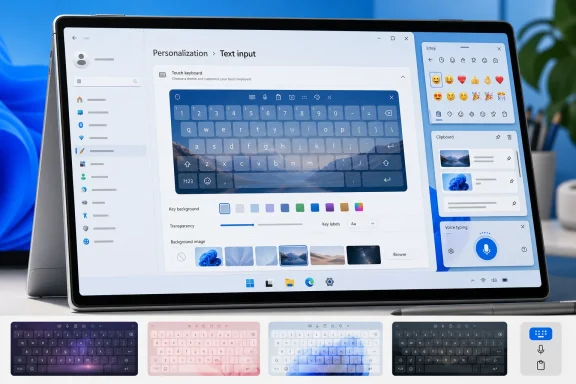 The setting is under Text input, not the keyboard’s own menu
Open Settings, select Personalization, then choose Text input. The page carries the preset theme gallery, the Custom theme option, and the controls for keyboard scale, key-label size, and key backgrounds.
If that route is difficult to locate after a Windows feature update, use the Settings search box and enter “touch keyboard” or “text input.” Windows has changed the name and placement of this page before. The broader Text input name dates to Windows 11’s expansion of touch-keyboard themes to other input surfaces, so older instructions that say to open “Touch keyboard” settings may point readers at an obsolete label.
The first decision is whether a built-in theme is enough. Windows provides light, dark, and color-focused presets; selecting one applies it immediately. This is the right choice for most users because it preserves Microsoft’s tested combinations of window color, key color, and text contrast.
A custom theme is worthwhile when there is a specific display problem to solve. Examples include matching an organization’s neutral desktop appearance on shared devices, making a compact keyboard easier to read on a high-resolution display, or avoiding the visual glare of a bright keyboard when working in a dark application.
Build the custom theme around readability first
Choose Custom theme from the theme gallery, then open its editing controls. Windows separates the overall input-surface background from the touch keyboard’s individual keys, which is an important distinction. A background image or color can look fine behind the emoji picker while creating poor contrast behind semi-transparent keyboard keys.
Start with the broadest elements:
- Set the background color or choose a background picture stored locally on the PC.
- Pick an accent color that remains visible against that background.
- Set the general text color before adjusting the touch-keyboard-specific settings.
- Open the Touch keyboard section and set key background color, key-text color, and transparency.
- Use Open keyboard to inspect the result before saving.
The preview step should not be skipped. A custom image may work on a large 27-inch monitor but become a distraction when the keyboard occupies much of a smaller tablet display. Likewise, a theme that looks balanced at full desktop brightness can produce low-contrast key labels in a dim room.
Transparency deserves particular caution. The keyboard’s translucent key caps layer over whatever is behind them, including the custom background picture and the active application. A subtle texture, photo, or strong accent color can therefore bleed through the keys. If users have to pause to identify Backspace, Shift, Enter, or punctuation, reduce transparency or return to a solid key background.
The Show key background option is also more useful than it sounds. Enabling it restores clearer boundaries around keys, making the standard keyboard grid more obvious. On devices used by multiple people, or for users who type with a stylus or mouse rather than fingertips, the stronger visual separation can be preferable to a minimalist design.
Keyboard size and label size solve different problems
Windows puts keyboard sizing and key-label sizing on the same Text input page, but they address separate constraints. Increasing keyboard size makes the entire on-screen keyboard larger relative to the desktop. Increasing key-text size enlarges the characters printed on the keys without necessarily improving the physical target area by the same amount.
For touch use, prioritize keyboard size when taps are missing or keys feel cramped. A larger keyboard gives fingers more room and can reduce errors, especially in the split or default layouts available on touchscreen devices. For mouse, pen, or accessibility use, a larger key-label setting may be enough when the problem is recognizing characters rather than hitting them.
Microsoft’s settings documentation shows these choices are retained in the current user’s Text input configuration, alongside the selected theme and key-background preference. In practical terms, that means a change is personal to the signed-in Windows account. An administrator preparing a shared PC should test with the actual account that will use the device rather than assuming a theme chosen in one profile will follow every user.
There is no good reason to edit the Registry for routine personalization. Microsoft documents the underlying current-user settings, including the selected theme, scaling factor, key-label size, and key-background state, but the supported Settings interface exposes the controls users need. Registry changes add support and rollback problems without adding a meaningful capability for ordinary customization.
Check the other input panels before calling the theme finished
A saved Text input theme should be checked in more than one place. Open the touch keyboard from its taskbar icon, then press Windows + . to view the emoji panel. Press Windows + V for clipboard history and Windows + H for voice typing. Those panels are the reason a heavily branded or photo-based keyboard theme can become tiring: the same visual choice follows users into several short, frequent interactions.
This shared behavior is the material detail missing from many quick theme guides. Someone may expect to personalize only an occasional on-screen keyboard and instead change the appearance of clipboard history and emoji search throughout the day. Conversely, users who want those panels to look consistent now have one place to control them.
If the keyboard icon is absent, right-click the taskbar and open Taskbar settings. Under System tray icons, set Touch keyboard to Always. Microsoft documents that this keeps the icon available even when a wired, wireless, or Bluetooth physical keyboard is attached, so the touch keyboard is not reserved for tablet-only hardware.
That capability is useful on conventional desktops as well. The touch keyboard can be operated with a mouse, and it offers an easy way to access handwriting, emoji, symbols, GIFs, and voice entry without installing a third-party keyboard utility.
Avoid using a theme as an accessibility substitute
Custom themes can improve clarity, but they are not a replacement for Windows accessibility settings. Users who need reliably distinct colors across applications should consider Windows contrast themes, text-size controls, display scaling, and color filters rather than relying only on a keyboard background image or accent color.
The Text input controls apply to Microsoft’s input interfaces; they do not recolor every application, repair weak contrast inside a website, or alter a physical keyboard. A custom theme should therefore be judged on the screens where it actually appears: the keyboard, emoji panel, clipboard history, and voice typing window.
For most PCs, a preset dark or light Text input theme with key backgrounds enabled is the lowest-risk configuration. Custom colors and images are best reserved for cases where the result has been checked across all four input panels—because in Windows 11, a “touch keyboard” theme is really a shared setting for the system’s entire expressive input layer.