

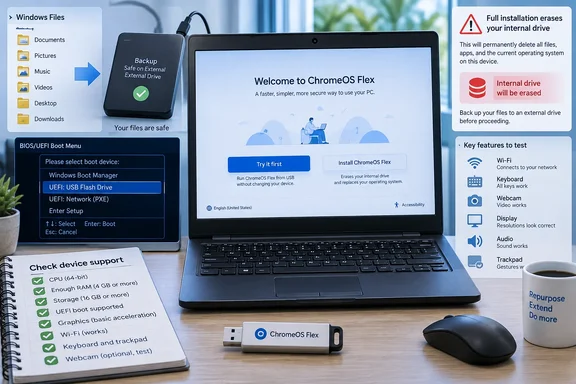
Engadget’s September 21 guide describes the basic route: create installation media in Chrome, start the old PC from that USB drive, test ChromeOS Flex, and install when ready. Google’s installation requirements and certified-model records add two important checks before you begin: the exact hardware configuration and its remaining support period. Those checks can save you from wiping a working Windows installation for a replacement that has little supported life left.
ChromeOS Flex replaces Windows without replacing the PC
ChromeOS Flex is Google’s way of bringing many ChromeOS features to existing Windows, Mac, and Linux computers. The operating system is free; you still need compatible hardware and a suitable USB drive. A functioning target PC can create its own installer, so a second computer is helpful rather than mandatory.
Calling the result a “Chromebook” is convenient shorthand, but it overstates the conversion. Google explicitly distinguishes ChromeOS Flex from ChromeOS devices, whose Google-designed security chips and hardware enable verified boot and firmware integration that Flex does not provide in the same way. Installing a different operating system cannot add those components to an old laptop.
The immediate trade-off is more straightforward: a full installation replaces the existing operating system, programs, settings, and files. Treat this as a migration to a different computing environment, not a Windows update that preserves your applications. Before committing, establish that the tasks you actually need can be completed in the new environment.
There are two ways to evaluate that decision. A USB session runs ChromeOS Flex temporarily while leaving the existing Windows installation in place; a full installation makes Flex the computer’s operating system. TechRadar also describes these two routes in its conversion guide, distinguishing the reversible USB trial from the destructive installation. “Destructive” does not mean the hardware can never run Windows again. It means that installing Flex does not preserve a Windows installation you can simply switch back to.
ChromeOS Flex compatibility starts with the exact model
Google’s published minimum requirements are modest, but more specific than “an old Intel or AMD PC.” The target must be an Intel or AMD x86-64-compatible device, with at least 4GB of RAM and 16GB of internal storage. It must support booting from USB, and you need full administrator access to its BIOS or UEFI—the firmware settings that govern how the computer starts.
| Requirement | What it means for this conversion |
|---|---|
| Intel or AMD x86-64-compatible hardware | An Intel or AMD badge alone is not enough; the architecture must match Google’s requirement. |
| At least 4GB of RAM | This is an installation prerequisite, not a promise about the responsiveness of your workload. |
| At least 16GB of internal storage | This is separate from the USB drive used to start the installer. |
| USB boot capability | The computer must be able to start ChromeOS Flex from external installation media. |
| Administrator access to BIOS or UEFI | Firmware restrictions can prevent booting or necessary configuration changes. |
| A USB drive of at least 8GB | Creating the installer erases the contents of this drive. |
Hardware age needs careful handling. Engadget describes processors from 2012 or earlier as unable to support newer ChromeOS versions. Google’s wording is narrower: Intel or AMD processor/graphics components from 2012 and earlier are “not recommended or supported” and are unlikely to work. Google gives a similar warning for Nvidia components from 2014 and earlier. That is a strong reason not to choose such a machine for dependable use, but it is not a verified assertion that every installation on every component in those age groups is impossible.
The better starting point is Google’s Certified models list. Its September 2, 2026 revision distinguishes certified models from those with expected minor issues, expected major issues, and models that have reached the end of their support period. Read the entry for the exact model, including any variant information; Google warns that variants of certified models can behave unexpectedly.
ChromeOS Flex support dates change the value of a conversion
The support date can be more consequential than the minimum specifications. In Google’s September list, the Dell Latitude 3340 is certified through 2026, while the Latitude 3350 is certified through 2027 and the Latitude 3380 through 2028. Google states that support ends on December 31 of the listed year.
For someone considering a conversion in September 2026, those are materially different outcomes. A Latitude 3340 may be a reasonable experiment, but its certified support window is already close to ending. A machine with several supported years remaining offers a different basis for investing time in migration and setup.
Similar product names also require care. Google lists the Dell Latitude 3440 from 2014 separately from the Latitude 3440 with a 13th-generation Intel processor. The former is listed through 2026; the latter through 2032. Matching only the family name could produce a badly mistaken expectation about support.
Google permits installation on non-certified computers, but does not guarantee their stability, functionality, performance, or continued operation across updates. It also says those devices are ineligible for Chrome Education or Chrome Enterprise support. A successful USB test is useful evidence about the machine in front of you; it does not turn an unlisted model into supported hardware.
ChromeOS version 150 adds a separate graphics boundary
Google’s update documentation identifies another limit: increased minimum graphics requirements beginning with ChromeOS version 150. Its listed affected categories include older Intel and AMD graphics associated with devices from 2010 and earlier, and older Nvidia graphics associated with devices from 2014 and earlier.
The underlying graphics architecture matters, not merely the date or name of the finished PC. Google notes that some older architectures also appear in products with newer model names. Its guidance says affected devices can remain usable on version 150 but stop receiving subsequent updates.
These are separate checks. Minimum installation requirements establish whether a machine is a plausible candidate; model certification establishes Google’s documented support position; graphics restrictions can constrain future updates. Passing the first check does not settle the other two.
Create the ChromeOS Flex USB installer before touching Windows
For the Chromebook Recovery Utility method, Google specifies a ChromeOS, Windows, or Mac computer running the current Chrome browser. That can be the Windows PC you intend to convert, provided it still works. If it does not, create the installer on another suitable computer.
You also need a USB flash drive with at least 8GB of capacity. Everything on that USB drive will be erased. Copy off any files you want to keep before opening the recovery utility, and make sure you can distinguish the intended installer drive from other removable storage.
The creation process is separate from the later installation onto the PC. At this stage, the important destructive choice is which USB drive the utility will overwrite.
- Open Chrome on the computer that will create the installer, and install the Chromebook Recovery Utility extension from the Chrome Web Store.
- Open the utility from Chrome’s Extensions menu—the puzzle-piece button near the top-right corner.
- Select Get started, then choose “Select a model from a list.”
- Choose “Google ChromeOS Flex” as the manufacturer and “ChromeOS Flex” as the product, then select “Continue.”
- Insert the USB drive, select that drive in the utility, and double-check that it is the one you intend to erase.
- Select “Continue,” then “Create now.”
- Wait until the utility reports that the recovery media is ready before removing the drive.
Google notes that unusual percentage readings during creation can be normal. Completion is established by the utility’s ready message, rather than by guessing from an intermediate progress reading.
Keep your file backup separate from this installer. The installation USB has already been overwritten to serve a different purpose; it should not be the only place you expected to keep documents from the old PC.
Use ChromeOS Flex’s USB trial to test the machine and the job
Start with the temporary trial even if you are already convinced you want to leave Windows. Which?’s conversion guide also describes the choice between trying ChromeOS Flex over USB and installing it as the default operating system. Google calls the temporary option live boot: it lets you explore Flex and test device functionality without first replacing the operating system on the internal drive.
Getting to that choice requires the PC to start from USB rather than its usual Windows drive.
- Insert the completed installer into the target PC.
- Restart or power on the computer, and invoke its boot-selection menu immediately.
- Select the USB drive from the available boot devices.
- Wait for the ChromeOS Flex welcome screen.
- Select “Get started,” then Try it first rather than the installation option.
The boot-menu key varies by manufacturer and model. Engadget gives F10, F12, and Delete as examples, but none is a universal instruction. Some keys open firmware setup rather than a one-time boot menu; the useful outcome is reaching the screen that lets you choose the USB drive. If Windows starts normally, the computer has not booted the Flex installer. Restart and invoke the appropriate menu earlier.
The USB device’s displayed name varies too. It might identify the flash-drive manufacturer, include a UEFI prefix, or mention ChromeOS Flex. Do not assume that a different label means the installer is wrong.
Test the hardware you will actually depend on
Google specifically recommends checking device functionality, including networking and input tools. For a practical home or work trial, extend that into a checklist based on what this particular PC must do:
- Connect to the network you intend to use, and confirm that the sites needed for your daily work load.
- Test the keyboard and pointing device, including any keys or gestures you rely on.
- Check sound output and the microphone if the machine will be used for calls.
- Try the webcam, Bluetooth devices, and external display connections you expect to need.
- Check display brightness controls and the computer’s behavior when sleeping and waking.
- Connect essential USB peripherals and test the task you need them to perform.
This is an editorial testing checklist, not a claim that Google certifies each of those functions on every PC. Its purpose is to make the trial representative. A laptop that reaches a desktop has passed a startup test; a laptop that completes your actual tasks has passed a more useful one.
Test the workflow as well as the hardware. Open the services you intend to use, work with representative files, and establish whether the experience is sufficient before erasing Windows. If a task still depends on the existing Windows installation, resolve that dependency first.
Live boot has limits that a permanent installation does not share
Google describes the USB session as temporary. User data, downloads, and settings do not persist between sessions; live boot also has performance and storage limitations. It does not support automatic updates or enrollment for device management.
That makes it useful for compatibility checks, but unsuitable as a persistent everyday setup. Do not download something important during a trial and assume it will still be there after restarting. Likewise, the performance of a USB session should not be treated as a measured prediction of the installed system’s speed.
For administrators, lack of live-boot enrollment is a firm testing boundary. You can investigate local hardware behavior this way, but you cannot validate the complete managed-device experience from the temporary session alone. On an employer- or school-owned PC, authority to change the operating system is also a prerequisite; possession of the machine does not establish permission to repurpose it.
Install ChromeOS Flex only after preparing for a complete wipe
Before selecting installation, back up the files you need to cloud storage or a separate drive. Check that the backup contains the material you intended to save and that you can access it. Disconnect external backup and storage drives before proceeding.
Google’s warning is stronger than “your documents may disappear.” Installation erases the existing operating system, applications, settings, and files, and Google says data can be lost even if installation fails. A failed conversion is therefore not a route back to the previous Windows state.
ChromeOS Flex also does not support dual booting. Do not approach its installer as a supported way to add a second operating system alongside Windows. The supported reversible exploration route is the USB trial.
Once the backup and testing are complete:
- Start the PC from the ChromeOS Flex USB installer.
- Choose “Install ChromeOS Flex.”
- Review the data-erasure warning and confirm only when you are ready to replace the existing installation.
- Let the installation finish. Google says the device shuts down automatically when it is complete.
- While the computer is fully powered off, remove the USB installer.
- Turn the PC on again and complete the ChromeOS Flex setup.
The first useful completion check is that the PC starts ChromeOS Flex from its internal storage without the USB drive attached. Then repeat the essential hardware and workflow checks from the trial. The conversion is complete when the installed machine performs the intended job, rather than merely when the installer reports success.
Troubleshoot USB boot before making broad firmware changes
If the USB installer will not start, Google recommends trying another USB port, trying another flash drive, and checking whether USB boot is enabled in BIOS or UEFI. Its documentation specifically notes that some SanDisk and other USB drives may not work as installers.
Those checks help separate an installation-media problem from a hardware-support problem. Failure with one flash drive does not, by itself, prove that the computer cannot run ChromeOS Flex.
Firmware changes deserve more caution. Google generally recommends UEFI and Secure Boot where supported, subject to model-specific guidance. Its troubleshooting documentation also says Flex cannot install to internal storage configured in RAID mode; such configurations generally need AHCI instead.
Do not change storage mode casually while trying to preserve an existing Windows environment. This is a consequential firmware setting, and the exact menu, appropriate configuration, and recovery implications are model-specific. The evidence does not support a universal click-by-click BIOS procedure. If installation requires a change you cannot confidently manage, stop before the wipe rather than experiment with unrelated settings.
Returning to Windows requires another installation
There is no Google-provided ChromeOS Flex uninstall procedure that restores the previous operating system and files. Removing Flex generally means installing another operating system, which normally replaces Flex in turn.
For a reader who may want Windows back, the practical consequence is to establish a recovery route before converting. A file backup protects the copied files; it does not, by itself, recreate the old operating system, installed programs, and settings. No universal Windows restoration sequence applies to every PC in this guide.
The installation USB can eventually return to ordinary storage use. Google recommends the Chromebook Recovery Utility’s “Settings” menu, followed by “Erase recovery media.” Windows may not recognize all of the installer’s partitions, making the drive appear to have less capacity than it actually has; using the utility addresses the recovery-media layout rather than treating that appearance as proof of a damaged drive.
Choose ChromeOS Flex when the supported lifespan and workflow justify it
Proceed with installation only when the exact PC has an acceptable support outlook, the USB trial has passed your essential checks, and replacing Windows is a decision you are prepared to reverse through reinstallation rather than a simple toggle.
The strongest candidate is a computer that still has useful hardware, appears in Google’s certification records with sufficient support remaining, and can perform its intended tasks in Flex. An uncertified machine can still be an experiment, but Google’s warning about future updates makes it a weaker choice for someone who needs predictable operation.
Keep these five points in front of you before confirming installation:
- Match the exact model and variant against Google’s certification records, including the support end date and any listed limitations.
- Treat the minimum RAM and storage requirements as entry conditions, not a guarantee of satisfactory performance or future updates.
- Use “Try it first” to test networking, essential hardware, and real tasks while Windows remains intact.
- Keep a verified backup separate from the installation USB, and disconnect external storage before the destructive installation.
- Assume that returning to Windows will require another operating-system installation; Flex does not provide supported dual boot or an undo button.
ChromeOS Flex offers a practical second role for some older Windows PCs at no operating-system purchase cost. The sensible next step is the USB trial, with the model’s support date already understood. If the machine passes that trial and you are ready to replace its existing software, a full installation can turn unused hardware into a useful computer again—without pretending that every old PC is a suitable Chromebook substitute.
Update: Additional app and sign-in limits to weigh before converting (September 22, 2026)
PCQuest notes that ChromeOS Flex does not include the Google Play Store or Android virtual machine, so users cannot install or sideload Android apps as they could on many standard Chromebooks. That is a meaningful workflow limitation for anyone relying on mobile-only services or Android versions of productivity apps.
The outlet also reports that Linux support can vary by hardware and may require command-line setup, rather than being a dependable replacement for Windows desktop software. Prospective converts should therefore verify browser-based alternatives for essential applications before wiping a PC.
PCQuest further says ChromeOS Flex lacks the same PIN-based startup experience available on supported Chromebook hardware, potentially requiring users to enter their Google Account password at sign-in. This is another practical distinction between reusing an old Windows PC with Flex and buying a purpose-built Chromebook.
References
- How to turn your old Windows PC into a Chromebook for free Engadget · 2026-09-21T23:00:00+00:00
- Certified models list - ChromeOS Flex Help support.google.com
- Prepare for installation - ChromeOS Flex Help support.google.com