Calibrate HDR in Windows 11 and Auto HDR in Games for Better Color and Brightness
Difficulty: Beginner | Time Required: 15 minutes
High Dynamic Range, or HDR, can make games and videos look more vivid, with brighter highlights, deeper shadows, and richer colors. On Windows 11, you can improve HDR results even further by using the Windows HDR Calibration app and enabling Auto HDR for supported games.
If HDR looks washed out, too dim, overly bright, or just “off,” a quick calibration can make a noticeable difference. This guide walks you through setting up HDR properly in Windows 11 and turning on Auto HDR so older and newer games can look better without complicated manual tweaks.
Prerequisites
Before you begin, make sure you have the following:Quick walkthrough
- A monitor or TV that supports HDR
- A PC with Windows 11
- A graphics card that supports HDR output
- An HDMI 2.0/2.1 or DisplayPort connection that supports HDR
- The latest graphics drivers installed from NVIDIA, AMD, or Intel
- The Windows HDR Calibration app installed from the Microsoft Store
Note: Auto HDR is a Windows 11 feature and is not available in the same way on Windows 10.
Version info: HDR settings and the calibration workflow are best supported on Windows 11 22H2 and later.
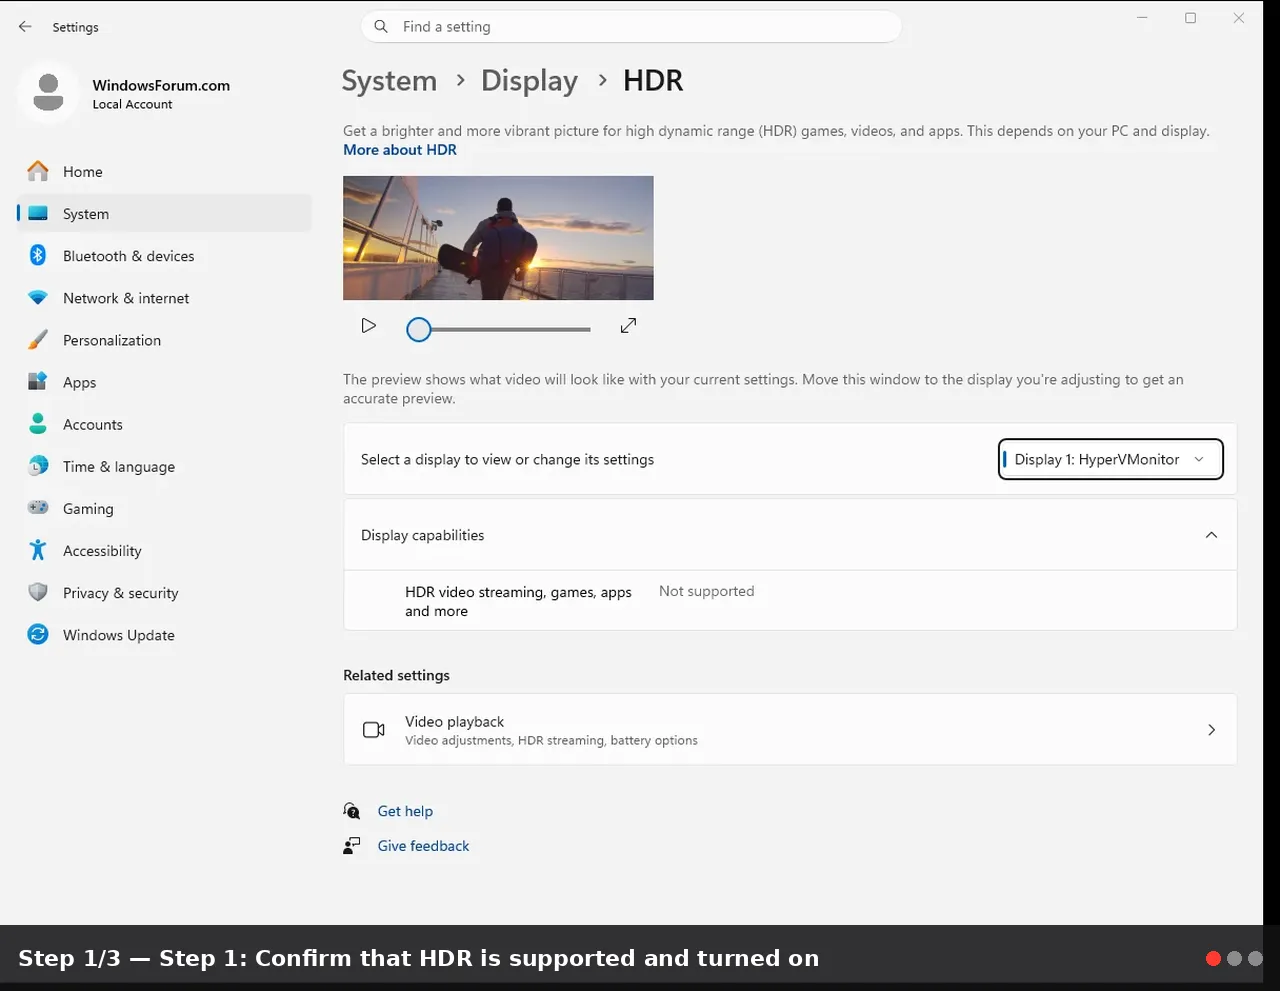
Step 1: Confirm that HDR is supported and turned on
First, make sure Windows detects your display as HDR-capable.
- Right-click the desktop and select Display settings.
- In the System > Display page, click your HDR-capable monitor if you use more than one display.
- Scroll down and select HDR.
- Make sure Use HDR is turned On.
- Use HDR
- Stream HDR video
- Auto HDR
Tip: If you have multiple monitors, HDR settings apply per display. Make sure you select the correct screen before changing options.
Warning: Some monitors only allow HDR at certain refresh rates or resolutions. If HDR is missing, check your monitor’s on-screen menu and your cable type.
Step 2: Install the Windows HDR Calibration app
Windows 11 uses a separate app to fine-tune HDR performance.- Open the Microsoft Store.
- Search for Windows HDR Calibration.
- Click Install.
- After installation, open the app from the Start menu.
Note: If you cannot find the app, make sure Windows is fully updated through Settings > Windows Update.
Step 3: Prepare your display before calibrating
For the most accurate results, spend a minute preparing your monitor or TV.- Turn on HDR in Windows before opening the calibration app.
- Set your monitor or TV to its preferred HDR picture mode, such as:
- HDR
- Game HDR
- Cinema HDR
- Disable features that may interfere with calibration, if available:
- Dynamic contrast
- Eco brightness
- Blue light filters
- Automatic brightness adjustments
Tip: Perform calibration in normal room lighting. Very bright sunlight or a completely dark room can affect how you judge brightness.
Step 4: Run the Windows HDR Calibration app
Now you are ready to calibrate HDR.- Open Windows HDR Calibration.
- Click Get started.
- Follow the on-screen patterns and instructions carefully.
Minimum luminance
This helps define how dark shadow detail should appear.- Move the slider until the pattern is barely visible or disappears as instructed.
Maximum luminance
This sets how bright highlights can appear.- Adjust the slider until the bright test pattern matches the app’s guidance.
Maximum full-frame luminance
This helps with scenes where the whole screen becomes bright.- Move the slider until the image looks correct according to the instructions.
Color saturation
Windows may also let you adjust color intensity.- Increase or decrease saturation until colors look vibrant but not exaggerated.
- When finished, save the calibration profile.
Tip: If the screen looks too intense after calibration, rerun the app and use more conservative settings.
Warning: Avoid pushing brightness and saturation too far. Over-calibration can crush detail in shadows or blow out highlights.
Step 5: Enable Auto HDR for games
Auto HDR can improve lighting and contrast in many games that were originally designed for Standard Dynamic Range (SDR).- Open Settings.
- Go to System > Display.
- Select your HDR display.
- Click HDR.
- Turn on Auto HDR.
Version info: Auto HDR is available in Windows 11 and works best on modern systems with updated GPU drivers.
Note: Not every game supports Auto HDR equally well. Some titles look fantastic, while others may show only subtle improvement.
Step 6: Adjust SDR content brightness if the desktop looks wrong
A common complaint with HDR on Windows is that the desktop or non-HDR apps may look too dim or washed out.
- Go to Settings > System > Display > HDR.
- Find the SDR content brightness slider.
- Adjust it until the Windows desktop, web pages, and regular apps look comfortable.
Tip: If HDR looks great in games but bad on the desktop, this slider is often the fix.
Step 7: Test HDR and Auto HDR in a game
After calibration, try a game you know well so you can compare the results.- Launch an HDR-capable or Auto HDR-supported game.
- Check whether the game has its own HDR settings menu.
- If it does, use the in-game HDR setup after finishing Windows calibration.
- Compare:
- Bright highlights
- Shadow detail
- Color richness
- Overall balance
Note: In-game HDR settings and Windows HDR calibration work together. For best results, calibrate Windows first, then fine-tune inside the game.
Tips and Troubleshooting
HDR option is missing
Try the following:- Confirm your monitor or TV actually supports HDR
- Use a certified HDMI or DisplayPort cable
- Update GPU drivers
- Check your monitor’s internal settings and enable HDMI UHD Color, Deep Color, or similar options
- Make sure you are connected directly to the HDR display, not through an unsupported adapter
HDR looks washed out
Possible fixes include:- Rerun Windows HDR Calibration
- Adjust the SDR content brightness slider
- Disable unusual monitor image enhancements
- Check whether the monitor is in the correct HDR mode
Auto HDR does not seem to work
- Make sure Use HDR and Auto HDR are both enabled
- Update Windows and your graphics driver
- Test with a known DirectX game
- Some games simply do not benefit much from Auto HDR
Colors look too strong
- Reduce saturation in the calibration app
- Reset your monitor picture mode
- Lower any “Vivid” or “Enhanced Color” settings on the display itself
Performance concerns
HDR and Auto HDR can add a small amount of overhead on some systems.- If a game stutters, try lowering graphics settings slightly
- Update your GPU driver
- Test fullscreen and borderless modes to see which behaves better
Helpful tip: If you use multiple monitors, keeping HDR enabled only on your main HDR display can reduce confusion and improve consistency.
Conclusion
Calibrating HDR in Windows 11 is one of the easiest ways to improve color accuracy, highlight detail, and overall image quality on a compatible display. When you combine that with Auto HDR, many games can look more vibrant and immersive with very little effort.A few minutes spent checking HDR support, running the calibration app, and adjusting Auto HDR can turn a dull or uneven picture into something much more impressive. If your games or videos have looked too dim, washed out, or unbalanced, this is a great place to start.
Key Takeaways:
- HDR calibration helps Windows 11 display better brightness and color on compatible screens
- The Windows HDR Calibration app can improve both gaming and video playback
- Auto HDR enhances many SDR games automatically on Windows 11
- The SDR content brightness slider can fix a dim or washed-out desktop
- Best results come from combining Windows calibration with proper monitor and in-game settings
This tutorial was generated to help WindowsForum.com users get the most out of their Windows experience.
Last edited: