Create a Gaming-Optimized Network Profile on Windows 10/11 to Reduce Ping
Difficulty: Intermediate | Time Required: 20-30 minutesOnline games are very sensitive to latency (ping) and packet loss. Even with a fast connection, Windows might not be configured in a way that prioritizes gaming traffic. In this guide, you’ll create a “gaming-optimized” network profile on Windows 10/11 that focuses on stability, lower ping, and fewer spikes rather than just raw download speed.
This tutorial uses only built-in Windows features and safe tweaks you can easily revert.
Prerequisites
Before you start, make sure you have:Quick walkthrough
- Windows 10 or Windows 11
- Recommended:
- Windows 10 version 21H1 or later
- Windows 11 21H2 or later
- Most steps work on earlier versions, but some Settings screens may look slightly different.
- Administrator account
- You’ll need admin rights to change adapter settings, firewall rules, and power options.
- Wired Ethernet connection (recommended)
- You can do this on Wi-Fi, but a cable typically gives lower and more stable ping.
- Your main gaming PC profile/account
- We’ll optimize Windows for the account you actually use to play.
Step 1 – Put Your Network Adapter in “Performance Mode”
We’ll start by making sure your network card isn’t trying to save power at the cost of latency.1.1 Disable power saving on the adapter
- Right-click the Start button and choose Device Manager.
- Expand Network adapters.
- Right-click your main adapter (e.g., Intel(R) Ethernet Controller, Realtek Gaming 2.5GbE, or your Wi-Fi adapter) and select Properties.
- Go to the Power Management tab.
- Uncheck:
- “Allow the computer to turn off this device to save power.”
- Click OK.
Note (Laptop users): This may slightly reduce battery life but improves connection stability during gaming.
Step 2 – Use a High-Performance Power Plan
Network and CPU performance are closely linked. A power-saving plan can cause CPU frequency changes that contribute to ping spikes.2.1 Select the right power plan (Windows 10/11)
- Press Win + R, type:
control powercfg.cpl
Press Enter. - In Power Options, select:
- High performance, or
- Ultimate Performance (if available; often on Windows 11 Pro/Workstation or unlocked via tweaks).
- If you don’t see High performance, click Show additional plans.
Tip: For desktop PCs, leave this plan active. Laptop users can switch to High Performance only while plugged in and gaming.
Step 3 – Configure Your Network as a Private, “Home/Gaming” Network
Windows applies different firewall and sharing rules depending on your network profile. A Private network trusted as “home” is best for gaming on a secure home router.3.1 Set your connection to Private
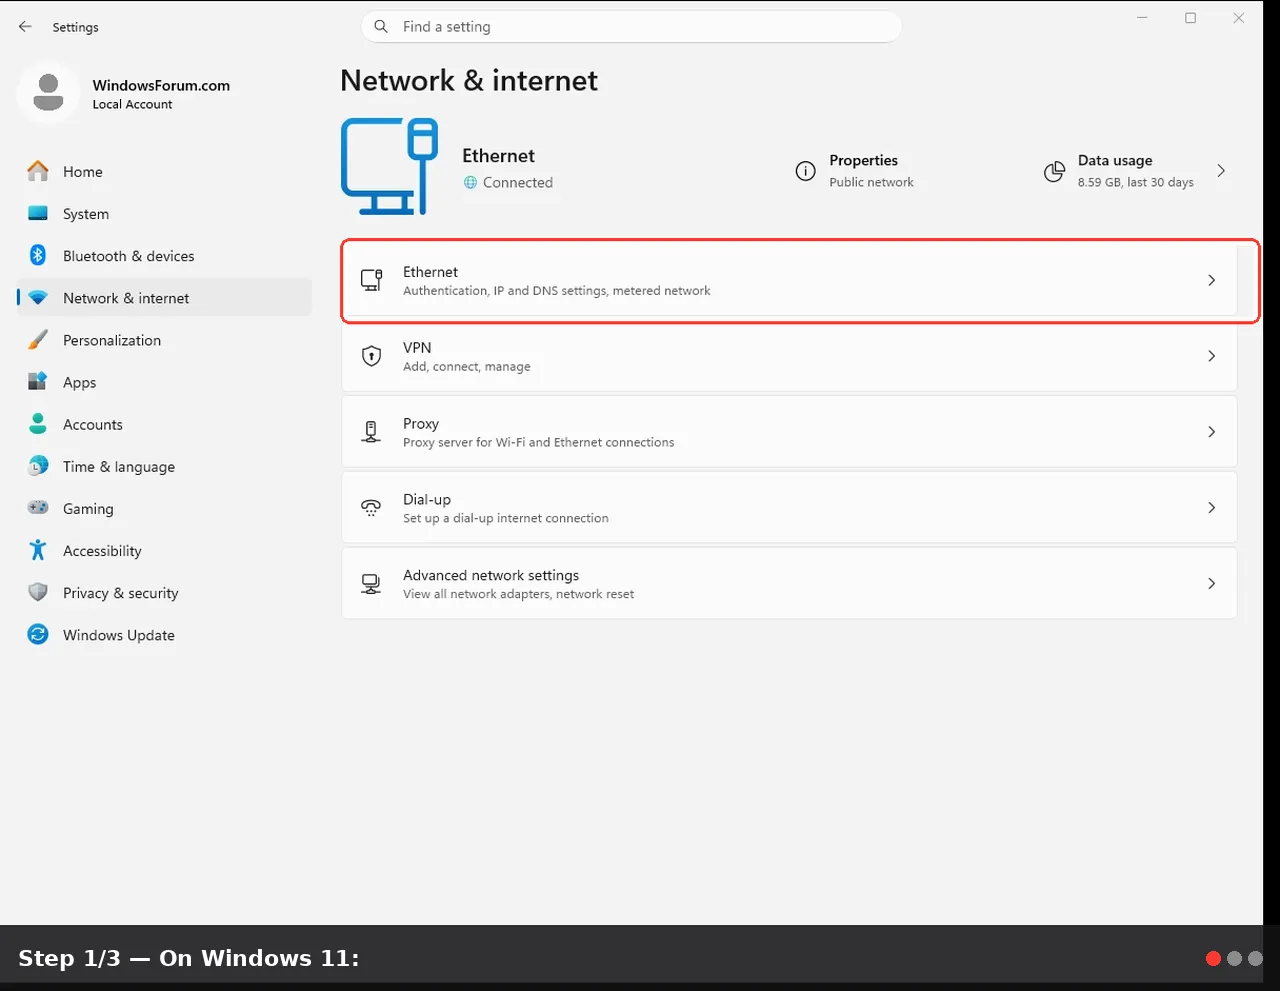
On Windows 11:
- Press Win + I to open Settings.
- Go to Network & internet.
- Click Ethernet (or Wi-Fi → click your connected network).
- Under Network profile type, select Private.
On Windows 10:
- Press Win + I → Network & Internet.
- For Wi-Fi: Click Wi-Fi → click your connected network.
For Ethernet: Click Ethernet → click your connected network. - Under Network profile, choose Private.
Warning: Only set Private on trusted home networks (your own router). Use Public on public Wi-Fi or shared networks for safety.
Step 4 – Turn Off Background Bandwidth Hogs
Updates and app downloads can quietly consume bandwidth and spike your ping.4.1 Limit Delivery Optimization (Windows Update P2P)
- Press Win + I → Settings.
- Windows 11: System → Windows Update → Advanced options → Delivery Optimization.
Windows 10: Update & Security → Delivery Optimization. - Toggle Allow downloads from other PCs to Off.
4.2 Disable automatic Store/App downloads
- Open Microsoft Store.
- Click your profile icon → App settings.
- Turn App updates to Off if you want full control (remember to update manually sometimes).
4.3 Stop OneDrive/Cloud sync while gaming (optional)
- Right-click the OneDrive (or other cloud) icon in the system tray.
- Choose Pause syncing and select a time (e.g., 2 hours).
Tip: Before competitive matches, close any launchers doing background downloads (Steam, Battle.net, EA app, Xbox app, etc..
Step 5 – Set a “Gaming” QoS Tag for Specific Games (Advanced, but Safe)
Windows has a built-in feature called QoS (Quality of Service) Policy that can mark certain traffic as high priority. This can help your router and local stack prefer your game packets over other traffic.Note: This works best if your router also supports QoS, but even on its own it can help slightly with local prioritization.
5.1 Open Local Group Policy Editor (Windows 10/11 Pro/Enterprise)
If you use Windows Home, skip to Step 5.4 for a registry-free alternative (less precise but still helpful).
- Press Win + R, type:
gpedit.msc
Press Enter. - Navigate to:
Computer Configuration → Windows Settings → Policy-based QoS
5.2 Create a new gaming QoS policy
- Right-click Policy-based QoS → Create new policy.
- Name it something like: Gaming – High Priority.
- Check Specify DSCP Value and set Value to 46 (a commonly used high-priority EF value).
- Leave Specify Outbound Throttle Rate unchecked → click Next.
5.3 Target your game executable
You can make one policy per game or per launcher.- On the This QoS policy applies to screen:
- Select Only applications with this executable name.
- Enter your game’s main
.exe(e.g.,cs2.exe,valorant.exe,fortniteclient-win64-shipping.exe). - Click Next.
- For IP addresses, choose Any source IP address and Any destination IP address → Next.
- For protocol, select TCP and UDP (most games use both or UDP) → Finish.
5.4 If you have Windows Home (no gpedit)
Windows Home doesn’t have the Local Group Policy Editor by default. In that case:- Configure router-level QoS instead (log in to your router and prioritize your PC or specific game ports).
- Ensure your PC is wired, on High Performance, and background apps are minimized; these changes alone still help greatly.
Warning: Avoid third-party “registry tweak packs” or “ping boosters” from random sites. They often do more harm than good.
Step 6 – Disable Unnecessary Network Features on Your Gaming Adapter
Some legacy or enterprise-oriented features are rarely used in home gaming setups and can be safely turned off to reduce overhead.6.1 Turn off unused protocols
- Right-click the Start button → Network Connections:
- Windows 11: Settings → Network & internet → Advanced network settings → More network adapter options (opens old Control Panel).
- Windows 10: Settings → Network & Internet → Change adapter options.
- Right-click your main adapter (Ethernet or Wi-Fi) → Properties.
- In the item list, leave checked:
- Client for Microsoft Networks
- File and Printer Sharing for Microsoft Networks (optional; keep if you use file sharing)
- Internet Protocol Version 4 (TCP/IPv4)
- Internet Protocol Version 6 (TCP/IPv6) (recommended to keep on modern networks)
- You can safely uncheck things like:
- “Microsoft Network Adapter Multiplexor Protocol” (if present and not in use)
- “QoS Packet Scheduler” – often safe to leave on, but turning off rarely affects gaming either way.
- Click OK.
Tip: If you share files between PCs, don’t uncheck file-sharing related entries. If you’re unsure, only disable obviously unused or vendor-specific components you recognize.
Step 7 – Optimize DNS for Faster Name Resolution
DNS doesn’t change actual in-game ping much, but it can reduce connect times and sometimes choose better endpoints.7.1 Set DNS on your adapter
- Go back to adapter Properties (as in Step 6).
- Select Internet Protocol Version 4 (TCP/IPv4) → click Properties.
- Select Use the following DNS server addresses and enter:
- Google DNS:
- Preferred:
8.8.8.8 - Alternate:
8.8.4.4
- Cloudflare DNS:
- Preferred:
1.1.1.1 - Alternate:
1.0.0.1 - Click OK, then Close.
Note: Some ISPs or games work best with their own/automatic DNS. If things get slower, you can always revert to Obtain DNS server address automatically.
Step 8 – Test and Save Your “Gaming Profile”
Now that you’ve tuned everything, you want to verify the impact and keep a repeatable setup.8.1 Measure baseline ping
Before gaming, test latency to a nearby server:- Press Win + R, type
cmd, press Enter. - Run:
ping 1.1.1.1 -n 20ping 8.8.8.8 -n 20
- Lower average and/or max, and
- Fewer spikes (no random 300–1000 ms times).
8.2 Create a quick “Gaming Mode” checklist for yourself
On a notepad or text file, list things you’ll do before serious gaming, for example:- Plug in Ethernet cable.
- Switch to High Performance power plan.
- Pause OneDrive/backup sync.
- Close downloaders (Steam, Battle.net, etc..
- Ensure VPN is off (unless required by your region/game).
Tip: You can even create a desktop shortcut that opens Task Manager and Services, so you can quickly see if anything heavy is running.
Troubleshooting & Extra Tips
- Ping still high to game servers?
- That’s usually an ISP routing or server location issue. Your local tweaks can’t fix bad routes across the internet. Try different servers in-game (EU/NA/Asia, etc. if possible.
- Ping fine, but lots of spikes/lag?
- Check if someone on your network is streaming 4K video, doing large downloads, or using a VPN. Your router’s QoS or bandwidth control might help here more than Windows tweaks.
- Games disconnect when idle or on battery:
- Re-check adapter Power Management (Step 1) and your power plan (Step 2). On laptops, make sure High Performance is set for “Plugged in”.
- Wi-Fi only users:
- Use the 5 GHz band instead of 2.4 GHz if available.
- Move closer to the router; avoid thick walls and interference.
- Update your Wi-Fi adapter drivers from your laptop/motherboard manufacturer.
- Drivers & firmware:
- Keep your network card drivers and router firmware up to date for the best stability and compatibility with modern games.
Conclusion
By creating a gaming-optimized network profile in Windows 10/11, you’ve:- Reduced power-saving interruptions on your network adapter
- Enabled a performance-focused power plan
- Set your network to a trusted, low-friction Private profile
- Limited background bandwidth hogs and update traffic
- Optionally prioritized game traffic with Windows QoS
- Cleaned up unused network features and improved DNS responsiveness
Key Takeaways:
- Using a High Performance power plan and disabling adapter power saving helps prevent lag spikes.
- Setting your connection as Private on a trusted home network reduces unnecessary restrictions and issues.
- Turning off or pausing background updates and sync during gaming stops them from stealing bandwidth.
- QoS policies (on Pro/Enterprise) and router QoS can prioritize your game traffic over other devices.
- A wired Ethernet connection remains the single biggest improvement you can make for stable, low-latency gaming.
This tutorial was generated to help WindowsForum.com users get the most out of their Windows experience.
Last edited: