

Windows 11 does not keep every kind of installed software in one perfectly complete list, but it does provide several reliable ways to answer the practical question: is this app actually installed on this PC? For most users, Settings > Apps > Installed apps is the right starting point. When that does not tell the full story, Start, Control Panel, Microsoft Store, Microsoft Edge, Windows Package Manager, and PowerShell each reveal a different part of the picture.
The important distinction is that Windows 11 supports multiple application models at once. Traditional desktop programs, Microsoft Store packages, MSIX apps, browser-installed web apps, utilities installed for a single user, and apps managed by an organization do not always register identically. A clean Windows 11 installed apps inventory therefore begins with the built-in graphical lists, then expands into command-line tools only when the task calls for more detail.
For a normal installed-app check, Windows 11’s Installed apps page is the primary destination. It is designed to show software that Windows recognizes as installed and, in many cases, lets you uninstall, repair, reset, move, or modify it.
Open it with the following path:
The list can be sorted to make an inventory easier to review. Depending on the version of Windows 11 and the application metadata available, useful sorting choices can include:
For each recognizable item, select the More button next to its name to see available actions. Depending on the app, these can include:
That difference matters. Seeing an app in the list does not guarantee that it can be uninstalled safely, and not seeing a familiar shortcut does not automatically mean the app has been removed.
This list is particularly useful when the real question is not merely whether software files exist on the drive, but whether Windows has a usable shortcut for the software. If an app appears under All apps, it can usually be launched directly from there.
On current Windows 11 builds, the All apps area may support multiple display styles, such as:
The reverse is also possible. A stale shortcut can remain after a program has been deleted or incompletely uninstalled. Selecting such an entry may result in an error, a missing-file message, or a request to locate the executable.
Treat the Start menu as an excellent launchability check:
A matching shortcut is useful evidence, but it is still worth opening the entry if the app’s status matters. An app that appears in Search but fails immediately may have a broken installation, a missing dependency, or a shortcut pointing to a deleted target.
For software support and troubleshooting, a sensible sequence is:
To open it:
This opens the same Programs and Features view directly.
It can be the better choice when:
Its importance is practical rather than universal. If a conventional application refuses to uninstall through Settings, Control Panel is the natural fallback. If you need a broad modern view of installed apps, start with Settings instead.
To open it:
If your goal is to find software you can launch, it is useful. If your goal is to document everything installed across all accounts and installer technologies, use it only as one part of a larger check.
Open Microsoft Store, then select Library or My Library, depending on the current Store layout.
Items that show a download or cloud-style icon generally have not been downloaded to the current PC. Entries without that icon may indicate that the app or game is already installed locally, though the Store Library should not be treated as the only confirmation method.
That means it can answer questions such as:
To review web apps installed through Edge:
For example, a work portal, streaming service, note-taking site, or collaboration service may have been installed through Edge as an app. The entry might be visible in Start but not represented in Microsoft Store Library or Control Panel.
This is not a Windows error. It is simply a different app model.
For a comprehensive check, review
To access it:
Startup apps deserve separate attention because they affect boot speed, background activity, memory use, and battery life. An application may be installed but absent from the Startup list, while another may appear because it has registered a launch task.
Review the entries for:
If an item appears as missing or has an invalid path, it may be the leftover registration from an app that was already removed. In that situation, do not assume the app is still installed merely because it appears on the Startup page.
Open a terminal and run:
This displays applications that Windows Package Manager can identify, including many applications installed through
To search for a particular program, use a text query:
For a more precise package identifier check, use:
The package ID approach is valuable when multiple products share similar names or when an organization requires a specific package.
It is particularly effective when you want to:
This creates a JSON export file that can later support a rebuild or migration workflow.
The Limits of
The word export can imply that the resulting JSON file is a perfect image of the computer’s software state. It is not.
Windows Package Manager attempts to match installed apps to available package manifests. When it cannot match an application, it warns that the app was not exported. That can happen because the software came from an unsupported source, has incomplete uninstall metadata, is too old, is internally deployed, or does not have a matching package definition.
The resulting file is best understood as a reinstall-oriented package manifest, not a complete forensic inventory. It can be extremely useful after a clean Windows 11 installation, but it may omit drivers, custom business applications, standalone executables, browser web apps, and unmatched legacy software.
To list AppX and MSIX packages installed for the current user, run:
This command returns package-level information, including package names, publishers, architecture, versions, and installation locations.
To query packages for all user accounts, open PowerShell or Windows Terminal as administrator and run:
This is useful on shared PCs, family systems, lab machines, and business devices where apps may have been installed or provisioned under another account.
Understand What
That makes it useful for inspecting:
To narrow the result set, filter by name:
Wildcards are useful because package identifiers can be longer and more technical than the name displayed in Start.
Another command that may appear in app-inventory advice is:
This command returns packages installed through PowerShell PackageManagement providers. It can be valuable in development and automation environments, especially where packages were installed through providers such as PowerShellGet.
But it should not be presented as a universal Windows software inventory. It reports what its configured providers know about. If a conventional desktop application was installed through a vendor-specific setup program,
The practical rule is simple:
That guidance is now outdated and should be avoided. WMIC is deprecated, and Windows has shifted toward PowerShell-based management for WMI tasks.
There is another reason not to rely on the old
Modern Windows 11 troubleshooting should favor:
Microsoft Intune can provide administrators with App inventory information for supported enrolled Windows devices. This can include richer metadata such as app name, version, publisher, install location, installation date, size, architecture, uninstall command, and installation scope.
That capability is not automatically equivalent to what a user sees in Settings. It depends on device enrollment, management configuration, assigned policy, and organizational permissions.
For managed devices, the right approach is:
For everyday use, Settings > Apps > Installed apps is the most reliable and approachable starting point. Start, Windows Search, and the Apps folder are best for finding something you want to launch. Programs and Features remains essential for stubborn legacy desktop software. Microsoft Store Library and
For advanced users,
The important distinction is that Windows 11 supports multiple application models at once. Traditional desktop programs, Microsoft Store packages, MSIX apps, browser-installed web apps, utilities installed for a single user, and apps managed by an organization do not always register identically. A clean Windows 11 installed apps inventory therefore begins with the built-in graphical lists, then expands into command-line tools only when the task calls for more detail.
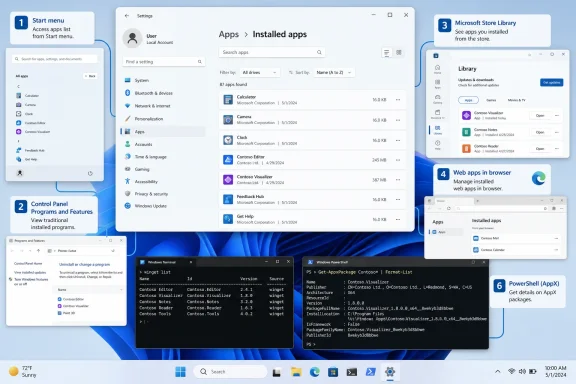 The Fastest Answer: Check Installed Apps in Settings
For a normal installed-app check, Windows 11’s Installed apps page is the primary destination. It is designed to show software that Windows recognizes as installed and, in many cases, lets you uninstall, repair, reset, move, or modify it.Open it with the following path:
- Select Start.
- Open Settings.
- Choose Apps.
- Select Installed apps.
- Use the search box or browse the list.
The list can be sorted to make an inventory easier to review. Depending on the version of Windows 11 and the application metadata available, useful sorting choices can include:
- Name
- Size
- Install date
- Drive
- App type
Why Settings Is the Preferred Starting Point
The Installed apps page brings together a large share of software registered with Windows, including many traditional Win32 programs and Microsoft Store apps. It is also the modern replacement for the older “Apps & features” style of app management.For each recognizable item, select the More button next to its name to see available actions. Depending on the app, these can include:
- Uninstall
- Modify
- Advanced options
- Move
- Repair
- Reset
That difference matters. Seeing an app in the list does not guarantee that it can be uninstalled safely, and not seeing a familiar shortcut does not automatically mean the app has been removed.
Use the Start Menu to Browse What You Can Launch
The Start menu offers the quickest visual confirmation that an app has an accessible entry point. Select Start, then choose All apps to browse the alphabetical app list.This list is particularly useful when the real question is not merely whether software files exist on the drive, but whether Windows has a usable shortcut for the software. If an app appears under All apps, it can usually be launched directly from there.
On current Windows 11 builds, the All apps area may support multiple display styles, such as:
- Category
- Grid
- List
Start Menu Entries Are Helpful, Not Definitive
The Start menu is convenient, but it is not an authoritative record of every installed component. A program can be installed without creating a Start entry. Portable utilities, command-line tools, background services, drivers, plug-ins, and some enterprise applications may not appear there at all.The reverse is also possible. A stale shortcut can remain after a program has been deleted or incompletely uninstalled. Selecting such an entry may result in an error, a missing-file message, or a request to locate the executable.
Treat the Start menu as an excellent launchability check:
- If it appears and opens, the app is installed and usable.
- If it appears but fails to open, the shortcut or installation may be damaged.
- If it does not appear, check Installed apps before concluding that it is absent.
Search for a Known App Name
When you know the app’s name, Windows Search is usually the fastest method of all.- Select Search on the taskbar.
- Type the app or program name.
- Select the matching result.
- Press the Windows key.
- Type the name of the application.
- Select the result or press Enter.
Search Results Need a Quick Sanity Check
Windows Search can return web results, settings pages, documents, installers, or similarly named files alongside actual applications. Confirm that the entry is labeled as an App before assuming it represents an installed program.A matching shortcut is useful evidence, but it is still worth opening the entry if the app’s status matters. An app that appears in Search but fails immediately may have a broken installation, a missing dependency, or a shortcut pointing to a deleted target.
For software support and troubleshooting, a sensible sequence is:
- Search for the app.
- Launch it if found.
- If it fails, check Settings > Apps > Installed apps.
- Use the app’s available repair, reset, modify, or uninstall controls.
- Reinstall only after confirming that the app’s files or registration are genuinely damaged.
The Classic Option: Programs and Features in Control Panel
Windows 11 still includes the long-standing Programs and Features list in Control Panel. It remains valuable for older desktop software, particularly programs built around traditional Windows Installer technology or applications that have complex uninstallers.To open it:
- Select Search on the taskbar.
- Type Control Panel.
- Open Control Panel.
- Select Programs.
- Choose Programs and Features.
appwiz.cplThis opens the same Programs and Features view directly.
When Control Panel Is Better Than Settings
Control Panel is not the preferred everyday Windows 11 interface, but it is far from irrelevant. Some legacy desktop programs integrate more fully with Programs and Features than with the modern Installed apps page.It can be the better choice when:
- An app is visible in Settings but its uninstall command fails.
- A desktop program offers Uninstall/Change rather than a simple uninstall action.
- You need to remove an older productivity suite, engineering tool, driver utility, or line-of-business application.
- You are troubleshooting an installation created with older installer technology.
- A software vendor’s instructions specifically reference Programs and Features.
Do Not Assume It Shows Everything
Programs and Features is not a full Windows app inventory. It was designed around classic desktop software and does not represent every Microsoft Store, AppX, MSIX, Progressive Web App, or user-scoped package in the same way.Its importance is practical rather than universal. If a conventional application refuses to uninstall through Settings, Control Panel is the natural fallback. If you need a broad modern view of installed apps, start with Settings instead.
Open the Hidden Apps Folder for a Unified Launcher View
Windows includes a shell-based folder view that displays application entries in a File Explorer-style window. It can be useful when you prefer browsing application icons outside the Start menu.To open it:
- Press Windows + R.
- Type:
shell:appsfolder- Press Enter.
What the Apps Folder Is Good For
This view works well for:- Browsing registered apps in a simple Explorer-like interface.
- Locating an app’s display name.
- Creating shortcuts for certain applications.
- Confirming that an app entry exists independently of Start pins.
- Reviewing both traditional and packaged app entries in a single launcher-oriented view.
If your goal is to find software you can launch, it is useful. If your goal is to document everything installed across all accounts and installer technologies, use it only as one part of a larger check.
Microsoft Store Library: Check Account-Linked Apps and Games
A Microsoft Store Library is useful for a different reason: it helps identify Store apps and games associated with the signed-in Microsoft account. It is especially helpful when you are trying to reinstall a previous purchase, determine whether a Store title has been downloaded on the current PC, or find an app that no longer has an obvious Start menu entry.Open Microsoft Store, then select Library or My Library, depending on the current Store layout.
Items that show a download or cloud-style icon generally have not been downloaded to the current PC. Entries without that icon may indicate that the app or game is already installed locally, though the Store Library should not be treated as the only confirmation method.
Why Store Library Is Not a Complete App List
Microsoft Store Library reflects the relationship between the Microsoft account and Store content. It does not attempt to catalog every desktop program installed from a developer website, USB drive, enterprise deployment system, game launcher, or third-party package manager.That means it can answer questions such as:
- Was this Store game previously acquired?
- Can this app be reinstalled on this PC?
- Is this Store download associated with my account?
- Has this Store item been downloaded locally?
- Is every program on this PC listed here?
- Is a non-Store desktop application installed?
- Which applications were installed by another Windows user?
- Which legacy programs are managed by an employer?
Check Microsoft Edge for Installed Web Apps
A modern Windows 11 app inventory can be incomplete if it ignores browser-installed web apps. Microsoft Edge can install supported websites as Progressive Web Apps, or PWAs, which behave more like native apps: they can have their own windows, taskbar entries, Start menu shortcuts, and launch behavior.To review web apps installed through Edge:
- Open Microsoft Edge.
- Enter the following in the address bar:
edge://apps- Review the installed app entries.
Why Edge Apps Can Be Confusing
An installed website may appear in Start and behave like a separate application, even though it is fundamentally powered by the browser and website content. That can confuse users who expect every app to appear in a conventional installer list.For example, a work portal, streaming service, note-taking site, or collaboration service may have been installed through Edge as an app. The entry might be visible in Start but not represented in Microsoft Store Library or Control Panel.
This is not a Windows error. It is simply a different app model.
For a comprehensive check, review
edge://apps when:- An app opens in an Edge-based window without normal browser tabs.
- A website seems to have installed itself as an app.
- You are cleaning up duplicate app-style entries.
- A Start menu entry is present but does not appear in the expected installed-program list.
Startup Apps Answer a Different Question
The Startup page in Settings is often mistaken for an installed app list. It is not. Instead, it shows applications that have registered to run automatically when Windows starts or when a user signs in.To access it:
- Select Start.
- Open Settings.
- Choose Apps.
- Select Startup.
Startup apps deserve separate attention because they affect boot speed, background activity, memory use, and battery life. An application may be installed but absent from the Startup list, while another may appear because it has registered a launch task.
Use Startup Settings for Performance Triage
The page is helpful when you are investigating a slow sign-in, excessive background activity, or unfamiliar software that launches automatically.Review the entries for:
- Software you recognize and use regularly.
- Update utilities from trusted vendors.
- Collaboration clients that need to start with Windows.
- Gaming launchers.
- Printer, audio, graphics, or peripheral control software.
- Unknown entries that may warrant closer inspection.
If an item appears as missing or has an invalid path, it may be the leftover registration from an app that was already removed. In that situation, do not assume the app is still installed merely because it appears on the Startup page.
Use Winget for a Cleaner Text-Based Inventory
For enthusiasts, administrators, developers, and support technicians, Windows Package Manager provides a useful command-line view of installed applications. Thewinget command is available through Windows Terminal, PowerShell, or Command Prompt on supported systems.Open a terminal and run:
winget listThis displays applications that Windows Package Manager can identify, including many applications installed through
winget and many applications installed by other methods.To search for a particular program, use a text query:
winget list "Firefox"For a more precise package identifier check, use:
winget list --id Mozilla.FirefoxThe package ID approach is valuable when multiple products share similar names or when an organization requires a specific package.
Strengths of Winget Inventory
winget list is excellent for a readable, copyable inventory. It can show useful fields such as name, ID, version, and source information. It also supports update workflows, making it practical for maintenance as well as discovery.It is particularly effective when you want to:
- Confirm a known package is installed.
- Compare installed versions across PCs.
- Identify applications with updates available.
- Create a repeatable setup or rebuild checklist.
- Share a software inventory with a support technician.
- Script basic app-audit tasks.
winget export -o apps.jsonThis creates a JSON export file that can later support a rebuild or migration workflow.
The Limits of winget export
The word export can imply that the resulting JSON file is a perfect image of the computer’s software state. It is not.Windows Package Manager attempts to match installed apps to available package manifests. When it cannot match an application, it warns that the app was not exported. That can happen because the software came from an unsupported source, has incomplete uninstall metadata, is too old, is internally deployed, or does not have a matching package definition.
The resulting file is best understood as a reinstall-oriented package manifest, not a complete forensic inventory. It can be extremely useful after a clean Windows 11 installation, but it may omit drivers, custom business applications, standalone executables, browser web apps, and unmatched legacy software.
Use PowerShell for App Package Detail
PowerShell is best when you need to inspect modern Windows app packages rather than simply browse consumer-facing app names.To list AppX and MSIX packages installed for the current user, run:
Get-AppxPackageThis command returns package-level information, including package names, publishers, architecture, versions, and installation locations.
To query packages for all user accounts, open PowerShell or Windows Terminal as administrator and run:
Get-AppxPackage -AllUsersThis is useful on shared PCs, family systems, lab machines, and business devices where apps may have been installed or provisioned under another account.
Understand What Get-AppxPackage Does Not Show
Get-AppxPackage is not intended to enumerate every traditional desktop application. It focuses on app packages with .appx or .msix packaging and related modern Windows package types.That makes it useful for inspecting:
- Microsoft Store apps.
- Built-in Windows apps.
- MSIX-packaged desktop applications.
- Framework packages.
- App packages installed per user.
- App packages installed across multiple accounts.
To narrow the result set, filter by name:
Get-AppxPackage -Name "*Microsoft.WindowsCalculator*"Wildcards are useful because package identifiers can be longer and more technical than the name displayed in Start.
Get-Package Is Provider-Specific
Another command that may appear in app-inventory advice is:Get-PackageThis command returns packages installed through PowerShell PackageManagement providers. It can be valuable in development and automation environments, especially where packages were installed through providers such as PowerShellGet.
But it should not be presented as a universal Windows software inventory. It reports what its configured providers know about. If a conventional desktop application was installed through a vendor-specific setup program,
Get-Package may not list it.The practical rule is simple:
- Use Installed apps for a broad user-facing list.
- Use winget list for a convenient text inventory.
- Use Get-AppxPackage for AppX and MSIX details.
- Use Get-Package for packages known to PackageManagement providers.
Avoid Old WMIC Product Queries
Older Windows troubleshooting guides often recommend commands such as:wmic product get nameThat guidance is now outdated and should be avoided. WMIC is deprecated, and Windows has shifted toward PowerShell-based management for WMI tasks.
There is another reason not to rely on the old
wmic product query: querying MSI products through that path can be slow and may trigger consistency checks or repair behavior for some installations. It is a poor choice for a casual inventory check.Modern Windows 11 troubleshooting should favor:
- Settings > Apps > Installed apps
- Control Panel > Programs and Features
- winget list
- Get-AppxPackage
- Purpose-built management tools in business environments
Managed Work and School PCs Require a Different Approach
On a work or school Windows 11 device, the local user’s view may not tell the entire story. Company-managed computers can have apps deployed silently, installed under device-wide scopes, restricted by policy, or reported through enterprise management systems.Microsoft Intune can provide administrators with App inventory information for supported enrolled Windows devices. This can include richer metadata such as app name, version, publisher, install location, installation date, size, architecture, uninstall command, and installation scope.
That capability is not automatically equivalent to what a user sees in Settings. It depends on device enrollment, management configuration, assigned policy, and organizational permissions.
Why Local and Admin Inventories Can Differ
An administrator may see apps that a standard user cannot easily identify, including device-scoped applications, background components, security tools, and software installed for another profile. Conversely, a user may see personal, per-user apps that are not meaningful to a central IT inventory unless the organization is collecting that data.For managed devices, the right approach is:
- Use Installed apps locally for a quick user-level check.
- Check Start and Search to confirm whether an app can be launched.
- Use Winget or PowerShell only when permitted by organizational policy.
- Contact IT for authoritative managed-device inventory or deployment status.
A Practical Windows 11 App Inventory Workflow
The best way to find installed apps on Windows 11 is not to open every list at random. Use a layered approach based on the question you need answered.For a Quick “Is It Installed?” Check
- Press the Windows key.
- Type the app name.
- If it appears, open it to confirm it works.
- If it does not appear, check Settings > Apps > Installed apps.
For Removing a Program
- Open Settings > Apps > Installed apps.
- Search for the program.
- Select More > Uninstall.
- If that fails or the program is missing, open Programs and Features with
appwiz.cpl. - Use the program’s own uninstaller if Windows directs you to one.
For Finding Store or Browser-Based Apps
- Check Microsoft Store > Library for Store-linked downloads.
- Open
edge://appsto check Edge-installed web apps. - Review Start and Installed apps for the corresponding launch entries.
For a More Detailed Technical Inventory
- Run
winget list. - Search for a known package with
winget list "App Name". - Use
Get-AppxPackagefor AppX and MSIX package information. - Run
Get-AppxPackage -AllUsersfrom an elevated session when checking shared-user package installations. - Export with
winget export -o apps.jsonif you need a practical rebuild list.
The Bottom Line
Windows 11 offers several ways to find installed apps because “installed” has become a broader concept than it was in the Control Panel era. A traditional desktop application, a Microsoft Store package, an Edge web app, a PowerShell-managed package, and an organization-deployed tool can all be present on the same PC while appearing in different places.For everyday use, Settings > Apps > Installed apps is the most reliable and approachable starting point. Start, Windows Search, and the Apps folder are best for finding something you want to launch. Programs and Features remains essential for stubborn legacy desktop software. Microsoft Store Library and
edge://apps cover two app categories that conventional lists may not explain clearly.For advanced users,
winget list provides a clean and useful Windows 11 installed apps inventory, while Get-AppxPackage exposes the package-level detail needed for Store and MSIX troubleshooting. None of these tools is individually complete, but together they provide a clear, modern method for finding, verifying, managing, and documenting the software installed on a Windows 11 PC.References
- Primary source: Technobezz
Published: 2026-07-23T19:36:51.309000+00:00
Loading…
www.technobezz.com - Official source: support.microsoft.com
Uninstall or remove apps and programs in Windows - Microsoft Support
Uninstall or remove apps and programs in the Settings app.support.microsoft.com