

A Dell computer microphone that suddenly stops working rarely points to one universal defect. More often, Windows has selected the wrong recording device, a privacy switch is blocking access, the keyboard mute control is active, an application has retained an outdated input choice, or the Dell audio-driver stack has become corrupted. The fastest repair strategy is therefore diagnostic rather than destructive: begin with the physical and one-minute checks, prove whether Windows can record audio, isolate application-specific failures, and only then reinstall drivers or investigate hardware.
Modern Dell laptops and desktops handle microphone input through several overlapping layers. The physical microphone feeds an audio codec or USB/Bluetooth controller, Dell and component-vendor drivers expose that hardware to Windows, Windows applies privacy and signal-processing rules, and each calling or recording application chooses which available endpoint it wants to use.
A failure at any one of those layers can produce the same symptom: nobody can hear you. That similarity is why microphone troubleshooting often becomes frustrating. Reinstalling a driver cannot fix a muted headset, while changing Teams settings cannot restore a microphone that has disappeared from Device Manager.
After Windows returns, test the microphone before reopening every background application. This helps determine whether a conferencing program, voice utility, or peripheral-management service is contributing to the problem.
If the issue began after connecting or removing a dock, headset, webcam, or Bluetooth device, restart with only the essential peripherals attached. A dock can expose several similarly named audio endpoints, and Windows may continue routing input to a disconnected dock microphone.
A headset with separate green headphone and pink microphone plugs needs a compatible Y-adapter. Plugging the microphone lead alone into a combo jack does not guarantee that the system will recognize it correctly.
The distinction between a headset input and a stand-alone analog microphone also matters. Some newer Dell designs do not provide a traditional dedicated mic-in or line-in circuit through the 3.5 mm socket. If a stand-alone analog microphone is not detected, a compatible USB audio adapter may be the more reliable solution.
This is not merely another Teams or Windows mute button. On supported hardware, it can operate at a lower level and affect the integrated microphone, USB or jack-connected microphones, and wireless microphones. Consequently, an application can display its own microphone icon as unmuted while receiving no usable input.
Check the icon printed on the key rather than relying solely on the F4 label. If the indicator’s behavior does not match the expected mute state, consult the system’s service manual or keyboard guide.
A mute LED that remains stuck after repeated key presses can also point to a hotkey service, firmware, or audio-driver problem. Restart first, then install the Dell-provided system and audio updates before treating the LED itself as proof of a hardware failure.
Desktop applications generally do not appear as individually controllable switches in the Store-app permissions list. If the broad desktop-app access option is disabled, searching for a separate switch for a conventional Win32 program will not solve the problem.
Then disconnect and reconnect the webcam. Test it directly in Windows before returning to the conferencing application.
Do not attempt to bypass those restrictions. Contact the organization’s support team, especially when:
Avoid selecting a device based only on a generic name such as “Microphone.” Compare the manufacturer, connection type, and device status. If necessary, disconnect external audio devices temporarily and watch which entries disappear.
Once the intended microphone is selected, speak normally and observe the input-level meter. A moving meter confirms that Windows is receiving a signal, even if an application still cannot.
This single test creates a crucial troubleshooting boundary:
Set the main microphone level high enough to capture speech without clipping. A setting of 100 is a useful diagnostic baseline, but it is not always the best permanent value.
Microphone Boost may be unavailable on some Dell systems because the audio codec, driver, or digital microphone array does not expose it. When it is available, increase it cautiously. Excessive boost raises keyboard noise, electrical hiss, room ambience, and feedback along with the voice.
Then use the application’s test function where available. In Microsoft Teams, choose the intended microphone under device settings and make a test call. In Zoom, verify the selected input and run its microphone test. In Discord, open Voice & Video, choose the input device, and compare Voice Activity with Push to Talk.
Also examine these application-level conditions:
In Chrome, open the privacy and site-settings area, review microphone permissions, select the intended default device, and remove the affected site from the blocked list. In Edge, inspect the site’s microphone permission under site permissions. In Firefox, open privacy and security settings, locate microphone permissions, change the site to Allow, save the change, and reload the page.
For any browser, also select the site-information or permission icon beside the address bar while the meeting page is open. Set microphone access to Allow, then reload the tab.
Private-browsing modes, security extensions, anti-tracking tools, and enterprise policies can alter permission behavior. Test in a normal browser window with unnecessary extensions disabled before concluding that the Dell microphone itself is faulty.
Confirm the headset is both paired and connected for audio. If Windows shows it but receives no microphone signal:
Test another recording immediately. If speech returns or becomes clearer, leave the enhancement disabled while updating the Dell audio package.
If disabling enhancements makes no difference, restore the previous setting. The goal is to isolate the variable, not permanently disable every feature regardless of the result.
For diagnosis, use one processing layer at a time:
Automated troubleshooting is most useful for disabled devices, incorrect defaults, stalled services, and basic configuration errors. It is less likely to resolve damaged connectors, unsupported analog microphones, or model-specific driver dependencies.
Treat a successful troubleshooter result as a prompt to retest, not as proof that the issue has been repaired. The recorded sample remains the better measure.
Windows Update is a reasonable first source for broadly compatible drivers. However, Device Manager may report that the best driver is already installed even when Dell offers a newer or more model-specific package.
If the issue began immediately after an update, do not assume another update will automatically reverse it. Record the approximate installation date, inspect update history, and consider driver rollback if the option is available.
For manual installation, identify the computer by its Service Tag or exact model. Download drivers intended for that specific configuration rather than using a package found through a general search.
A sensible installation order is:
Connect AC power, ensure the battery has a healthy charge, close applications, and do not interrupt the update. On encrypted enterprise systems, follow organizational procedures because firmware changes can interact with BitLocker recovery requirements.
A BIOS update should be a targeted repair step, not the first response to an application-specific microphone failure.
Rollback is particularly valuable when the device was fully functional before a known change. It is less useful when Windows has already removed the previous package or when the problem predates the update.
After confirming that rollback repairs the microphone, pause before reinstalling the same problematic version. Check Dell’s model-specific guidance and subsequent driver releases.
The recovery path may require removing the affected Intel SST devices, restarting, installing Windows updates, and then installing Dell’s current audio packages. Because implementations differ by model and processor generation, use the Dell-supported package for the exact computer.
Older incompatible Intel SST versions have also caused broader Windows 11 compatibility problems on certain Intel platforms. That history reinforces an important point: the driver version and hardware generation must match, and a numerically different package is not automatically suitable for every Dell.
Newer Dell Optimizer releases have reduced or removed some of those audio-quality controls. Dell increasingly expects applications such as Teams or Zoom to handle conferencing effects.
If a guide tells you to open an Audio panel that is absent, do not assume the installation is corrupted. Verify the installed Dell Optimizer version and the features supported by that particular system.
This is why generic driver-reinstallation advice sometimes falls short. A microphone that works only when connected before startup, disappears after being unplugged, or is not recognized by the jack-detection interface may require a specific BIOS and audio-package combination.
Check the exact model rather than assuming all Latitude or Inspiron computers use the same audio architecture.
A failed result may generate an error code or direct the user toward a component replacement. Save:
Pre-boot diagnostics operate outside the normal Windows desktop and can help distinguish an operating-system problem from a lower-level hardware failure. However, available microphone-specific tests vary by model, so a complete pass may not exercise every recording scenario.
If diagnostics report a failure, avoid factory-resetting Windows as a first response. A reset cannot repair a damaged microphone array, loose internal cable, failed audio codec, or broken jack.
If the app is browser-based, check both Windows microphone privacy and the website’s browser permission. A successful Windows test means the repair should focus above the driver layer.
Exceptions exist across Dell product families. Use the keyboard icon and model documentation when the behavior differs.
Install the Dell-approved chipset, Intel SST, and audio packages for the exact Service Tag. Remove Intel SST devices only when there is a relevant warning or model-specific repair path.
Also confirm that Windows allows desktop applications to access the microphone. Browser permission cannot override a global Windows block.
Do not reset the PC when diagnostics identify hardware failure. Arrange service instead.
Windows can legitimately change default endpoints after adding a monitor, dock, webcam, or Bluetooth headset. That behavior does not necessarily mean the update damaged the microphone.
Enterprise administrators should test audio packages on representative Dell models before broad deployment. Different generations may use different codecs, Intel SST implementations, docking firmware, and jack-detection components despite sharing a similar product name.
Provide the exact model, Service Tag, Windows version, driver versions, diagnostic codes, and the results of internal-versus-external microphone tests. That information can shorten the path from a generic support script to the appropriate repair.
A nonworking Dell microphone is best approached as a routing and detection problem before it is treated as failed hardware. Start with mute, connection, privacy, and the Windows recording test; move to application settings only after Windows hears you; and reserve driver removal, firmware work, and system recovery for cases where the microphone is missing or consistently silent. By following that order, most users can identify whether the fault belongs to a headset, Windows, a conferencing app, Dell’s driver stack, organizational policy, or the physical microphone itself—and fix it without turning a simple input-selection error into a much larger repair.
 Overview
Modern Dell laptops and desktops handle microphone input through several overlapping layers. The physical microphone feeds an audio codec or USB/Bluetooth controller, Dell and component-vendor drivers expose that hardware to Windows, Windows applies privacy and signal-processing rules, and each calling or recording application chooses which available endpoint it wants to use.A failure at any one of those layers can produce the same symptom: nobody can hear you. That similarity is why microphone troubleshooting often becomes frustrating. Reinstalling a driver cannot fix a muted headset, while changing Teams settings cannot restore a microphone that has disappeared from Device Manager.
Why Dell microphone problems can be deceptive
The phrase “microphone not working” can describe several distinct conditions:- The microphone is not detected at all, suggesting a connection, driver, firmware, or hardware problem.
- Windows detects the microphone but records silence, which often points to mute controls, privacy restrictions, low input gain, or audio processing.
- Windows records correctly but one app does not, indicating an application device selection or permission problem.
- The microphone works intermittently, which may involve a loose connector, Bluetooth instability, driver power management, or aggressive noise suppression.
- The microphone sounds quiet, distorted, or robotic, suggesting incorrect gain, enhancements, wireless bandwidth limits, or a failing microphone element.
The troubleshooting order matters
The best sequence moves from low-risk checks to increasingly invasive repairs. Follow this order and stop as soon as the microphone works:- Restart the computer and inspect the microphone, cable, connector, and mute controls.
- Check Dell’s keyboard microphone-mute key where supported.
- Confirm Windows microphone privacy access.
- Select and test the correct input in Windows Sound settings.
- Check the affected application or browser.
- Disable audio enhancements and run Windows troubleshooting.
- Install Windows, Dell audio, chipset, and firmware updates.
- Reinstall audio devices only if simpler repairs fail.
- Run Dell hardware diagnostics and escalate confirmed hardware faults.
Start With the Physical Checks
A restart and a physical inspection sound obvious, but they eliminate a surprising number of microphone failures. Windows audio services can stall, USB endpoints can remain in a bad state after sleep, and applications can hold an invalid device handle after a headset is disconnected.Restart Windows properly
Select Start > Power > Restart rather than shutting the lid or putting the system to sleep. Fast startup, hibernation, and modern standby do not always reinitialize audio devices in the same way as a full restart.After Windows returns, test the microphone before reopening every background application. This helps determine whether a conferencing program, voice utility, or peripheral-management service is contributing to the problem.
If the issue began after connecting or removing a dock, headset, webcam, or Bluetooth device, restart with only the essential peripherals attached. A dock can expose several similarly named audio endpoints, and Windows may continue routing input to a disconnected dock microphone.
Inspect external microphones and headsets
For an external microphone, verify the following:- The plug is fully inserted and does not stop halfway because of a tight case opening.
- A USB microphone is connected directly to the PC for testing, not through an unpowered hub.
- The headset’s inline mute switch is in the unmuted position.
- A boom microphone is lowered into its active position if the headset uses a flip-to-mute mechanism.
- Detachable headset cables are firmly connected at both ends.
- The connector has no bent contacts, cracks, corrosion, lint, or other debris.
- A wireless microphone has sufficient battery charge and shows as connected rather than merely paired.
Understand Dell combo audio jacks
Many Dell laptops use a single 3.5 mm combination port for headphones and microphone input. A conventional headset intended for that port normally uses a four-contact TRRS connector, carrying left audio, right audio, ground, and microphone signals through one plug.A headset with separate green headphone and pink microphone plugs needs a compatible Y-adapter. Plugging the microphone lead alone into a combo jack does not guarantee that the system will recognize it correctly.
The distinction between a headset input and a stand-alone analog microphone also matters. Some newer Dell designs do not provide a traditional dedicated mic-in or line-in circuit through the 3.5 mm socket. If a stand-alone analog microphone is not detected, a compatible USB audio adapter may be the more reliable solution.
Check Dell’s F4 Microphone-Mute Control
Selected Dell Latitude laptops, Precision mobile workstations, and some XPS models include a keyboard-level microphone-mute function. This control can silence the integrated microphone and connected microphones even when Windows and the calling application appear to be configured correctly.Read the F4 indicator correctly
On supported Dell systems, the usual behavior is:- F4 LED illuminated: The microphone is muted.
- F4 LED off: The microphone is unmuted.
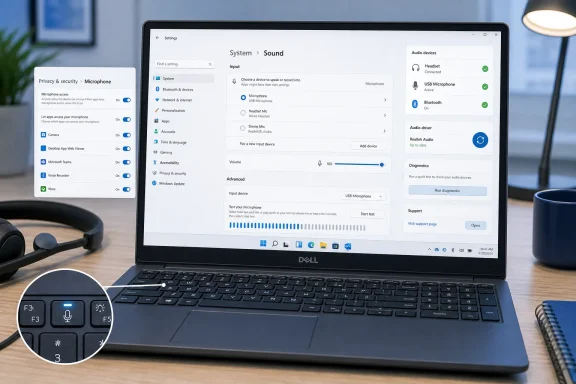
This is not merely another Teams or Windows mute button. On supported hardware, it can operate at a lower level and affect the integrated microphone, USB or jack-connected microphones, and wireless microphones. Consequently, an application can display its own microphone icon as unmuted while receiving no usable input.
Do not assume every Dell keyboard behaves identically
Dell has used different keyboard layouts across Inspiron, Latitude, XPS, Vostro, Alienware, and Precision product generations. Some systems place microphone mute on another key, some provide only speaker mute, and others have no dedicated hardware microphone control.Check the icon printed on the key rather than relying solely on the F4 label. If the indicator’s behavior does not match the expected mute state, consult the system’s service manual or keyboard guide.
A mute LED that remains stuck after repeated key presses can also point to a hotkey service, firmware, or audio-driver problem. Restart first, then install the Dell-provided system and audio updates before treating the LED itself as proof of a hardware failure.
Restore Windows Microphone Permissions
Windows 11 privacy controls sit between the hardware and applications. A perfectly functional microphone can appear unusable if global access, application access, or desktop-application access has been disabled.Enable the three important Windows switches
Open Start > Settings > Privacy & security > Microphone. Verify these settings:- Microphone access is turned on.
- Let apps access your microphone is turned on.
- Let desktop apps access your microphone is turned on.
Desktop applications generally do not appear as individually controllable switches in the Store-app permissions list. If the broad desktop-app access option is disabled, searching for a separate switch for a conventional Win32 program will not solve the problem.
Check camera permission for webcam microphones
A webcam may expose its microphone as an audio device while still depending on camera-related permission or device initialization. If an external webcam microphone is failing, also open Settings > Privacy & security > Camera and confirm that appropriate camera access is enabled.Then disconnect and reconnect the webcam. Test it directly in Windows before returning to the conferencing application.
Recognize administrator-controlled restrictions
On a work or school computer, microphone controls may be unavailable or marked as managed by the organization. Group Policy, mobile-device management, endpoint security software, browser policy, or data-loss-prevention controls can intentionally block audio capture.Do not attempt to bypass those restrictions. Contact the organization’s support team, especially when:
- Permission switches are disabled or greyed out.
- Windows reports that settings are managed by an administrator.
- Every microphone fails in the same managed application.
- A website never receives a permission prompt despite correct browser settings.
- The microphone works in personal applications but not in corporate tools.
Select and Test the Correct Windows Input
Windows may expose several recording devices at once: the laptop microphone array, a webcam microphone, a Bluetooth headset, a monitor or dock audio endpoint, a USB microphone, and virtual devices installed by recording software. The presence of all these options makes incorrect selection one of the most common causes of apparent microphone failure.Choose the active recording device
Open Start > Settings > System > Sound. Under Input, expand or open the list for choosing a device for speaking or recording, and select the microphone you actually intend to use.Avoid selecting a device based only on a generic name such as “Microphone.” Compare the manufacturer, connection type, and device status. If necessary, disconnect external audio devices temporarily and watch which entries disappear.
Once the intended microphone is selected, speak normally and observe the input-level meter. A moving meter confirms that Windows is receiving a signal, even if an application still cannot.
Make a Windows test recording
Select the microphone’s properties, find Microphone test, and choose Start test. Speak at a normal distance and volume, stop the test, and play the recorded sample.This single test creates a crucial troubleshooting boundary:
- If the Windows recording is clear, the hardware and core driver path probably work.
- If the meter moves but the recording is faint, adjust input volume and microphone position.
- If the device appears but records silence, check mute, privacy, levels, and enhancements.
- If the device is absent, move toward connection, driver, firmware, and hardware diagnostics.
Correct low microphone volume
Increase Input volume in the microphone properties and test again. If available, open Additional device properties, choose the Levels tab, and inspect both the microphone slider and any microphone-boost control.Set the main microphone level high enough to capture speech without clipping. A setting of 100 is a useful diagnostic baseline, but it is not always the best permanent value.
Microphone Boost may be unavailable on some Dell systems because the audio codec, driver, or digital microphone array does not expose it. When it is available, increase it cautiously. Excessive boost raises keyboard noise, electrical hiss, room ambience, and feedback along with the voice.
Isolate Application and Browser Failures
When Windows records correctly but a communication application does not, the microphone is not broadly broken. The failure is usually inside the application’s input selection, mute state, permissions, processing options, or cached device configuration.Check Teams, Zoom, Discord, and similar apps
Open the application’s Audio, Voice, or Devices settings and explicitly choose the same microphone that succeeded in the Windows test. Do not rely on an option named “Default” while troubleshooting, because the Windows default can change when a dock, monitor, Bluetooth headset, or webcam reconnects.Then use the application’s test function where available. In Microsoft Teams, choose the intended microphone under device settings and make a test call. In Zoom, verify the selected input and run its microphone test. In Discord, open Voice & Video, choose the input device, and compare Voice Activity with Push to Talk.
Also examine these application-level conditions:
- The application’s microphone button is not muted.
- Push to Talk is not enabled unintentionally.
- The voice-activation threshold is not set too high.
- Automatic sensitivity has not reduced input excessively.
- Background-noise removal is not suppressing a soft or distant voice.
- Exclusive-use or studio software is not holding the device.
- The app was restarted after reconnecting the microphone.
Repair browser microphone permissions
Browsers maintain site-specific permissions independently of Windows. A website can therefore remain blocked even after global microphone access is enabled.In Chrome, open the privacy and site-settings area, review microphone permissions, select the intended default device, and remove the affected site from the blocked list. In Edge, inspect the site’s microphone permission under site permissions. In Firefox, open privacy and security settings, locate microphone permissions, change the site to Allow, save the change, and reload the page.
For any browser, also select the site-information or permission icon beside the address bar while the meeting page is open. Set microphone access to Allow, then reload the tab.
Private-browsing modes, security extensions, anti-tracking tools, and enterprise policies can alter permission behavior. Test in a normal browser window with unnecessary extensions disabled before concluding that the Dell microphone itself is faulty.
Reconnect Bluetooth audio carefully
Bluetooth headsets commonly expose separate profiles for high-quality stereo playback and two-way communications. The microphone requires a hands-free or headset profile, which can reduce playback quality while active.Confirm the headset is both paired and connected for audio. If Windows shows it but receives no microphone signal:
- Turn the headset off and back on.
- Disconnect it from nearby phones or tablets that may claim the connection.
- Remove the device from Windows Bluetooth settings.
- Restart the computer.
- Pair the headset again.
- Select its microphone explicitly in Windows and the calling app.
Disable Enhancements and Run Windows Troubleshooting
Audio processing objects can improve conferencing by applying beamforming, gain control, noise reduction, and echo cancellation. They can also suppress legitimate speech, malfunction after a driver update, or conflict with similar processing inside Teams, Zoom, or another application.Test without audio enhancements
Open the microphone properties from Settings > System > Sound and turn Audio enhancements off. Depending on the driver, the option may instead appear in Additional device properties under an Enhancements or Advanced tab.Test another recording immediately. If speech returns or becomes clearer, leave the enhancement disabled while updating the Dell audio package.
If disabling enhancements makes no difference, restore the previous setting. The goal is to isolate the variable, not permanently disable every feature regardless of the result.
Avoid stacking multiple noise-removal systems
A Dell utility, the audio driver, the conferencing application, and a headset companion app can all apply noise reduction simultaneously. Layering those systems may create clipped syllables, pumping volume, metallic speech, or complete suppression of a quiet speaker.For diagnosis, use one processing layer at a time:
- Disable third-party headset effects.
- Disable Windows or driver enhancements temporarily.
- Turn off application background-noise suppression.
- Make a local Windows recording.
- Re-enable features individually and retest.
Run the built-in input troubleshooter
Under Settings > System > Sound, find the advanced troubleshooting area and run the troubleshooter for input devices. Follow its prompts, apply recommended changes, and test again.Automated troubleshooting is most useful for disabled devices, incorrect defaults, stalled services, and basic configuration errors. It is less likely to resolve damaged connectors, unsupported analog microphones, or model-specific driver dependencies.
Treat a successful troubleshooter result as a prompt to retest, not as proof that the issue has been repaired. The recorded sample remains the better measure.
Update Dell and Windows Components
Dell audio is often a package rather than one isolated driver. The microphone path may involve the system BIOS, chipset components, Intel Smart Sound Technology, a Realtek or Cirrus Logic codec, USB or Bluetooth controllers, and Dell-specific applications.Install Windows updates first
Open Settings > Windows Update, check for updates, install available updates, and restart. Review optional driver updates if the microphone problem coincides with a missing device or recently installed Windows feature update.Windows Update is a reasonable first source for broadly compatible drivers. However, Device Manager may report that the best driver is already installed even when Dell offers a newer or more model-specific package.
If the issue began immediately after an update, do not assume another update will automatically reverse it. Record the approximate installation date, inspect update history, and consider driver rollback if the option is available.
Use Dell SupportAssist or the model-specific support page
Open Dell SupportAssist and run its software-update check. Install applicable audio, chipset, Bluetooth, USB, and firmware updates, restarting when requested.For manual installation, identify the computer by its Service Tag or exact model. Download drivers intended for that specific configuration rather than using a package found through a general search.
A sensible installation order is:
- BIOS or UEFI firmware, where the release notes address relevant stability or device issues.
- Chipset and platform components.
- Intel Smart Sound Technology or equivalent audio-controller components.
- The Dell-approved codec or audio driver.
- Bluetooth, USB, docking-station, or webcam drivers for external microphones.
- Dell applications required for jack detection or audio control on the affected model.
Treat BIOS updates with appropriate care
A BIOS update can correct device enumeration, audio-controller behavior, docking problems, and firmware-level compatibility. It also carries more risk than changing a Windows setting.Connect AC power, ensure the battery has a healthy charge, close applications, and do not interrupt the update. On encrypted enterprise systems, follow organizational procedures because firmware changes can interact with BitLocker recovery requirements.
A BIOS update should be a targeted repair step, not the first response to an application-specific microphone failure.
Repair Drivers and Intel Smart Sound Technology
If the microphone is absent from Windows input devices, displays warning icons, or stopped working after a driver change, Device Manager becomes the central diagnostic tool.Inspect all relevant Device Manager categories
Right-click Start and open Device Manager. Examine:- Audio inputs and outputs
- Sound, video and game controllers
- System devices
- Bluetooth, for wireless microphones
- Cameras, for webcam-integrated microphones
- Universal Serial Bus controllers, for USB audio devices
Roll back a recent audio driver
If the failure began immediately after an audio-driver update, open the device’s properties, select the Driver tab, and choose Roll Back Driver when available. Restart and test.Rollback is particularly valuable when the device was fully functional before a known change. It is less useful when Windows has already removed the previous package or when the problem predates the update.
After confirming that rollback repairs the microphone, pause before reinstalling the same problematic version. Check Dell’s model-specific guidance and subsequent driver releases.
Reinstall the audio device cleanly
If updating and rollback do not help, reinstall the audio device:- Open Device Manager.
- Expand Sound, video and game controllers.
- Right-click the relevant audio device and select Uninstall device.
- Select the option to remove the driver package only when performing a deliberate clean reinstall.
- Restart the computer.
- Allow Windows to detect the hardware.
- Install the current Dell-approved audio package.
- Restart and retest.
Handle Intel SST warning icons methodically
Some Dell systems route the internal digital microphone through Intel Smart Sound Technology. If Intel Smart Sound Technology Audio Controller or an associated Intel SST device displays a yellow warning icon, the internal microphone may vanish even though external USB audio still works.The recovery path may require removing the affected Intel SST devices, restarting, installing Windows updates, and then installing Dell’s current audio packages. Because implementations differ by model and processor generation, use the Dell-supported package for the exact computer.
Older incompatible Intel SST versions have also caused broader Windows 11 compatibility problems on certain Intel platforms. That history reinforces an important point: the driver version and hardware generation must match, and a numerically different package is not automatically suitable for every Dell.
Understand Dell Optimizer and Jack Detection
Dell Optimizer has changed across product generations. Advice written for older releases may refer to audio controls that no longer exist in current versions, while some legacy systems still depend on Dell components for proper jack detection.Current and legacy behavior differ
Older Dell Optimizer releases offered controls such as background-noise removal, suppression of other speakers’ noise, and voice-quality monitoring. On systems still using those versions, temporarily toggling the features can help identify overprocessing.Newer Dell Optimizer releases have reduced or removed some of those audio-quality controls. Dell increasingly expects applications such as Teams or Zoom to handle conferencing effects.
If a guide tells you to open an Audio panel that is absent, do not assume the installation is corrupted. Verify the installed Dell Optimizer version and the features supported by that particular system.
Some models have specific BIOS and audio dependencies
Dell has documented model-specific cases in which BIOS versions, audio drivers, and Dell Optimizer components interact with headset-jack detection. For example, certain Latitude configurations have required firmware corrections to restore reliable recognition after a Windows installation.This is why generic driver-reinstallation advice sometimes falls short. A microphone that works only when connected before startup, disappears after being unplugged, or is not recognized by the jack-detection interface may require a specific BIOS and audio-package combination.
Check the exact model rather than assuming all Latitude or Inspiron computers use the same audio architecture.
Run Dell Diagnostics and Separate Software From Hardware
When Windows settings and driver repairs do not restore the microphone, hardware diagnostics can determine whether the system detects a physical fault. They also create useful error information for warranty or repair discussions.Use SupportAssist inside Windows
Open Dell SupportAssist and run the available microphone or audio-recording diagnostic. Follow the prompts closely, because some tests require speaking, selecting a detected endpoint, or confirming whether recorded audio was heard.A failed result may generate an error code or direct the user toward a component replacement. Save:
- The diagnostic error code.
- The validation code.
- The computer’s Service Tag.
- The date and conditions of the test.
- Whether internal and external microphones produced the same result.
Run Dell pre-boot diagnostics
Restart the computer and press F12 repeatedly when the Dell logo appears. Choose Diagnostics and run the available hardware tests.Pre-boot diagnostics operate outside the normal Windows desktop and can help distinguish an operating-system problem from a lower-level hardware failure. However, available microphone-specific tests vary by model, so a complete pass may not exercise every recording scenario.
If diagnostics report a failure, avoid factory-resetting Windows as a first response. A reset cannot repair a damaged microphone array, loose internal cable, failed audio codec, or broken jack.
Use comparison tests to isolate the failed component
A few controlled comparisons can reveal the likely fault:- If the internal microphone fails but a USB microphone works, Windows audio services are probably operational.
- If every microphone fails, investigate global privacy, audio services, drivers, and policy.
- If one USB port fails but another works, inspect the port, hub, dock, and USB controller path.
- If the microphone works before Windows loads but not inside Windows, software or policy becomes more likely.
- If the microphone cuts out when the cable moves, suspect the plug, cable, or socket.
- If a headset works on another device but not the Dell, focus on compatibility, jack type, drivers, or the Dell port.
- If no microphone works in one application but all work elsewhere, repair the application rather than the PC.
Strengths and Opportunities
The layered Dell and Windows audio architecture creates complexity, but it also provides several ways to recover a microphone without replacing hardware.- Windows includes a direct recording test. This quickly separates system-wide input failures from app-specific problems.
- Dell provides model-specific driver packages. These packages can restore platform components that a generic audio driver does not include.
- Hardware mute indicators offer immediate feedback. On supported systems, the F4 LED can reveal a mute state that software interfaces overlook.
- USB audio offers a practical fallback. A USB headset or adapter can bypass a damaged analog jack or unsupported microphone connection.
- Pre-boot diagnostics improve fault isolation. Testing outside Windows can prevent unnecessary operating-system resets.
- Application-level audio tests expose configuration errors. Teams, Zoom, and similar tools can verify the exact endpoint they are using.
- Controlled feature testing can improve voice quality. Disabling duplicated noise suppression often fixes clipping and robotic speech without a driver reinstall.
Risks and Concerns
Some repair steps can introduce new problems if used too early or without model-specific information.- Deleting driver packages can remove required Dell components. Download the correct replacement before beginning a clean uninstall.
- BIOS updates must not be interrupted. Loss of power during firmware installation can leave the system unable to start normally.
- Factory recovery removes applications and may erase personal data. Back up files and recovery keys before using reset or operating-system recovery tools.
- Generic driver utilities can install unsuitable packages. Prefer Windows Update and Dell’s support tools over unverified driver-download software.
- Excessive microphone boost can create feedback and distortion. Increase gain gradually and test with a local recording.
- Disabling security policy may violate organizational requirements. Managed-device restrictions should be addressed by authorized IT staff.
- Compressed-air misuse can damage ports. Power down first and never insert conductive objects into the connector.
- Uninstalling unrelated Device Manager entries can compound the fault. Record device names and error codes before making changes.
Frequently Asked Questions
Why does the microphone work in Windows but not in Teams or Zoom?
The application is probably using a different input device, retaining a disconnected endpoint, or applying its own mute or permission rule. Select the exact microphone inside the app, restart the app, and run its test call or recording feature.If the app is browser-based, check both Windows microphone privacy and the website’s browser permission. A successful Windows test means the repair should focus above the driver layer.
What does the Dell F4 microphone light mean?
On supported Dell Latitude, Precision, and selected XPS systems, an illuminated F4 microphone indicator normally means the microphone is muted. Press Fn + F4, or F4 when Fn Lock is enabled, to toggle it.Exceptions exist across Dell product families. Use the keyboard icon and model documentation when the behavior differs.
Why is the internal microphone missing?
A missing internal microphone often indicates an incomplete audio package, a disabled endpoint, an Intel Smart Sound Technology problem, or a firmware-level detection issue. Inspect Audio inputs and outputs, Sound controllers, and System devices in Device Manager.Install the Dell-approved chipset, Intel SST, and audio packages for the exact Service Tag. Remove Intel SST devices only when there is a relevant warning or model-specific repair path.
Why does the browser never ask for permission?
The site may already be blocked, the browser’s global microphone permission may be disabled, or an enterprise policy may suppress the prompt. Clear or change the site permission, select the correct microphone, and reload the page.Also confirm that Windows allows desktop applications to access the microphone. Browser permission cannot override a global Windows block.
When should the computer be reset?
Reset Windows only after the microphone has failed Windows tests, application checks, driver repair, platform updates, and Dell diagnostics without a clearer explanation. Back up personal files, application data, BitLocker recovery information, and other essential credentials first.Do not reset the PC when diagnostics identify hardware failure. Arrange service instead.
What to Watch Next
Audio stacks continue to evolve as Windows, conferencing applications, and PC manufacturers shift more voice processing into software and dedicated low-power hardware. Future driver and firmware updates may change where microphone controls appear, especially on systems using Intel Smart Sound Technology, AI-assisted noise reduction, or newer Dell management applications.Monitor behavior after major updates
After a Windows feature update, BIOS installation, or large audio-package change, verify the microphone before an important meeting. Make a short Windows recording, check the preferred input, and confirm the conferencing application still points to that device.Windows can legitimately change default endpoints after adding a monitor, dock, webcam, or Bluetooth headset. That behavior does not necessarily mean the update damaged the microphone.
Preserve a known-good configuration
When the microphone works reliably, note the selected Windows input, driver version, Dell Optimizer version, and application settings. This creates a baseline for future troubleshooting.Enterprise administrators should test audio packages on representative Dell models before broad deployment. Different generations may use different codecs, Intel SST implementations, docking firmware, and jack-detection components despite sharing a similar product name.
Escalate with useful evidence
Contact Dell or organizational support when diagnostics fail, the internal microphone remains absent after the correct driver stack is installed, the jack has visible damage, or the fault follows the hardware across operating environments.Provide the exact model, Service Tag, Windows version, driver versions, diagnostic codes, and the results of internal-versus-external microphone tests. That information can shorten the path from a generic support script to the appropriate repair.
A nonworking Dell microphone is best approached as a routing and detection problem before it is treated as failed hardware. Start with mute, connection, privacy, and the Windows recording test; move to application settings only after Windows hears you; and reserve driver removal, firmware work, and system recovery for cases where the microphone is missing or consistently silent. By following that order, most users can identify whether the fault belongs to a headset, Windows, a conferencing app, Dell’s driver stack, organizational policy, or the physical microphone itself—and fix it without turning a simple input-selection error into a much larger repair.