

Arrow keys not working in Microsoft Excel usually means Excel is receiving the keystrokes but Scroll Lock, a selection/editing mode, another Excel interface element, or an add-in has changed their behavior. These steps cover the desktop Excel app in Microsoft 365 and supported Office versions on Windows 11 and Windows 10. Start with Scroll Lock; do not repair or reinstall Office until the simpler checks fail.
Click a blank worksheet cell, then press an arrow key once.
If the status-bar indicator is missing:
If they fail outside Excel, the issue is not specific to Excel.
If the keyboard works in other apps but not in Excel, continue below.
When you find the cause, leave that add-in disabled, update it from its publisher, or contact your organization’s IT administrator if the add-in is required or centrally managed. To roll back the test, return to File > Options > Add-ins, select the same Manage category, choose Go, and reselect the add-in’s check box.
On Windows 11:
After Excel opens again, select a blank worksheet cell and verify that each arrow key moves the active cell by one position.
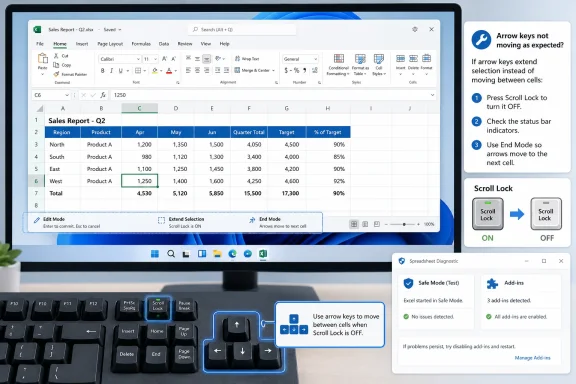 Identify what the arrow keys are doing
Click a blank worksheet cell, then press an arrow key once.- The worksheet scrolls but the active cell stays put: Scroll Lock is on.
- The cursor moves within the current cell or formula bar: Excel is in Edit mode.
- The selected range expands instead of moving to one cell: Extend Selection or Add to Selection is active.
- The arrow key jumps to an edge of a data area: End mode is active.
- A ribbon control, menu, pane, or dialog changes selection: the worksheet does not have keyboard focus.
- Nothing happens in Excel or other apps: investigate the keyboard and Windows input settings.
- Only one workbook is affected: test a new blank workbook before changing Office or Windows settings.
Turn off Scroll Lock
When Scroll Lock is enabled, Excel uses the arrow keys to scroll the worksheet rather than move the active-cell border. Excel normally shows Scroll Lock on its status bar while it is enabled.- Look at the bottom edge of the Excel window for Scroll Lock.
- Press the physical Scroll Lock or ScrLk key on the keyboard.
- Click a worksheet cell and press an arrow key.
If the status-bar indicator is missing:
- Right-click an empty area of the Excel status bar.
- Select Scroll Lock so that it is checked.
- Check the indicator again, then turn Scroll Lock off.
Use the Windows On-Screen Keyboard
Many laptop and compact keyboards have no dedicated Scroll Lock key.- Press Windows key + Ctrl + O to open the On-Screen Keyboard.
- Select ScrLk.
- Return to Excel and test an arrow key.
- Close the On-Screen Keyboard when finished.
Exit Excel modes that change arrow-key behavior
Excel displays several mode indicators on the status bar. They are useful clues when cells are not moving normally.Exit Edit mode
If an insertion point is visible in a cell or the formula bar, Excel is editing the active cell. The arrow keys move the insertion point or change a formula reference instead of moving to another worksheet cell.- Press Enter to keep the current edit.
- Or press Esc to cancel the edit.
- Press an arrow key again.
Turn off Extend Selection
When Extend Selection is active, each arrow-key press enlarges the selected range.- Check whether the Excel status bar shows Extend Selection.
- Press F8 once.
- Test an arrow key.
Turn off Add to Selection
When Add to Selection is active, Excel adds nonadjacent cells or ranges to the current selection as you move.- Check for Add to Selection on the status bar.
- Press Shift + F8 once.
- Test an arrow key.
Exit End mode
If the status bar shows End Mode, arrow keys can move to the next nonblank cell at the edge of a row or column rather than one cell at a time.- Press End.
- Confirm that End Mode disappears from the status bar.
- Press an arrow key.
Return focus to the worksheet
Arrow keys navigate whichever part of Excel currently has focus. For example, they can move between ribbon commands, a filter list, a task pane, or dialog controls instead of cells.- Press Esc to close an open menu, drop-down list, or active command.
- Click a normal worksheet cell—not the formula bar, Name Box, ribbon, or sheet tab.
- Press an arrow key.
Check whether the keyboard works outside Excel
Open Notepad, a web browser, or File Explorer and test all four arrow keys.If they fail outside Excel, the issue is not specific to Excel.
- If you use a USB keyboard, disconnect it and reconnect it directly to the PC rather than through a hub or dock.
- Try a different USB port.
- If possible, test with another keyboard.
- For a wireless keyboard, replace or recharge its batteries and reconnect it according to the keyboard manufacturer’s instructions.
- Restart Windows.
- Open Start > Settings > Accessibility > Keyboard.
- Check Sticky keys and Filter keys.
- Turn off a feature temporarily if it was enabled, then retest the arrow keys.
If the keyboard works in other apps but not in Excel, continue below.
Test a blank workbook and another Excel file
Before changing add-ins or repairing Office, determine whether the issue belongs to a workbook.- In Excel, select File > New > Blank workbook.
- Click a cell and test the arrow keys.
- Open another existing workbook and test there.
- Arrow keys work in a blank workbook but not one file: close and reopen the affected workbook, then check for an active cell edit, a filter drop-down, protected-sheet behavior, or workbook-specific automation.
- Arrow keys fail in every workbook: continue with Safe Mode and add-in troubleshooting.
- Arrow keys fail only in Excel for the web: test the workbook in a private/InPrivate browser window or temporarily disable browser extensions. If it works there, re-enable extensions one at a time to identify the conflict.
Start Excel in Safe Mode
Excel Safe Mode is a diagnostic method, not a permanent fix. It starts Excel with some customizations and add-ins unavailable, helping identify whether an add-in is intercepting or disrupting normal behavior.- Save open workbooks and close Excel.
- Press Windows key + R.
- Type:
excel /safe - Select OK.
- Confirm that Microsoft Excel (Safe Mode) appears in the title bar.
- Open a blank workbook and test the arrow keys.
If arrow keys work in Safe Mode
An add-in or customization is a likely cause. Disable add-ins one at a time so you can identify the specific one without unnecessarily losing useful functionality.- Close Excel Safe Mode and reopen Excel normally.
- Select File > Options > Add-ins.
- At the bottom, select an item in the Manage list, then choose Go.
- Start with COM Add-ins.
- Clear one add-in check box, then select OK.
- Close and reopen Excel normally.
- Test the arrow keys.
- Repeat for the remaining add-ins until the issue stops.
When you find the cause, leave that add-in disabled, update it from its publisher, or contact your organization’s IT administrator if the add-in is required or centrally managed. To roll back the test, return to File > Options > Add-ins, select the same Manage category, choose Go, and reselect the add-in’s check box.
Update and repair Office only after the checks above
Updating or repairing Office is appropriate when the problem occurs in every workbook, persists after Scroll Lock and Excel modes are cleared, and Safe Mode or add-in testing does not resolve it.Update Office
- Open Excel.
- Select File > Account.
- Under Product Information, select Update Options > Update Now.
- If Update Now is unavailable, select Enable Updates first.
- Let the update complete, then restart Excel.
Repair Microsoft 365 or Office
Warning: Repair applies to the Office installation, not just Excel. Close all Office apps first. An Online Repair may require you to sign in to Office again afterward.On Windows 11:
- Right-click Start and select Installed apps.
- Find Microsoft 365 or your Office product.
- Select the three-dot button next to it, then choose Modify.
- For most Microsoft 365 installations, choose Quick Repair first.
- If the issue remains, repeat the process and choose Online Repair.
- Follow the on-screen prompts and restart the PC if prompted.
- Right-click Start and select Apps and Features.
- Select Microsoft 365 or your Office product.
- Select Modify.
- Choose Quick Repair, or use Online Repair if Quick Repair does not resolve the issue.
- Follow the prompts and restart if requested.
After Excel opens again, select a blank worksheet cell and verify that each arrow key moves the active cell by one position.