

macOS Recovery Mode not working is usually fixed by using the correct startup method for your Mac, restoring a working network connection, or repairing the startup disk once Recovery opens. These steps cover Apple silicon Macs, Intel-based Macs, Intel Macs with the Apple T2 Security Chip, and current macOS versions through macOS Tahoe 26.
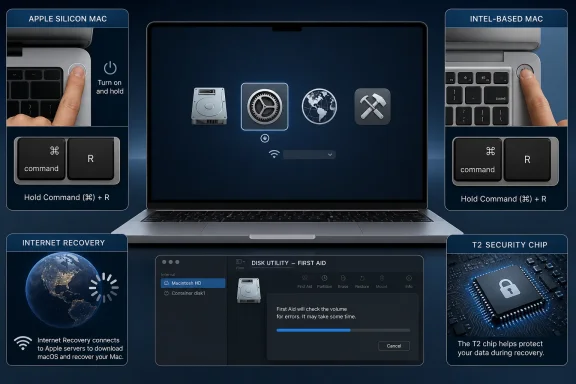
The startup procedure is different on Apple silicon and Intel Macs. Using
If macOS still starts, choose Apple menu > About This Mac:
If an Intel Mac normally starts Windows through Boot Camp, start macOS first and select the macOS startup disk in Apple menu > System Settings > General > Startup Disk or, on older macOS releases, Apple menu > System Preferences > Startup Disk. Then shut down and retry Command-R.
If the Mac is company-owned or school-owned, its management system may require network access, an organization credential, or administrator assistance before Recovery can continue.
Enter the firmware password if you know it. After Recovery opens:
Apple silicon:
On a Mac with Apple silicon or an Intel Mac with a T2 chip running macOS Monterey 12 or later:
You need:
If Recovery asks for an organization recovery password, Recovery Lock blocks startup, or Activation Lock requires an account you cannot access, stop troubleshooting and contact the organization administrator or the Apple Account owner.
 Identify your Mac before retrying Recovery
The startup procedure is different on Apple silicon and Intel Macs. Using Command-R on an Apple silicon Mac will not open Recovery.If macOS still starts, choose Apple menu > About This Mac:
- If the window lists Chip, such as Apple M1, M2, M3, or later, it is an Apple silicon Mac.
- If it lists Processor and says Intel, it is an Intel-based Mac.
Fix 1: Start macOS Recovery with the correct method
Apple silicon Macs
- Shut down the Mac completely.
- If it is frozen, press and hold the power button, or Touch ID button on a laptop, for up to 10 seconds until it turns off.
- Press and continue holding the power button.
- Release the button only when you see Loading startup options or an Options icon with a gear.
- Select Options.
- Click Continue.
- If prompted, choose the startup volume, select a user account, and enter that user’s macOS password.
Intel-based Macs
- Shut down the Mac.
- Press and release the power button.
- Immediately press and hold Command-R.
- Keep holding the keys until you see an Apple logo or a spinning globe.
- If asked, choose a Wi-Fi network or connect an Ethernet cable.
Fix 2: Rule out a keyboard or startup-input problem
This primarily applies to Intel Macs, because their normal Recovery method depends on Command-R being detected immediately at startup.- Shut down the Mac.
- Disconnect nonessential USB devices, docks, hubs, external drives, and displays.
- Use the Mac’s built-in keyboard if it has one.
- If you use an external keyboard, connect it directly to the Mac rather than through a hub or monitor.
- Retry the Intel startup sequence: power on, then immediately hold Command-R.
If an Intel Mac normally starts Windows through Boot Camp, start macOS first and select the macOS startup disk in Apple menu > System Settings > General > Startup Disk or, on older macOS releases, Apple menu > System Preferences > Startup Disk. Then shut down and retry Command-R.
Fix 3: Connect Recovery to a reliable network
Recovery may open successfully but fail during reinstallation, startup verification, activation, or Internet Recovery if it cannot reach Apple’s servers.- In macOS Recovery, click the Wi-Fi menu in the menu bar.
- Choose Turn Wi-Fi On if Wi-Fi is disabled.
- Select your normal network and enter its password.
- For a hidden network, choose Join Other Network and enter the network name and password.
- If wireless networking is unreliable, connect Ethernet directly or through a compatible adapter.
If the Mac is company-owned or school-owned, its management system may require network access, an organization credential, or administrator assistance before Recovery can continue.
Fix 4: Use Internet Recovery on an Intel Mac
Internet Recovery is an alternate recovery environment for Intel Macs. Use it when normal Command-R does not load, when the internal recovery environment is missing, or when you need a newer compatible macOS installer.- Shut down the Intel Mac.
- Turn it on.
- Immediately hold one of these key combinations:
- Option-Command-R: Starts Internet Recovery and offers the latest macOS compatible with that Mac.
- Option-Shift-Command-R: Starts Internet Recovery and offers the macOS version that came with the Mac, or the closest version still available.
- Release the keys when you see the spinning globe.
- Choose Wi-Fi if prompted, then wait for macOS Recovery to load.
- Select Reinstall macOS and follow the onscreen prompts.
Fix 5: Resolve a black screen, firmware password, or security restriction
A black, gray, or blue screen does not always mean Recovery is unavailable.- Press and hold the power button for up to 10 seconds to turn the Mac off.
- Disconnect external displays and nonessential peripherals.
- Turn the Mac back on and retry the appropriate Recovery method.
If you see a lock icon on an Intel Mac
A lock icon before Recovery can indicate a firmware password. This password prevents startup from Recovery and other startup disks without authorization.Enter the firmware password if you know it. After Recovery opens:
- Choose Utilities > Startup Security Utility or Utilities > Firmware Password Utility.
- Authenticate with an administrator account if prompted.
- Choose Turn Off Firmware Password only if you are authorized to remove it.
- Restart the Mac and confirm that it can start normally.
If an external installer is blocked on a T2 Mac
On an Intel Mac with the Apple T2 Security Chip, external startup media can be blocked by default.- Start macOS Recovery with Command-R.
- Choose Utilities > Startup Security Utility.
- Authenticate with an administrator account.
- Under Allowed Boot Media, select Allow booting from external or removable media.
- Restart and hold Option while starting the Mac to select the installer.
Fix 6: Repair the startup disk with Disk Utility First Aid
If Recovery opens but macOS will not start or reinstall, repair the internal storage before attempting another download.- In macOS Recovery, select Disk Utility and click Continue.
- Choose View > Show All Devices.
- In the sidebar, locate the internal startup storage device, its APFS container, and its volumes.
- Select the last volume listed under the startup disk, often Macintosh HD - Data.
- Click First Aid.
- Click Run or Repair Disk.
- When complete, select the next item above it and run First Aid again.
- Continue upward through every volume, then the APFS container, and finally the physical storage device.
- Choose Disk Utility > Quit Disk Utility.
- Choose Apple menu > Restart.
Fix 7: Use built-in macOS options if the Mac still starts
Recovery is not required for every update, reinstall, or reset task.Install updates normally
If the Mac reaches the desktop:- Choose Apple menu > System Settings > General > Software Update.
- Install the offered update or upgrade.
- Restart when prompted.
Retry an installation in Safe Mode
Safe Mode reduces startup extensions and can help when a normal update or installer repeatedly fails.Apple silicon:
- Shut down the Mac.
- Hold the power button until startup options appear.
- Select the startup volume.
- Hold Shift and click Continue in Safe Mode.
- Sign in, then retry Software Update.
- Restart the Mac.
- Immediately hold Shift until the login window appears.
- Sign in and retry the update.
Erase a Mac that still starts
Warning: Erasing removes local accounts, apps, files, settings, and saved data. Make a current backup first.On a Mac with Apple silicon or an Intel Mac with a T2 chip running macOS Monterey 12 or later:
- macOS Ventura 13 or later: Apple menu > System Settings > General > Transfer or Reset > Erase All Content and Settings
- macOS Monterey 12: Apple menu > System Preferences > Erase All Content and Settings
Fix 8: Use a bootable installer or revive Mac firmware
A bootable installer is the next supported option when Recovery will not load but the Mac can still recognize external startup media.Start from an existing bootable installer
Apple silicon:- Connect the installer directly to the Mac.
- Shut down the Mac.
- Hold the power button until startup options appear.
- Select the installer volume.
- Click Continue.
- Connect the installer.
- Shut down the Mac.
- Turn it on while holding Option.
- Select the installer, then click the onscreen arrow or press Return.
createinstallmedia command for that installer version. Creating the installer erases the target USB drive or external volume.Revive or restore firmware on Apple silicon or T2 Macs
Use firmware recovery only when normal Recovery, disk repair, and installation troubleshooting have failed. Typical symptoms include an exclamation point in a circle, a persistent blank screen, a firmware recovery indicator pattern, or an installation failure that will not clear.You need:
- The affected Apple silicon Mac or Intel Mac with a T2 chip.
- Another Mac running macOS 14 or later.
- A USB-C to USB-C cable that supports both charging and data. Do not use a Thunderbolt 3 cable.
- Internet access on the working Mac.
- Choose Revive Mac first. Revive updates firmware and recoveryOS without erasing the affected Mac.
- Choose Restore Mac only if Revive fails.
If Recovery asks for an organization recovery password, Recovery Lock blocks startup, or Activation Lock requires an account you cannot access, stop troubleshooting and contact the organization administrator or the Apple Account owner.
References
- Primary source: Technobezz
Published: 2026-07-19T16:22:39.253000+00:00
macOS Recovery Mode Not Working? 8 Fixes That Work in 2026 | Technobezz
macOS Recovery Mode not working? Use the right startup keys, fix Wi-Fi, clear locks, repair the disk, or revive your Mac.www.technobezz.com
