Fix Windows 10/11 Webcam Not Working: Privacy, Drivers, and Camera App Reset
Difficulty: Intermediate | Time Required: 20 minutesA webcam that suddenly stops working in Windows 10/11 can be frustrating—especially when you need it for Teams/Zoom meetings, Windows Hello, or recording. The good news is that most webcam issues come down to three common causes: privacy permissions, driver problems, or a broken Camera app state. This guide walks you through a clean, systematic fix that works for built-in laptop cameras and most USB webcams.
Prerequisites
Before you start, make sure you have:Quick walkthrough
- Administrator access (some driver steps require it)
- A few minutes to restart your PC once or twice
- If using a USB webcam: plug it directly into the PC (avoid hubs/docks during troubleshooting)
- Windows 11: Settings app layout used below applies to Windows 11 (22H2/23H2/24H2), with minor label changes depending on build.
- Windows 10: Steps apply to Windows 10 (1909 through 22H2). Some menus are in different locations, noted below.
Step-by-step: Fix the webcam in Windows 10/11
1) Confirm the camera isn’t blocked physically (fast check)
Many laptops have a hardware privacy switch or shutter.- Look for a physical shutter above the lens and open it.
- Check for a camera hotkey (often
Fn+ a function key with a camera icon). - If you’re using a USB webcam, unplug it and reconnect it to a different USB port.
Note: If the camera light turns on briefly at login or in an app, the hardware is likely fine and you should focus on privacy/driver/app steps below.
2) Check Windows privacy permissions (most common fix)
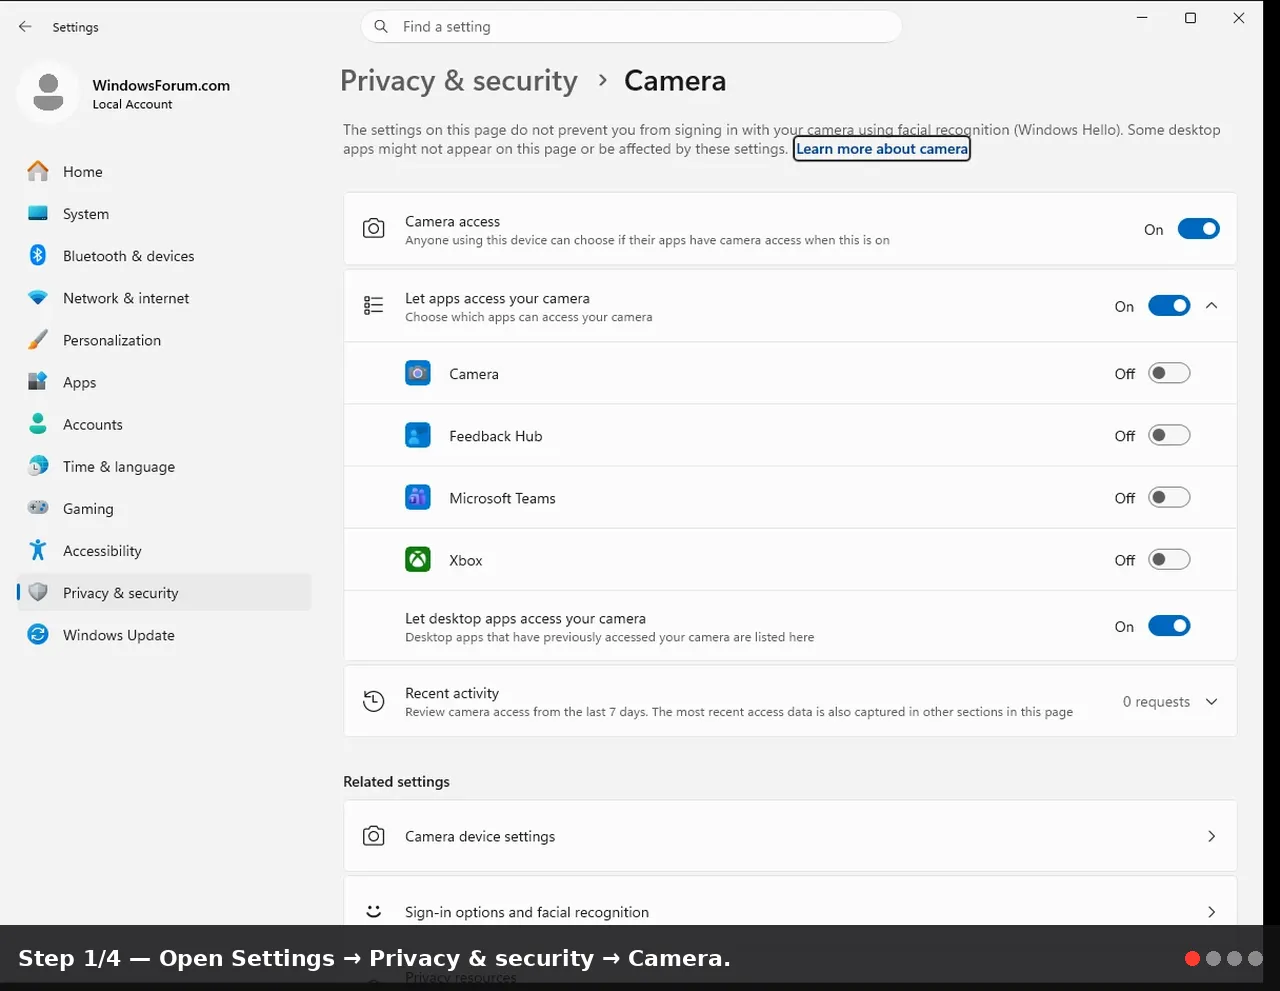
Windows can block camera access at the OS level—even if the camera is working.Windows 11
- Open Settings → Privacy & security → Camera.
- Turn Camera access On.
- Turn Let apps access your camera On.
- Review the app list and ensure your target app (e.g., Teams, Zoom, Discord, browser) is On.
- Scroll down to Let desktop apps access your camera and turn it On (important for classic apps).
Windows 10
- Open Settings → Privacy → Camera.
- Turn Allow access to the camera on this device On (click Change if needed).
- Turn Allow apps to access your camera On.
- Enable your specific apps.
- Ensure Allow desktop apps to access your camera is On.
Tip: If your webcam works in the Camera app but not in a browser or Teams/Zoom, it’s often an app-level permission issue (Step 6 also helps).
3) Close apps that might be “holding” the webcam
Only one app can sometimes lock the camera, preventing others from using it.- Press
Ctrl + Shift + Escto open Task Manager. - End tasks for apps that may be using the camera:
- Teams, Zoom, Skype, Discord
- Browser tabs (Chrome/Edge/Firefox) with video calls open
- Restart the app you actually want to use and test again.
Warning: Don’t end critical Windows processes—only close apps you recognize.
4) Test the webcam using the built-in Camera app
This confirms whether Windows can see and use the camera at all.- Open Start and search for Camera.
- Launch Camera and allow access if prompted.
- If you see an image, the camera is functional and your issue is likely permissions or app-specific configuration.
5) Fix or reinstall the webcam driver in Device Manager
Driver corruption or a bad update is a major cause of webcam failures—especially after Windows Updates.- Right-click Start → Device Manager.
- Expand:
- Cameras (common in Windows 11), and/or
- Imaging devices, and/or
- Sound, video and game controllers (some webcams appear here)
- Right-click your webcam device → choose Properties:
- Check Device status for error codes.
- Try Update driver → Search automatically for drivers.
- Right-click the webcam → Uninstall device.
- If you see Delete the driver software for this device, check it (recommended for stubborn issues).
- Click Uninstall.
- Restart your PC. Windows will attempt to reinstall the driver automatically.
Tip: For laptops (Dell/HP/Lenovo/ASUS/Acer), the most reliable driver is often from the manufacturer support page, not Windows Update. Install the OEM camera/chipset drivers if available.
6) Reset or repair the Camera app (Windows 10/11)
Even if the device works, the Camera app itself can get stuck due to a corrupted cache.Windows 11
- Settings → Apps → Installed apps.
- Find Camera → click the three dots → Advanced options.
- Click Repair first.
- If still broken, click Reset.
Windows 10
- Settings → Apps → Apps & features.
- Find Camera → Advanced options.
- Click Repair, then Reset if needed.
Note: Resetting clears the Camera app’s settings and stored data, but it won’t remove Windows itself or your files.
7) Check app-specific camera permissions (Teams/Zoom/Browsers)
If the webcam works in the Camera app but fails in one app, check that app’s internal settings.Browsers (Edge/Chrome):
- Open the site with the video call.
- Click the lock icon in the address bar.
- Set Camera to Allow and select the correct webcam.
- Refresh the page.
- Open Teams → Settings → Devices.
- Under Camera, select the correct device.
- Ensure no other app is using the webcam.
- Zoom → Settings → Video.
- Choose the correct camera and test video.
8) Run Windows troubleshoot checks (quick system integrity pass)
These steps can fix underlying system issues that affect device access.- Right-click Start → Terminal (Admin) (or Windows PowerShell (Admin) in Windows 10).
- Run these commands one at a time:
Code:
sfc /scannow
DISM /Online /Cleanup-Image /RestoreHealth- Restart your PC and test the camera again.
Tip: If DISM takes a while, that’s normal. Don’t interrupt it.
9) If it still doesn’t work: isolate the cause
Use these quick checks to determine whether it’s hardware, Windows, or the app.- Try a different USB port (USB webcam) and avoid docking stations/hubs.
- Test the webcam on another PC if possible.
- If it’s a laptop integrated camera: check BIOS/UEFI options (some models allow disabling the camera).
- In Device Manager, look for unknown devices or warnings:
- If you see a yellow triangle, it’s likely driver-related.
- Check Windows Update:
- Settings → Windows Update → Advanced options → Optional updates → Driver updates
- Install any camera-related driver updates (use judgment; OEM drivers are often best).
Warning: Avoid random “driver updater” utilities from third parties. Stick to Windows Update, the OEM support site, or the webcam manufacturer’s official downloads.
Tips and troubleshooting notes
- “Camera in use” light stays on: Reboot and close background apps. If it persists, review startup apps and privacy settings.
- Windows Hello stops working: Windows Hello uses the camera (or IR camera). Fixing camera drivers often restores Hello.
- External webcam not detected at all: This can be a USB power/port issue, a damaged cable, or a driver problem. Try another cable/port and test on another PC.
- Corporate/work devices: Your organization may enforce camera restrictions via policy. If Camera access is missing/greyed out in Settings, contact IT.
Conclusion
By checking privacy permissions, reinstalling or updating camera drivers, and repairing/resetting the Camera app, you can resolve the vast majority of Windows 10/11 webcam problems in about 20 minutes. This approach also helps prevent recurring issues after updates and ensures your camera works consistently across apps.Key Takeaways:
- Verify Windows camera privacy settings (including desktop app access) before deeper troubleshooting.
- Use Device Manager to update/reinstall webcam drivers—prefer OEM drivers when available.
- Repair/Reset the Camera app to fix app corruption and cached configuration issues.
- Confirm app-specific permissions in Teams/Zoom/browsers if the webcam works elsewhere.
This tutorial was generated to help WindowsForum.com users get the most out of their Windows experience.
Last edited: