

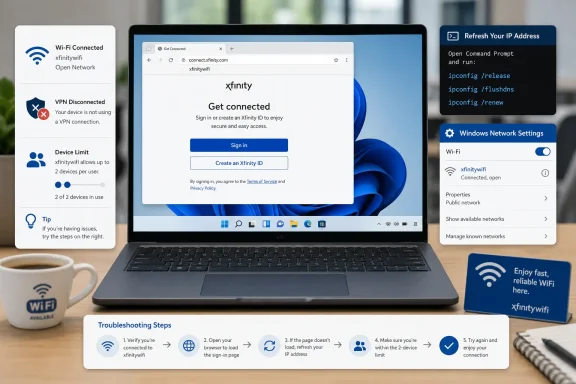
Your Xfinity NOW WiFi Pass should connect a Windows laptop or tablet to the open xfinitywifi hotspot, then display Xfinity’s sign-in page. If it does not, the usual causes are an unsupported or non-Xfinity-owned hotspot, a captive portal that did not open, a full two-device limit, or stale Wi-Fi/IP settings. These steps apply to Windows 11 and Windows 10 devices; Xfinity lists Windows 10 or later as supported for NOW WiFi Pass.
Confirm these basics before changing Windows settings:
Expected result: after successful sign-in, Windows should remain connected to xfinitywifi and normal web pages should load.
If the portal loads repeatedly, do not keep entering payment details. Proceed to forgetting the network instead.
If you use a manually assigned IP address on Wi-Fi for work or lab access, do not change that configuration without recording the existing settings or consulting the administrator.
Warning: Network reset removes and reinstalls network adapters, removes saved Wi-Fi networks, and can require you to reinstall or reconfigure VPN clients, Hyper-V virtual switches, and similar networking software. It may also set saved networks to the Public profile.
Use the support route in the NOW WiFi Pass purchase confirmation email. Xfinity directs NOW WiFi Pass customers to the Xfinity Assistant chat for connection and subscription help, and the confirmation email includes pass-specific support details.
Have the following ready:
 Before you start
Confirm these basics before changing Windows settings:- You are within range of a network named xfinitywifi.
- Your NOW WiFi Pass purchase is still within its 30-day period. Check the confirmation email, including its Junk or Spam folder.
- You are using a Windows 10 or Windows 11 PC with working Wi-Fi hardware.
- You are not trying to use a Chromebook, Linux PC, Kindle, BlackBerry, or similar unsupported device.
- Your device is not managed by an employer or school that restricts Wi-Fi, VPN, DNS, or proxy settings.
1. Connect through the official xfinitywifi flow
Start over with the supported connection process rather than attempting to connect to a secured network such as XFINITY or Xfinity Mobile.- Select the Network, Sound, or Battery icon on the right side of the Windows taskbar.
- Select the arrow next to the Wi-Fi button, if shown.
- Select Manage Wi-Fi connections.
- Choose xfinitywifi.
- Select Connect.
- Wait for the Xfinity sign-in page or notification to appear.
- Select Get connected.
- Sign in with the Xfinity ID and password used for the NOW WiFi Pass purchase.
Expected result: after successful sign-in, Windows should remain connected to xfinitywifi and normal web pages should load.
2. Try a different mapped Xfinity hotspot
A visible xfinitywifi signal is not proof that it supports NOW WiFi Pass. Xfinity states that the pass is available only at select Xfinity-owned and operated hotspot locations, and that hotspot availability or successful connection is not guaranteed.- Use Xfinity’s hotspot locator from the NOW WiFi Pass page or Xfinity app.
- Locate another nearby hotspot listed by Xfinity.
- Move within range of that location.
- Open Windows Wi-Fi connections and select xfinitywifi.
- Complete the Get connected sign-in flow again.
3. Check the two-device limit
One NOW WiFi Pass permits up to two devices connected at the same time. A third device may connect to the Wi-Fi signal but fail to receive working internet access or keep returning to the sign-in page.- Disconnect Wi-Fi on another phone, tablet, laptop, or other device currently using the pass.
- On that device, turn Wi-Fi off or select a different network.
- Wait a minute for the hotspot session to clear.
- On the Windows PC, disconnect from xfinitywifi and reconnect.
- Sign in again if prompted.
4. Make the Xfinity sign-in page appear
A captive portal is the temporary sign-in page used by public Wi-Fi. Windows can show “Connected” before the portal has finished authorizing the device.- Disconnect from xfinitywifi.
- Close all browser windows.
- Temporarily disconnect any active VPN:
- Open Start > Settings > Network & internet > VPN.
- Select the active VPN connection.
- Select Disconnect.
- Reconnect to xfinitywifi from the taskbar Wi-Fi menu.
- Wait for a Windows notification indicating that sign-in is required.
- Select that notification, or open a browser and try loading a normal website.
- Complete the Xfinity Get connected page.
If the portal loads repeatedly, do not keep entering payment details. Proceed to forgetting the network instead.
5. Forget xfinitywifi and create a fresh connection
Windows may retain an incomplete hotspot profile, including a failed portal session. Removing that saved profile forces Windows to treat the next connection as new.- Open Start > Settings > Network & internet > Wi-Fi.
- Select Manage known networks.
- Select xfinitywifi.
- Select Forget.
- Return to the taskbar and select the Network icon.
- Select Manage Wi-Fi connections.
- Select Refresh network list if xfinitywifi is not displayed.
- Select xfinitywifi > Connect.
- Complete the Xfinity sign-in page.
6. Release and renew the Windows IP address
If Xfinity reports an IP-address problem, or Windows connects but never reaches the sign-in page, renew the DHCP address assigned to the Wi-Fi adapter.- Connect to xfinitywifi if possible.
- Select Start and type Command Prompt.
- Open Command Prompt.
- Enter the following command and press Enter:
ipconfig /release - Wait for the command to finish.
- Enter the following command and press Enter:
ipconfig /renew - Close Command Prompt.
- Disconnect from xfinitywifi, then reconnect and retry the portal.
If you use a manually assigned IP address on Wi-Fi for work or lab access, do not change that configuration without recording the existing settings or consulting the administrator.
7. Use Windows troubleshooting, then network reset only if needed
Use the built-in Windows diagnostic tool before resetting all networking components.Windows 11
- Open Start > Settings > System > Troubleshoot > Other troubleshooters.
- Run the available Network and Internet troubleshooting option, or use the Get Help app when Windows directs you there.
- Follow the on-screen recommendations.
- Reconnect to xfinitywifi and test the portal.
Windows 10
- Open Start > Settings > Network & Internet > Status.
- Select Network troubleshooter.
- Follow the prompts.
- Reconnect to xfinitywifi.
Warning: Network reset removes and reinstalls network adapters, removes saved Wi-Fi networks, and can require you to reinstall or reconfigure VPN clients, Hyper-V virtual switches, and similar networking software. It may also set saved networks to the Public profile.
Windows 11 network reset
- Open Start > Settings > Network & internet > Advanced network settings.
- Select Network reset.
- Select Reset now.
- Select Yes to confirm.
- Allow Windows to restart.
- After restart, reconnect to xfinitywifi and sign in again.
Windows 10 network reset
- Open Start > Settings > Network & Internet > Status.
- Select Network reset.
- Select Reset now.
- Select Yes.
- Restart when prompted.
- Reconnect to xfinitywifi and complete the portal.
8. Contact Xfinity for pass or billing issues
If the PC can see xfinitywifi, the captive portal opens, and a fresh connection still rejects an active pass, the remaining issue is likely with the pass subscription, device authorization, or payment record.Use the support route in the NOW WiFi Pass purchase confirmation email. Xfinity directs NOW WiFi Pass customers to the Xfinity Assistant chat for connection and subscription help, and the confirmation email includes pass-specific support details.
Have the following ready:
- The email address used to purchase the pass.
- The purchase confirmation or transaction details.
- The approximate hotspot location.
- The Windows version: Windows 10 or Windows 11.
- The exact portal error message or screenshot.
- Whether one or two devices are already connected.
References
- Primary source: Technobezz
Published: 2026-07-17T17:42:19.228000+00:00
Xfinity NOW WiFi Pass Not Working? 8 Fixes to Get Online | Technobezz
xfinity now wifi pass not working? Fix sign-in, hotspot, device limit, portal, and renewal problems.www.technobezz.com - Related coverage: xfinity.com
NOW WiFi Pass overview - Xfinity Support
Learn more about NOW WiFi Pass and how to handle potential customers. www.xfinity.com
- Related coverage: forums.xfinity.com
Now Wi-Fi pass | Xfinity Community Forum
Cant login, cant login on router - only able to use 1 device - support won’t answer because the ai won’t generate a ticket for an account i “dont have” even though the internet is working a purchas...forums.xfinity.com