Master Virtual Desktops in Windows 10/11: Setup, Shortcuts & Workflow Tips
Difficulty: Intermediate | Time Required: 10 minutesVirtual desktops are a powerful but often under‑used productivity feature in Windows. They let you separate workspaces by task—so you can keep your email and chat on one desktop, creative apps on another, and reference documents on a third. This reduces clutter, minimizes distractions, and speeds context switching.
Note on versions: Virtual desktops have been available since Windows 10 (initial releases). Windows 11 adds quality‑of‑life improvements like easy renaming and per‑desktop backgrounds. When a step differs between Windows 10 and 11, that difference is called out below.
Prerequisites
Quick walkthrough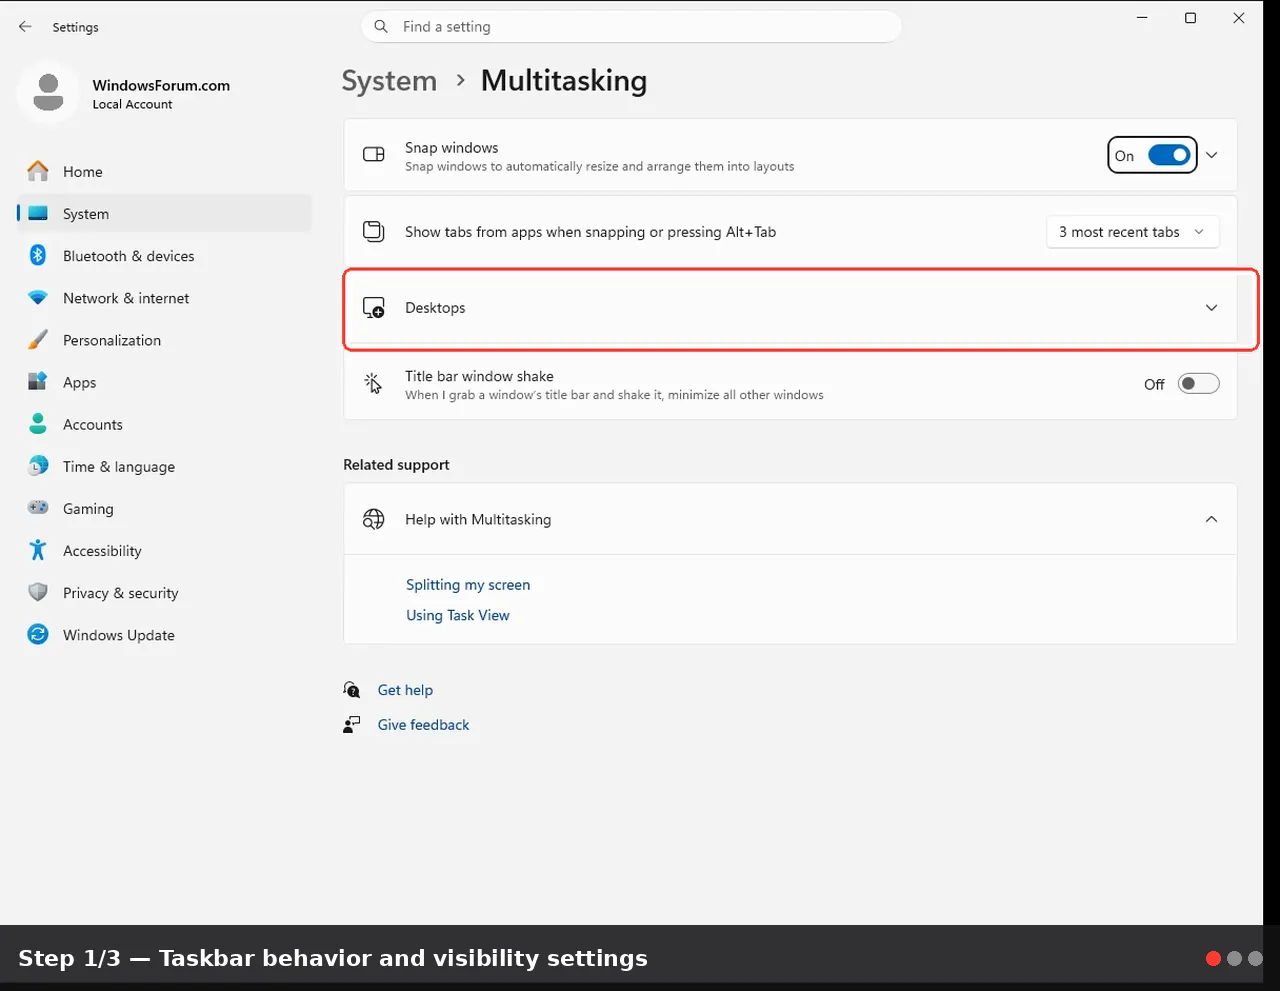
- Running Windows 10 or Windows 11 with an active user account.
- If keyboard shortcuts are not working, check that your keyboard drivers are up to date.
- For per‑desktop backgrounds and renaming, use Windows 11 (these are not built into Windows 10).
Step-by-step instructions
- Open Task View
- Press Win + Tab, or click the Task View button on the taskbar (icon looks like two overlapping rectangles).
- Tip: If you don’t see the Task View button, right‑click the taskbar → select “Show Task View button.”
- Create a new virtual desktop
- In Task View, click “New desktop” (Windows 10/11) or the + button at the top (Windows 11).
- Or use the keyboard shortcut: Win + Ctrl + D to create and switch to a brand new desktop immediately.
- Switch between desktops
- Keyboard: Win + Ctrl + Left arrow / Win + Ctrl + Right arrow to move between desktops.
- Mouse: Open Task View (Win + Tab) and click a desktop thumbnail to switch.
- Tip: Win + Tab shows a timeline of open windows and makes it easy to jump to the exact window on any desktop.
- Move apps between desktops
- Open Task View (Win + Tab), then drag any app window from one desktop thumbnail to another.
- Or: In Task View, right‑click an app thumbnail → choose Move to → select the target desktop.
- Note: There is no built‑in single‑key shortcut to instantly move the focused window to a specific desktop. You’ll need to use Task View or a third‑party tool.
- Close a virtual desktop
- In Task View, click the X on a desktop thumbnail to close it.
- Keyboard: Win + Ctrl + F4 will close the current desktop and move its windows to the previous desktop.
- Warning: Closing a desktop does NOT close the apps—those windows are moved to another desktop, so you won’t lose work.
- Rename and customize (Windows 11 only)
- Open Task View, right‑click (or click the name) of a desktop and select Rename to give it a meaningful label (e.g., “Email,” “Design,” “Research”).
- To set a different background per desktop: open Task View → right‑click a desktop → Choose background. This is a Windows 11 feature.
- Note: Windows 10 does not have per‑desktop rename/background natively.
- Taskbar behavior and visibility settings
- Settings → System → Multitasking → Virtual desktops (Windows 10) or Settings → System → Multitasking → Virtual desktops (Windows 11).
- Choose whether the taskbar shows windows from “All desktops” or “Only the desktop I’m using.”
- Tip: Set to “Only the desktop I’m using” to reduce taskbar clutter when you’re focused on one project.
- Handy global shortcuts (quick reference)
- Win + Tab: Open Task View
- Win + Ctrl + D: Create new desktop
- Win + Ctrl + Left/Right: Switch desktops
- Win + Ctrl + F4: Close current desktop
- Win + D: Show/hide desktop (minimize all windows)
- Tip: Combine desktop switching (Win + Ctrl + arrows) with Win + number (to launch or focus pinned apps) for fast multitasking.
Tips, workflow ideas & troubleshooting
- Workflow ideas
- Project-based desktops: Create one desktop per project (e.g., “Client A”, “Client B”) to keep related files and apps together.
- Role-based desktops: Use separate desktops for “Communication” (email, Slack), “Development” (IDE, terminals), and “Research” (browser, PDFs).
- Full-screen apps: Put full-screen tools (video editors, VMs, remote desktops) on their own desktop to avoid accidental Alt+Tab confusion.
- Use Snap Layouts (Windows 11) with virtual desktops
- Arrange windows using Snap Layouts, then save that layout on a dedicated desktop. This gives you consistent multi-window setups per task.
- Quick focus tip
- Hide notifications and set “Focus Assist” when working on a dedicated desktop for deep work: Settings → System → Focus assist.
- Troubleshooting shortcuts not working
- Make sure you’re using Win + Ctrl + Arrow (not Alt or Ctrl alone).
- If keyboard shortcuts fail, test with another keyboard and check for conflicting utilities that may intercept Win keys (some gaming utilities do).
- Ensure Windows is updated. If Task View is missing, right‑click the taskbar and enable it.
- Taskbar or window visibility oddities
- If windows seem to “disappear” after closing a desktop, open Task View to check the window’s new location.
- If a window doesn't show on another desktop, it may be set to “Show on all desktops” (right‑click in Task View). Toggle that to control visibility.
- Advanced power user options
- PowerToys (Microsoft) can extend window management (FancyZones) but does not replace virtual desktops. For more advanced behavior (like moving windows with keyboard hotkeys to specific desktops), third‑party apps can help.
- Virtual desktops and multiple monitors: desktops span monitors. Keep in mind the taskbar display setting (see step 7) to control whether apps from other desktops are visible.
- Accessibility and documentation
- If you rely on assistive tech, test virtual desktops in your environment—some screen readers interact differently with Task View.
Conclusion
Virtual desktops are a lightweight, built‑in way to get a big boost in organization and focus without installing anything extra. In just a few minutes you can set up dedicated workspaces, learn the few keyboard shortcuts that matter, and tailor Taskbar behavior to match your workflow. Windows 11 adds niceties like per‑desktop renaming and backgrounds, but the core productivity wins apply equally on Windows 10 and 11.Key Takeaways:
- Use Win + Ctrl + D to create, Win + Ctrl + Left/Right to switch, and Win + Ctrl + F4 to close desktops.
- Windows 11 allows renaming and per‑desktop backgrounds; Windows 10 supports multiple desktops but not per‑desktop backgrounds natively.
- Combine virtual desktops with Snap Layouts, Focus Assist, and taskbar settings for distraction‑free productivity.
- If shortcuts or Task View are missing, check taskbar settings, keyboard drivers, and Windows updates.
This tutorial was generated to help WindowsForum.com users get the most out of their Windows experience.
Last edited: