Move Installed Apps to Another Drive (Settings + Storage) in Windows 10/11
Difficulty: Intermediate | Time Required: 15 minutesRunning low on space on your C: drive is one of the most common Windows headaches—especially with large Store games, creative apps, and “modern” apps that quietly grow over time. The good news: Windows 10 and Windows 11 include built-in options to move supported installed apps to another drive (like D: or an SSD/HDD you use for storage) without uninstalling and reinstalling.
This guide focuses on the official Settings + Storage method, explains what can/can’t be moved, and includes troubleshooting tips if the “Move” button is missing or grayed out.
Prerequisites
Before you start, check these items:Quick walkthrough
- A second internal drive or secondary partition with enough free space (e.g., D: or E
") .
. - External USB drives may work for some Store apps, but reliability varies; internal drives are recommended.
- Administrator account access (some moves require admin approval).
- A bit of patience: moving large apps/games can take several minutes.
- Know what type of apps you have:
- The Settings “Move” feature typically applies to Microsoft Store apps and some games.
- Many traditional desktop apps (Win32 installers like .EXE/.MSI) won’t support moving this way.
Note (Windows versions):
- Windows 10: Steps are consistent across version 1903 and later, with slightly different menu wording.
- Windows 11: The menus are reorganized, but the capability remains.
Step-by-Step: Move Installed Apps to Another Drive (Settings)
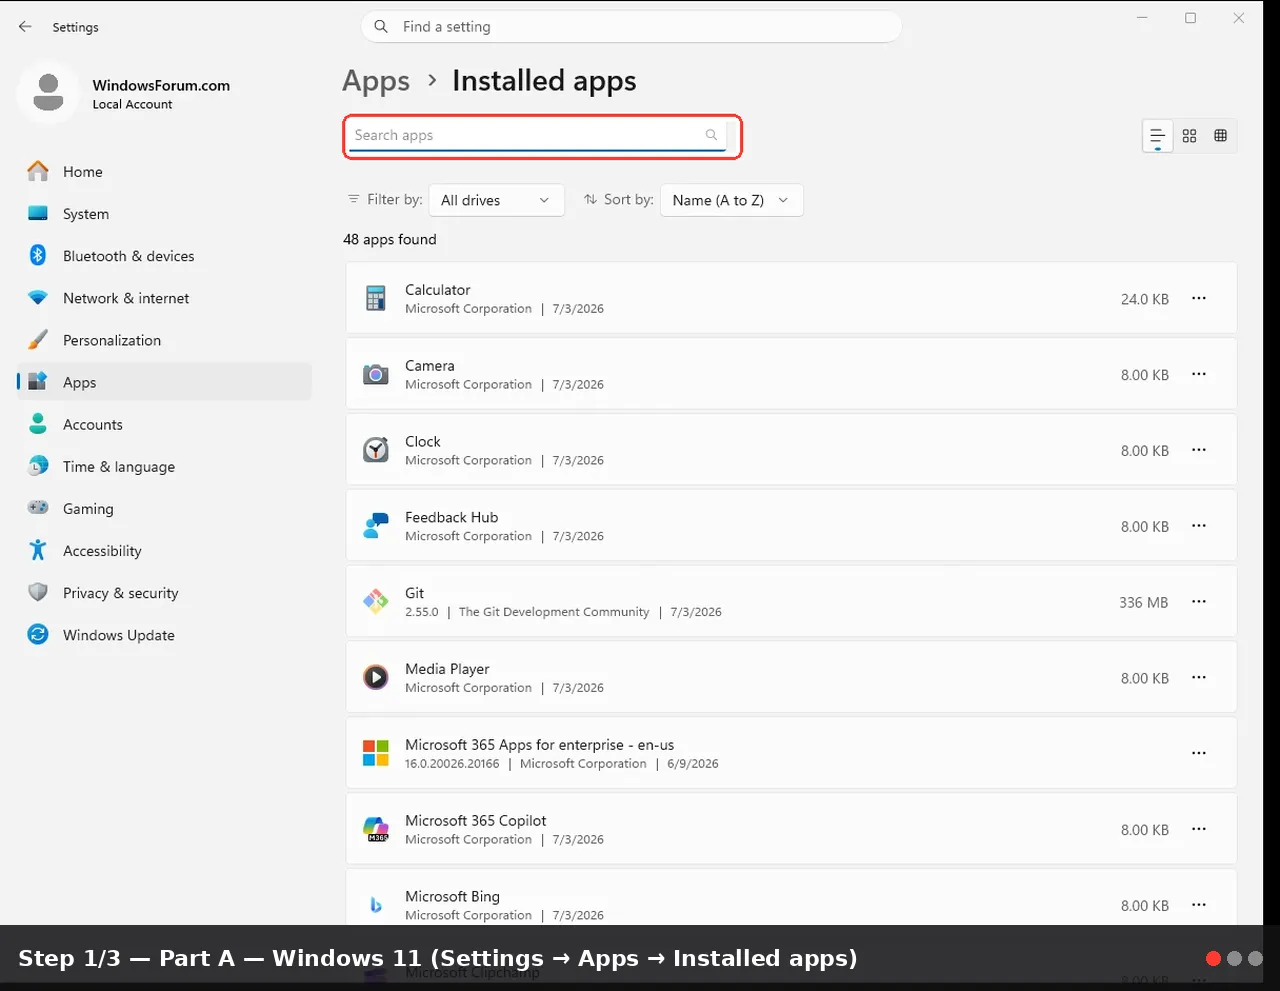
Part A — Windows 11 (Settings → Apps → Installed apps)
- Open Settings
- Press Win + I.
- Go to Installed Apps
- Click Apps → Installed apps.
- Find the app you want to move
- Use the search box (top) or scroll.
- Click the three dots (⋯) next to the app name.
- Choose “Move” (if available)
- Click Move.
- If you don’t see “Move,” skip to the Tips & Troubleshooting section—this usually means it’s not movable using Windows Settings.
- Select the destination drive
- In the drop-down list, choose your target drive (for example, D:).
- Start the move
- Click Move again to confirm.
- Wait for the process to complete. Don’t restart mid-move.
- Verify the app works
- Launch the app from Start.
- If it launches normally, the move is successful.
Warning: Don’t interrupt the process by force closing Settings, shutting down, or disconnecting the destination drive—this can corrupt the app install.
Part B — Windows 10 (Settings → Apps → Apps & features)
- Open Settings
- Press Win + I.
- Navigate to Apps & features
- Go to Apps → Apps & features.
- Select the app
- Click the app you want to move.
- If it’s supported, you’ll see Move and/or Uninstall buttons.
- Click “Move”
- Click Move.
- Choose the new drive
- Pick your destination drive from the list (e.g., D:).
- Confirm
- Click Move again and wait.
- Test
- Open the app from the Start menu to confirm everything runs correctly.
Note: Some apps allow choosing a different drive, but not a specific folder. Windows manages the folder structure automatically.
Optional (Recommended): Set Where New Apps Are Saved (Storage Settings)
Moving apps is great for existing installs, but you can also prevent future C: drive clutter by changing the default save location for new Microsoft Store apps.Windows 11: Change default install drive for new apps
- Open Settings (Win + I).
- Go to System → Storage.
- Scroll down and click Advanced storage settings.
- Click Where new content is saved.
- Under New apps will save to: choose your preferred drive (e.g., D:).
- Close Settings (changes apply immediately).
Windows 10: Change default install drive for new apps
- Open Settings (Win + I).
- Go to System → Storage.
- Under More storage settings, click Change where new content is saved.
- Set New apps will save to: your preferred drive.
- Exit Settings.
Tip: This affects new Microsoft Store installs. Many classic desktop apps still default to C: unless you change their install location during setup.
Tips, Notes, and Troubleshooting
1) The “Move” button is missing or grayed out
This is the most common issue. Usually it means:- The app is a traditional desktop program (Win32) installed via .EXE/.MSI.
- These generally cannot be moved through Settings.
- Best practice: Uninstall → reinstall, choosing a different location if the installer offers it.
- The app is a system component or Windows-managed app that’s locked to the system drive.
- The app publisher disabled moving (some Store apps still don’t allow it).
- If it’s a desktop app, check whether the program supports changing its install path (some launchers like Steam/Epic have their own library-move features).
- For games, prefer using the platform’s built-in “move install folder” function if available.
2) You can move the app—but it still uses space on C:
Even after moving, some apps still store:- caches
- temp files
- user data (AppData)
- settings and profiles
3) “This app can’t be moved” message
That message is normal for certain apps. It’s not necessarily an error.Try:
- Updating Windows (some behavior improves with cumulative updates).
- Updating the app in Microsoft Store (some apps change their packaging over time).
4) Moving large apps/games is slow
That’s expected—Windows is copying data between drives.Speed tips:
- Moving from HDD → SSD can be faster than HDD → HDD, but still may take time.
- Close the app before moving it (and stop background updates/downloads).
- Avoid heavy disk activity during the move.
5) Destination drive considerations (important)
- Ensure the destination drive is NTFS formatted for best compatibility.
- Avoid removable drives for frequently used apps (disconnections can break them).
- If you use BitLocker, ensure the destination is unlocked at sign-in to avoid app launch issues.
6) Don’t use “junction links” as a substitute (unless you know why)
You may find guides recommending symbolic links/junctions to “trick” apps into moving. This can work for advanced users but can also cause:- update failures
- permission problems
- broken Store apps
Conclusion
Moving installed apps to another drive using Windows 10/11 Settings is one of the cleanest ways to reclaim space on your system drive without reinstalling everything. It’s especially useful for large Microsoft Store apps and games, and when combined with changing where new apps are saved, it can keep your C: drive from filling up again.Key Takeaways:
- Move supported apps via Settings → Apps → Installed apps/Apps & features → Move.
- Use Storage → Where new content is saved to prevent future installs from landing on C:.
- If “Move” isn’t available, it’s likely a desktop app—uninstall/reinstall or use the app’s own move tools.
- Keep the destination drive stable (prefer internal NTFS drives) to avoid broken app links.
This tutorial was generated to help WindowsForum.com users get the most out of their Windows experience.
Last edited: