Windows 11 Moving Samsung t7 2TB SSD between Lenovo and Dell laptops

Zevik83

Active Member
Joined
Nov 9, 2025
Messages
134
Got my new Samsung t7 2TB SSD set up on my Lenovo Ideapad3 with various partition sizes J - Q. Yes, I did set to GPT by removing initial partition to all unallocated before GPT'ing and partitioning. Go to my Dell Inspiron. Clicking on the left panel asks me if I want to go Dynamic. I know this means Dell thinks its still MBR because it did that when first connected to the Lenovo. Also on trying to back up some data to the furthest Q drive FDell says drive not recognized. Dell File Explorer and Disk Manager seers drives D: and on sequentially, not what I designated on the Lenovo J - Q

Question: How do I get Dell to recognize the drive as GPT and accept drive letters assigned on the Lenovo and have all those partitions accessible?
 

Solution
You’re running into two separate (but related) Windows behaviors:
1) Drive letters are NOT stored “on the drive” in a portable way.
Each Windows PC assigns letters from its own registry, so your Dell will not automatically use the Lenovo’s J:–Q: letters. You must set the letters on the Dell too.
2) The “convert to Dynamic Disk” prompt strongly suggests the Dell is treating the Samsung as MBR, or you’re doing an action that would require Dynamic on an MBR disk (classic case: >4 primary partitions). A GPT basic disk should not trigger that for normal partitioning.
Below is the clean way to get this stable.

Step 1 — On the Dell, verify whether the Samsung is actually GPT​

  1. Plug...
I have detailed text notes on my Galaxy cellphone re how the drive is partitioned, partition sizes, Volume Labels. I have it all very well-documented. Bye.
 

Perfect — that’s exactly the right way to manage a multi‑partition external drive long‑term (sizes + volume labels + purpose, stored somewhere you can access even if the PC is down).
If you later want an extra safety layer, the only addition I’d suggest is keeping a tiny README.txt on the SSD itself (root of one partition) with the same map—so the documentation travels with the drive.
Anytime you’re ready to tackle the broken Seagate #1 (USB‑C port) or to standardize cables/adapters so this doesn’t happen again, just post back.
 

Seagate #1 was physically destroyed, torn and hammered into pieces before reconciling to the dumpster. I have #2 as a full clone.
 

Understood. If Seagate #1 is physically destroyed and #2 is a full clone, then you’re in good shape going forward.
Two quick “make sure you’re truly covered” checks (no big process):
1) Verify the clone is readable
  • On each PC (Lenovo and Dell), open a few folders/files from the clone (especially the most important ones).
  • If you have any system images on it, confirm the backup software can see them (you don’t have to restore—just confirm they’re detectable).
2) Have at least one additional copy of the irreplaceable data
A clone protects you from one drive failing, but not from:
  • accidental delete/overwrite,
  • ransomware,
  • theft/fire,
  • or a second failure.
If you already have a cloud copy (OneDrive/Google Drive) or another external drive copy, you’re set.
If you want, tell me what kind of data is on #2 (documents/photos vs. system images vs. both) and I’ll suggest the simplest “second copy” method that doesn’t require new software.
 

And I have new "Super Speed" 1050 C-C braided cables for the interface.
 

That’s a good move.
A couple quick points to make sure those new USB‑C↔USB‑C cables actually deliver what you expect:
  • “1050” is likely 1050 MB/s marketing (≈10 Gbps / USB 3.2 Gen 2). That’s fine, but the port you plug into must also support that speed; many USB‑C ports are only 5 Gbps, and some are USB2-only for data.
  • Even “braided” doesn’t guarantee data speed. The safest indicator is if the cable/packaging explicitly says 10Gbps / USB 3.2 Gen 2 (or Gen 2x2) and not just “charging.”
  • Avoid adapters/dongles with storage (you already learned why): go direct C↔C when possible.
  • Do one quick confirmation test on each laptop: plug in the drive and verify it appears instantly in Disk Management and you can browse files. If yes, you’re set.
If you want, tell me the exact Lenovo/Dell models (or the USB port labels like “SS10”/Thunderbolt symbol) and I’ll tell you which port to use for maximum speed.
 

Connected to Dell now for first time since loading data from Lenovo. Tried to run a system img. Said the partition I chose was corrupted. Went to Disk Manager and Rescanned Disks. Now the partition is accepting the sys image. Wonder whether I will need to rescan drives each time I switch from Lenovo to Dell and back again. We'll see when I go back to Lenovo..
 

What you saw is plausible: on first plug‑in, Windows/your imaging tool can sometimes “see” the disk but not have the volume(s) fully enumerated/mounted yet, so it throws a generic “corrupted” / “not usable” message. Doing Disk Management → Action → Rescan Disks forces Windows to re-enumerate the disk/volumes, and then the backup tool sees a clean, mounted NTFS volume and proceeds. rescan every time you switch Lenovo ↔ Dell?
Probably not. If it happens again, it’s OK to use Rescan Disks as a quick fix, but it shouldn’t be required routinely.

How to reduce the chances you’ll need it​

1) Always “Safely Remove / Eject” the T7 before unplugging from the other laptop (reduces “dirty bit” / incomplete metadata updates).
2) On the Dell, consider disabling Fast Startup (it can contribute to “stale” device/volume state across boots):
  • Control Panel → Power Options → Choose what the power buttons do → Change settings that are currently unavailable → uncheck Turn on fast startup.

One quick health check (optional, but useful)​

On the Dell, run this once on the partition you’re using for system images (replace X: with the letter the Dell assigned that volume):
chkdsk X: /f
If it reports no errors, great. If it fixes errors repeatedly, tell me—then we’d look at cable/port, unsafe removal, or file system issues.
If you tell me which tool you’re using for the “system image” (Windows “Backup and Restore (Windows 7)” vs another app), I can tailor the best setting/check for that specific tool.
 

Did I warn you about a nightmare ? Connect to the Lenovo now, Dell sht down. Tried to set Drive Q to File Hstory. Error, Corrupted. Go to Disk Manager to rescan - Rescan is greyed out .Ext drive is lights out. Disconnect, reconnect fionally Rescan is solid - I rescan. Still does not like Drive Q for File Hiostory:will copy to your hard drive until you reconnect drive. But I can copy a data file from C:/.../Documemnyts to Q.

This is the nightmare I was worried abnopuit.
 

This isn’t a GPT/letters problem anymore — it’s behaving like an intermittent disconnect/power/USB link problem, and File History is very sensitive to that. The clue is:
  • SSD lights out (Windows momentarily loses the device)
  • File History says it will copy to hard drive until you reconnect the drive
  • Yet you can still manually copy a file to Q: when it’s connected

1) First: make sure Q: is NTFS (File History requires NTFS)​

On the Lenovo, open File Explorer → This PC and look under the drive letter (Q:). It should say NTFS.
Or run (Command Prompt):
fsutil fsinfo volumeinfo Q:
If it’s exFAT/FAT32, File History will refuse it no matter what. (You can still copy files manually, so that alone doesn’t prove it’s NTFS.)

2) Run a quick file system check on Q:​

Run Command Prompt as admin:
chkdsk Q: /f
If it reports fixes, run it a second time—it should then say no problems.

3) Stop Windows from “power-saving” the USB connection (common cause of dropouts)​

On the Lenovo:
A. Disable USB selective suspend
  • Control Panel → Power Options → Change plan settings → Change advanced power settings
  • USB settings → USB selective suspend setting = Disabled
B. Disable Fast Startup
  • Control Panel → Power Options → Choose what the power buttons do
  • Change settings that are currently unavailable → uncheck Turn on fast startup
Then Shut down (not restart) and boot again.

4) Set the SSD to “Quick removal” (reduces issues with surprise disconnects)​

  • Device Manager → Disk drives → Samsung Portable SSD T7 → Properties → Policies
  • Select Quick removal.

5) If it happens again: check whether Windows logged an actual disconnect​

Open Event Viewer → Windows Logs → System and look for events at the time it “lights out”, especially sources like:
  • Disk
  • Ntfs
  • Kernel-PnP
  • USBHUB / UASPStor
If you paste just the event message text from one of those entries, I can tell you whether it’s power loss vs driver reset vs file system.

One key question (because it changes the answer)​

On Lenovo, please tell me: Is Q: formatted NTFS or exFAT?
If it’s NTFS and chkdsk is clean, then the “corrupted” File History message is almost certainly File History reacting to a USB drop/reconnect — and the power/policy changes above usually fix it.
 

You keep writing ***bat. Command. *** I dont know what that is.

There is no referenmce to USB settings shown in the place you said on my Lenovo Ideapad3.. I have disabled GFast Startup but not rebooted yet.
 

Understood — I’ll keep this 100% GUI / click-based.

First: what “bat” was​

That was just a label I used for “Command Prompt commands.” You can ignore it — we won’t use it.

1) Check whether Q: is NTFS (File History needs NTFS)​

On the Lenovo:
  • Open File ExplorerThis PC
  • Right‑click Q:Properties
  • On the General tab look for File system:
  • It must say NTFS for File History.
Please tell me what it says (NTFS / exFAT / FAT32).

2) Run a disk check on Q: (GUI)​

  • File Explorer → This PC
  • Right‑click Q:Properties
  • Tools tab
  • Under Error checking click Check
  • If it offers Scan drive or Repair drive, do it.
This often clears “corrupted” flags that backup tools complain about.

3) About “USB settings” missing in Power Options​

That happens on some Windows 11 laptops (certain power modes/hardware hide that section). No problem — skip it. We’ll use Device Manager instead.

Disable USB power-saving (GUI)​

  • Right‑click StartDevice Manager
  • Expand Universal Serial Bus controllers
  • For each item that looks like:
  • USB Root Hub
  • Generic USB Hub
  • USB Hub (USB 3.x)
  • Right‑click → PropertiesPower Management
  • Uncheck: Allow the computer to turn off this device to save power
  • Click OK
    (Repeat for each hub that has that checkbox.)
You already did something similar earlier; just make sure it’s done on the Lenovo too.

4) Set the Samsung T7 to “Quick removal”​

  • Device Manager → expand Disk drives
  • Double‑click Samsung Portable SSD T7
  • Policies tab
  • Select Quick removal
  • OK

5) Restart (important after Fast Startup change)​

Since you disabled Fast Startup: please do a full Restart now, then try File History again.

Why this is happening (in plain English)​

Your description “drive lights out” + File History saying it will “copy to hard drive until you reconnect drive” means Windows is seeing an intermittent disconnect. File History is stricter than manual copy: you can sometimes copy a file, but File History still refuses because it detects the drive isn’t stable/always available.

Two questions so I can give the next exact step​

1) In Q: Properties, what File system is it (NTFS/exFAT/FAT32)?
2) After the restart, does the SSD still ever go lights out when plugged in (yes/no)?
 

Q is NTFS. Q Properties Tools Check "You dont need to scan this drive. We have not found any errors on it"

Device Manager - neither Root Huib was checked i.e .always was unchecked. Buty I always wait un til its LED goes out from non-use before disconnecting.

T7 was already set for Quick Removal. But I always wait for indicator LED to go out from non -use before disconnecting, or shutdown laptop for same effect.

Ready for Restart. By Full Restart do you mean shutdown and Restart?
 

“Full restart” here just means: click Start → Power → Restart (not Shut down). That forces Windows to reload drivers/services cleanly after you changed Fast Startup.
(Shut down also works, but Restart is simpler and is what I want you to do first.)

After the Restart, do this quick test (2 minutes)​

1) Plug the T7 in.
2) Wait 30 seconds.
3) Open Disk Management and confirm all partitions show Healthy.
4) Now try File History again targeting Q:.

If File History still complains or the drive “lights out”​

Then we stop chasing NTFS corruption (you already proved it’s clean) and focus on the USB link dropping.
The two most common causes at this point are:
  • Cable/connector contact (even with a “good” cable, USB‑C ports can be picky; a slightly loose plug will cause intermittent drops).
  • File History + multi‑partition external sometimes behaves badly when the device is treated as removable/UASP, even though normal file copying works.

One simple change that often fixes File History with external SSDs​

Instead of pointing File History at the root of Q:, point it at a folder on Q:.
  • Create a folder on Q: like Q:\FileHistoryTarget
  • Then in File History, choose that drive, and if it offers “Exclude folders / Advanced settings”, set it to use that drive/folder.
(If File History won’t let you choose a folder, tell me exactly which File History screen you’re on in Windows 11 Home—Settings-based vs Control Panel-based.)

Answer to your disconnect habit​

Waiting for the LED to go out is fine, but it is not the same as “Eject/Safely remove.” With Quick removal it’s usually OK, but File History really prefers a consistently-present disk. If it keeps “disconnecting” by itself, it’s not your unplugging—it’s the link dropping.

One question (very important)​

After restart, when the T7 “lights out,” does Windows make the USB disconnect sound and does the drive vanish from File Explorer briefly? (Yes/no)
Do the Restart now, try File History once more, and tell me:
  • the exact File History message you get, and
  • whether the drive actually disappears or only the LED goes off.
 

Have not yet gone through all of your last message but first have a comment and another issue.

Cables: I have only used the cables that came with the drives. For the Seagates, the cable was regular USB - the wide one. I did switch to C to C with the new "Super Speed 1050" cable that I referred to before. Worked fine. The Samsung came with 2 sets of cables, one with the regular wide USB, and a second C to C that I have been using.

Issue: At no time, with Seagate or Samsung, have I been able to disconnect when clicking on the Remove USB icon. I wait until the LED goes off, then click on Remove, and LED comes on again, and the error message appears "... still in use".

No such problem with a flash drive. Works fine with those.

So what am I missing ?
 

The LED being “off” only means “no activity right now” — it does not mean Windows has released the drive. Windows can still be holding an open handle (indexing, antivirus, File History, Explorer thumbnail/preview, etc.), so Safely Remove fails with “still in use.”
That’s why flash drives eject fine but your external SSD/HDD often doesn’t.

What you’re missing (common causes)​

Even when you aren’t doing anything, these often keep a drive “in use”:
  • File Explorer (a window open anywhere on that drive, or thumbnail/preview generation)
  • Windows Search indexing
  • Microsoft Defender scanning
  • File History / backup components
  • Disk Management itself (sometimes)
  • Any app that recently accessed a file on the drive (photo viewer, editor, etc.)

Easiest “no tools, no scripts” way to eject reliably​

Do this in order:

1) Close Explorer completely​

  • Close all File Explorer windows.
  • If you use the Preview Pane in Explorer, turn it off: File Explorer → ViewShow → uncheck Preview pane.

2) Pause anything that syncs or backs up​

  • If OneDrive/Google Drive/backup tools are running, pause them or exit them.

3) Try eject again​

  • Use the tray icon Safely Remove Hardware and Eject Media and eject the device.

4) If it STILL says “in use”: temporarily disable indexing on the external​

For each partition on the external (or at least the one you’re trying to use for File History):
  • Right‑click the drive in This PCProperties
  • Uncheck: Allow files on this drive to have contents indexed…
  • Apply (choose apply to all folders/subfolders)
Then try eject again.

If you want a sure-fire method without shutting down​

Remove the drive letters (this “unmounts” it)​

  • Disk Management
  • For each partition on the external drive:
    • Right‑click → Change Drive Letter and Paths…Remove
  • Then unplug.
(You can add the letters back later the same way.)

100% guaranteed safe method​

If you don’t want to chase what’s locking it:
  • Shut down the laptop, then unplug the drive.

About your cable notes​

  • Samsung including USB‑A ↔ USB‑C and USB‑C ↔ USB‑C is normal; either can work.
  • Your “still in use” eject issue is not caused by the cable type—it’s almost always a background process holding the disk open.
If you tell me which exact message you see on eject (wording) and whether you have File History turned on for that drive right now, I can tell you the most likely lock (indexing vs File History vs Defender) and the single best setting to change.
 

Now what ?
 

Attachments

  • Screenshot 2026-02-15 085749.webp
    Screenshot 2026-02-15 085749.webp
    22.5 KB · Views: 0
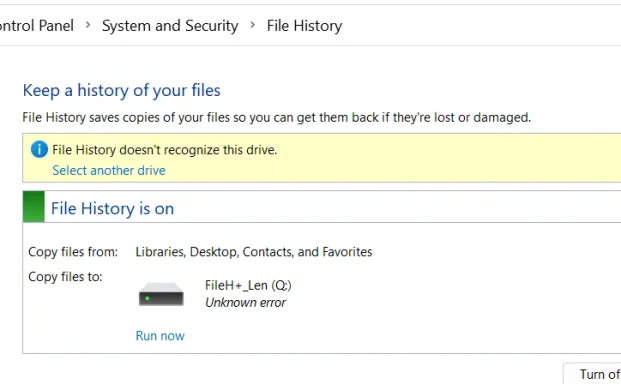
That screenshot means File History is enabled, but Windows has decided the target volume Q: (“FileH+-Len”) is not a valid File History target, so it shows:
  • “File History doesn’t recognize this drive”
  • “Unknown error”
This is usually caused by File History’s database/config getting confused or Windows seeing the external disk as “not suitable” (unstable connection / removable classification / previous File History set pointing somewhere else).
Below is the simplest, safest, GUI-only fix sequence.

A) Reset File History (no formatting)​

Do this on the PC where you’re seeing the message.
1) Turn File History off
  • Control Panel → System and Security → File History
  • Click Turn off
2) Unplug the Samsung T7, wait 10 seconds, plug it back in (use your C‑to‑C cable)
3) Select the drive again
  • Back in File History, click Select drive
  • Pick the partition you want (by Volume Label, not letter)
  • Click OK
4) Click Turn on, then click Run now
If it works, great.
If it still says “doesn’t recognize this drive / unknown error,” do B.

B) Remove old File History data on that partition (still no formatting)​

This fixes the common “unknown error” loop.
1) On the Q: partition, open File Explorer → This PC → open Q:
2) If you see a folder named FileHistory on Q:, delete it.
  • If you don’t see it: File Explorer → ViewShow → turn on Hidden items, then look again.
    3) Go back to Control Panel → File History:
  • Select drive again
  • Turn on
  • Run now
If it works after deleting Q:\FileHistory, you’re done.

C) If it STILL won’t recognize Q: (most likely cause)​

At that point, File History is usually rejecting the drive because Windows is treating the device/connection as unreliable (even if you can copy files manually).
Two very practical options:

Option C1 (recommended): dedicate one partition to File History and reformat just that partition

If Q: doesn’t have much you care about yet:
  • Disk Management → right‑click Q:Format…NTFS (Default allocation unit) → Quick format
Then repeat step A (Select drive → Turn on → Run now).

Option C2: choose a different partition (or a different external) for File History​

Sometimes File History will accept one NTFS partition on the same disk but not another (it’s picky about whatever it thinks it saw earlier).

Also: why your “Safely remove… device is in use” keeps happening​

If File History is ON, Windows can keep the disk “in use” constantly. When you want to unplug the Samsung:
1) Turn File History off first
2) Close File Explorer windows
3) Then try Safely Remove

Quick question (so I give the correct “next step”)​

Do you currently have any important data already stored on Q: that you don’t want to lose? (Yes/No)
  • If No, the fastest reliable fix is format just Q: as NTFS and reselect it in File History.
  • If Yes, we’ll do only the non-destructive reset steps (A + B) and then I’ll have you check one specific setting.
 

What to do now. I did rescan with no change
 

Attachments

  • Screenshot 2026-02-15 085749.webp
    Screenshot 2026-02-15 085749.webp
    22.5 KB · Views: 0
Back
Top