

OBS Studio can record your Windows desktop, broadcast a live stream, and send a polished scene to Zoom, Teams, Discord, or another video-call app through its Virtual Camera. This guide covers the current Windows release of OBS Studio on Windows 10 and Windows 11, including microphone, desktop audio, webcam, game, and application capture.
Install OBS Studio from the OBS Project’s official download page or the Microsoft Store. Avoid third-party “OBS download” sites.
To move or resize a source:
If you want a microphone or output device only in one scene rather than every OBS scene, add it as a source instead:
To prevent duplicate sound when using application-specific audio, set Settings > Audio > Desktop Audio to Disabled unless you intentionally want all Windows audio included.
Warning: Treat a stream key like a password. Anyone who has it may be able to stream to your channel. Do not show it in screenshots, recordings, or screen shares.
Click Stop Streaming in OBS when finished. Stopping the stream does not stop a recording already in progress; use Stop Recording separately if both buttons are active.
To choose what Virtual Camera sends:
Virtual Camera sends video, not your microphone audio. Select your normal microphone separately in the video-call application’s audio settings.
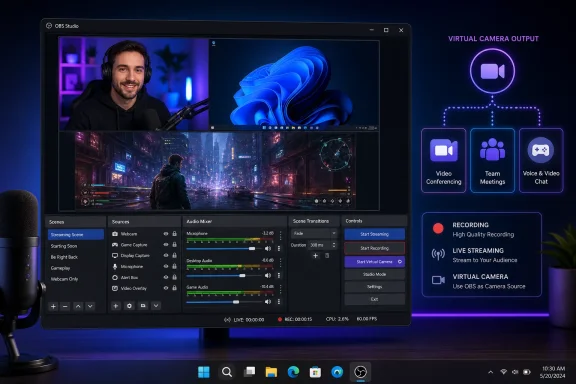 Install OBS Studio and run the setup wizard
Install OBS Studio from the OBS Project’s official download page or the Microsoft Store. Avoid third-party “OBS download” sites.- Install OBS Studio, then open it from the Start menu.
- When the Auto-Configuration Wizard opens, choose the option that best matches your first task:
- Optimize for streaming if you primarily plan to go live.
- Optimize just for recording if you only need local video files.
- Complete the wizard and accept its recommended settings.
- If you need to rerun it later, select Tools > Auto-Configuration Wizard.
Understand scenes, sources, and the preview
OBS uses two main building blocks:- A Scene is a layout, such as “Screen Recording,” “Game + Camera,” or “Video Call.”
- A Source is an item inside that layout, such as a monitor, app window, game, webcam, microphone, image, or text overlay.
- In the Scenes dock, select the existing scene or click + to create one.
- Give it a clear name, such as
Screen Recording. - In the Sources dock, click +.
- Add the source that matches what you want to show:
- Display Capture: records an entire monitor.
- Window Capture: records one application window.
- Game Capture: captures a supported Windows game with better performance than capturing the whole display.
- Video Capture Device: adds a webcam, capture card, or other camera.
- Image, Media Source, or Text: adds an overlay, logo, prerecorded clip, or label.
- Select the monitor, window, game, or device when prompted, then click OK.
To move or resize a source:
- Click the source in the preview or Sources dock.
- Drag the red outline to reposition it.
- Drag a red handle to resize it.
- Right-click the source, select Transform, then choose Fit to Screen when a screen or game source should fill the canvas.
Configure microphone and desktop audio
Before recording or streaming, verify that OBS is receiving the sound you expect.- Look at the Audio Mixer dock.
- Speak into the microphone and play audio from Windows.
- Confirm that the meters for Mic/Aux and Desktop Audio move.
- Select Settings > Audio.
- Under Global Audio Devices, choose the correct playback device for Desktop Audio.
- Choose the correct microphone for Mic/Auxiliary Audio.
- Click Apply, then OK.
- Test the meters again.
If you want a microphone or output device only in one scene rather than every OBS scene, add it as a source instead:
- In Sources, click +.
- Choose Audio Input Capture for a microphone or Audio Output Capture for a headset, speakers, or another output device.
- Select the device.
Capture audio from one application
On Windows 10 version 2004 or later and Windows 11, OBS can capture audio from a selected application.- In Sources, click +.
- Select Application Audio Capture (BETA).
- Name the source and click OK.
- Select the application window from the list.
- Set an appropriate Window Match Priority. Matching by executable name is useful for apps whose window titles change often.
- Click OK.
To prevent duplicate sound when using application-specific audio, set Settings > Audio > Desktop Audio to Disabled unless you intentionally want all Windows audio included.
Record your screen or webcam
Set the save location before starting. This makes it easier to find test clips and prevents recordings from filling an unexpected drive.- Select Settings > Output.
- In Simple Output mode, locate the Recording section.
- Set the Recording Path to a folder with sufficient free storage.
- Select a recording quality preset appropriate for your available space and PC performance.
- Leave the encoder at the wizard’s recommendation unless you have a specific reason to change it.
- Click Apply, then OK.
- Confirm that the preview contains the right screen, app, game, or camera.
- Confirm that audio meters move.
- In the Controls dock, click Start Recording.
- Record for at least a few minutes, including microphone and desktop audio.
- Click Stop Recording.
- Open the saved file and watch it through to the end.
- The correct source and monitor.
- Readable text and appropriate resolution.
- Microphone volume that is audible but not distorted.
- Desktop or app audio that is present only once.
- Smooth video without significant stutter or skipped frames.
Stream to a service
OBS transmits the video, but your streaming service account provides the destination and stream key.Warning: Treat a stream key like a password. Anyone who has it may be able to stream to your channel. Do not show it in screenshots, recordings, or screen shares.
- Sign in to your streaming service in a web browser and obtain the stream key or connect option.
- In OBS, select Settings > Stream.
- Choose your Service.
- If the service is not listed, enable Show all services or choose Custom Streaming Server if your provider supplies an RTMP server address.
- Select the server if the service requires one.
- Enter the stream key, or use Get Stream Key when OBS provides that option.
- Click Apply, then OK.
- Return to the main OBS window and click Start Streaming.
Click Stop Streaming in OBS when finished. Stopping the stream does not stop a recording already in progress; use Stop Recording separately if both buttons are active.
Use OBS Virtual Camera for video calls
Virtual Camera sends an OBS scene to an app as though OBS were a webcam. Use it when you want your webcam, screen share, branding, captions, or overlays combined into one video feed.- Create a scene for the call, such as a webcam over a presentation or screen capture.
- In Controls, click Start Virtual Camera.
- Open Zoom, Teams, Discord, Skype, a browser meeting page, or another calling app.
- Open that app’s camera or video settings.
- Select OBS Virtual Camera as the camera.
To choose what Virtual Camera sends:
- Click the gear icon beside Virtual Camera in OBS.
- Choose one of the available outputs:
- Program: sends OBS’s normal live output.
- Preview: sends the preview while Studio Mode is in use.
- Scene: always sends one chosen scene.
- Source: always sends one chosen source.
- Confirm the selected scene or source if prompted.
Virtual Camera sends video, not your microphone audio. Select your normal microphone separately in the video-call application’s audio settings.
Fix common capture and audio problems
OBS captures the wrong display or window
- Open the source properties by double-clicking the source.
- For Display Capture, choose the correct monitor.
- For Window Capture, choose the intended app window.
- If an app window is black or blank, close it, reopen it, then reselect it in the Window Capture properties.
- For games, try Game Capture rather than Display Capture or Window Capture.
Your webcam is black, unavailable, or used by another app
- Close other apps that may be using the camera, including meeting apps and browser tabs.
- In Windows 11, open Settings > Privacy & security > Camera.
- In Windows 10, open Settings > Privacy > Camera.
- Confirm camera access is enabled for the device and desktop apps where applicable.
- Restart OBS and add or reselect Video Capture Device.
Your microphone does not appear in OBS
- In Windows 11, open Settings > Privacy & security > Microphone.
- In Windows 10, open Settings > Privacy > Microphone.
- Enable microphone access and access for desktop apps.
- Return to Settings > Audio in OBS and select the microphone manually.
- Check the Audio Mixer meter.
Audio is doubled or echoes
- Disable duplicate global Desktop Audio or Mic/Aux devices under Settings > Audio.
- Remove duplicate Audio Input Capture or Audio Output Capture sources.
- If using Application Audio Capture, disable global Desktop Audio unless you need it.
- Wear headphones instead of using speakers near an active microphone.
The recording has no sound even though the meters moved
Verify the saved file in another media player. If one player has no audio but another does, the issue may be playback support rather than OBS capture. If no player has audio, record a short new test while watching the Audio Mixer and confirm that the intended audio source is not muted.Add hotkeys for repeatable recordings and streams
Hotkeys reduce the chance of showing OBS controls in a recording or missing the start of a presentation.- Select Settings > Hotkeys.
- Assign shortcuts for:
- Start Recording and Stop Recording.
- Start Streaming and Stop Streaming.
- Start Virtual Camera and Stop Virtual Camera.
- Scene switching.
- Push-to-talk or push-to-mute.
- Click Apply, then OK.
- Test each shortcut while OBS is open before relying on it in a meeting or live broadcast.
References
- Primary source: Technobezz
Published: 2026-07-20T17:23:21.733000+00:00
Loading…
www.technobezz.com