Secure Windows 10/11: Turn On Core Isolation (Memory Integrity) + Fix Driver Blocks
Difficulty: Intermediate | Time Required: 15 minutesCore Isolation’s Memory integrity feature (also called HVCI – Hypervisor-Protected Code Integrity) adds an extra security layer that helps prevent malicious or unsigned code from running in the Windows kernel. This is important because kernel-level threats (rootkits, vulnerable drivers, certain ransomware techniques) can bypass many traditional protections.
On some PCs, turning it on fails because Windows detects incompatible or vulnerable drivers. This tutorial shows you how to enable Memory integrity safely—and how to identify and fix the “driver blocks” that prevent it.
Prerequisites
Before you begin:Quick walkthrough
- Windows 10 (version 1903+) or Windows 11
- Windows 11 supports this broadly; Windows 10 needs a relatively modern build.
- Admin account access
- A few minutes for a restart
- Recommended (not required, but smart):
- Create a restore point (driver changes can occasionally cause issues)
- Have your device/vendor support page handy (for updated drivers)
Create a Restore Point (recommended)
- Press Start, type Create a restore point, and open it.
- Select your System drive (usually C
") → Configure (if needed) → turn on protection.
→ Configure (if needed) → turn on protection. - Click Create…, name it (e.g., Before enabling Memory Integrity), then Create.
Step-by-Step: Turn On Core Isolation (Memory Integrity)
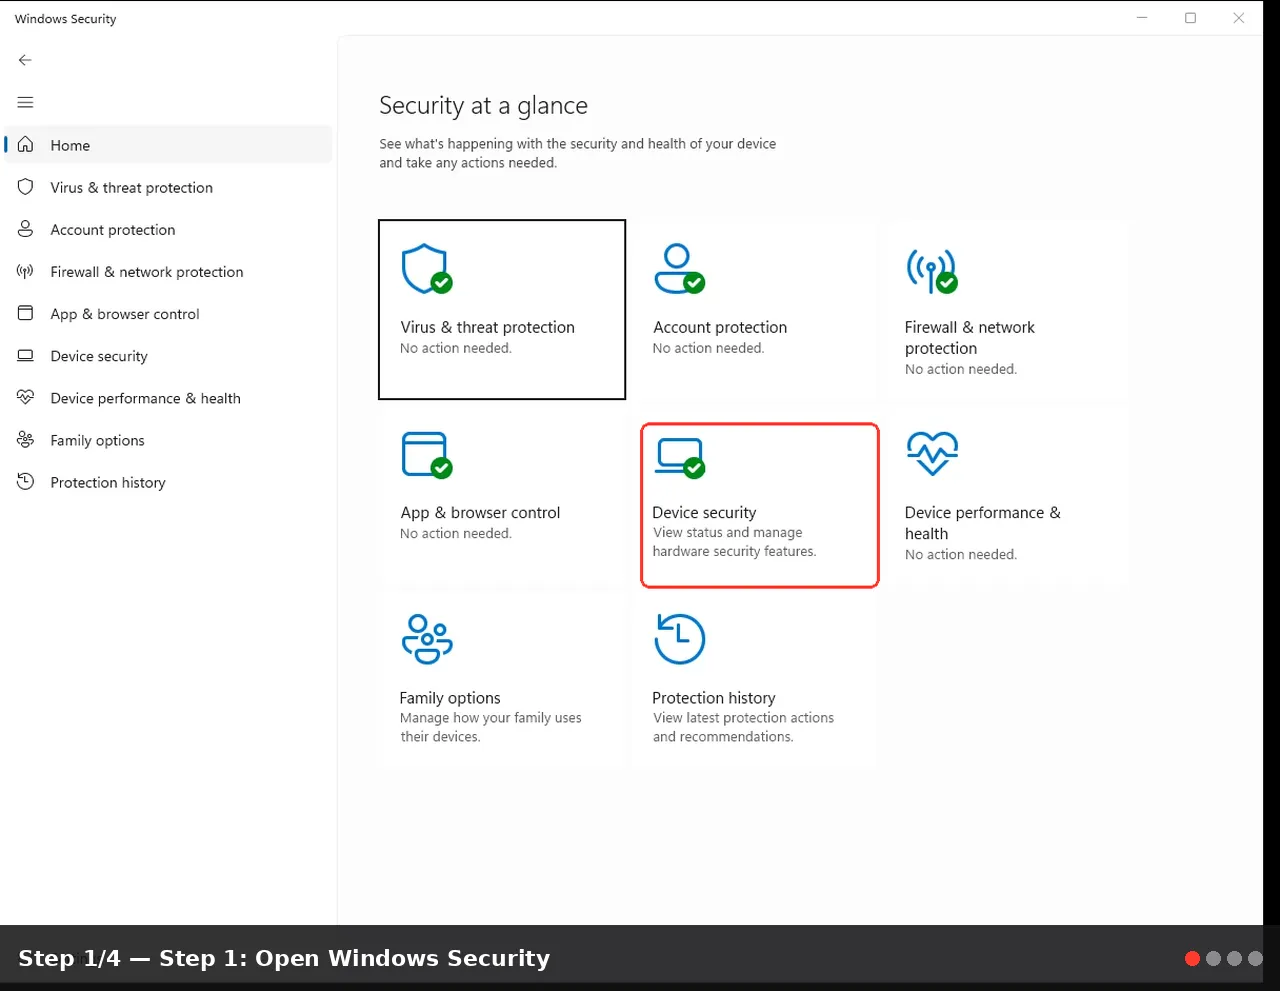
Step 1: Open Windows Security
- Press Windows + I to open Settings.
- Go to:
- Windows 11: Privacy & security → Windows Security
- Windows 10: Update & Security → Windows Security
- Click Open Windows Security.
Step 2: Navigate to Core Isolation
- In Windows Security, click Device security.
- Under Core isolation, click Core isolation details.
Step 3: Enable Memory integrity
- Toggle Memory integrity to On.
- If prompted, click Restart.
If you see a message like “Memory integrity can’t be turned on” due to incompatible drivers, continue below.
Fix Driver Blocks (Most Common Reason It Won’t Enable)
When Windows blocks Memory integrity, it’s usually because a driver is:- too old
- not HVCI-compatible
- known vulnerable
- installed by older hardware utilities, legacy VPNs, outdated anti-cheat, virtual drive software, etc.
Step 4: View the blocked drivers list
- Go back to Windows Security → Device security → Core isolation details.
- Under the Memory integrity message, look for Review incompatible drivers (wording can vary).
- Note the driver file name (commonly
.sys) and any publisher info shown.
olddriver.sys). You’ll use them to locate what installed them.Step-by-Step Fix Options (Use the Least Disruptive First)
Step 5: Update Windows fully (quick win)
Sometimes Windows Update delivers newer compatible drivers.
- Settings → Windows Update
- Click Check for updates
- Also check:
- Advanced options → Optional updates → Driver updates
- Install updates, then restart.
Step 6: Update the driver from the PC or device manufacturer
If Windows names a driver but doesn’t automatically update it, get a newer version directly.- Identify the hardware/software tied to the driver:
- If the blocked driver looks like a chipset/storage/network driver, start with your PC/motherboard vendor.
- Download and install updated drivers from:
- Your laptop/desktop manufacturer (Dell/HP/Lenovo/ASUS/Acer/MSI, etc.)
- Your motherboard vendor (ASUS/Gigabyte/MSI/ASRock)
- Or the component vendor (Intel/AMD/NVIDIA/Realtek, etc.)
- Restart.
- Try enabling Memory integrity again.
Step 7: If the driver belongs to an app, update or uninstall the app
Many blocked.sys drivers come from older utilities.- Press Windows + I → Apps
- Find likely candidates (examples):
- old VPN clients
- legacy antivirus remnants
- RGB/overclock utilities
- virtual drive tools
- older hardware monitoring tools
- Choose Update (if available) or Uninstall
- Restart and try again.
Step 8: Locate what the .sys file is tied to (advanced but useful)
If Windows only shows a filename and you don’t recognize it:- Press Windows + X → Terminal (Admin) or Command Prompt (Admin)
- Run:
pnputil /enum-drivers - Look for entries with Published Name (like
oem23.inf) and compare Driver Package Provider / Class / Original Name.
This list can be long—use the Windows Terminal search (Ctrl+F) for a clue (vendor name, or part of the filename if shown in Windows Security).
- Navigate to
C:\Windows\System32\drivers - Find the blocked
.sysfile - Right-click → Properties → Details (often shows product/vendor)
Step 9 (Use with caution): Remove an old driver package (last resort)
Only do this if you’re confident the driver is not required (or you have an updated replacement).- Open Terminal (Admin)
- Remove the driver package (requires the INF name like
oem23.inf):
pnputil /delete-driver oem23.inf /uninstall /force - Restart and attempt to enable Memory integrity again.
Verify Memory Integrity Is Enabled
Step 10: Confirm the setting
- Open Windows Security → Device security → Core isolation details
- Confirm Memory integrity = On
- System Information
- Press Windows + R, type
msinfo32, press Enter - Look for virtualization/security-related lines (availability varies by system)
Tips & Troubleshooting Notes
Performance and compatibility notes
- Memory integrity can slightly affect performance on some systems, but on modern CPUs it’s usually minimal.
- Some older drivers (especially legacy gaming peripherals, old audio interfaces, certain virtualization tools) may never become compatible.
If the toggle keeps turning off
- Ensure Windows is fully updated
- Update BIOS/UEFI firmware (from your manufacturer) if you have stability or virtualization-related issues
- Check if you’re using third-party virtualization/security software that conflicts (rare, but possible)
“My hardware doesn’t support it”
- Most Windows 11-capable PCs support the necessary virtualization features, but they must be enabled in firmware:
- Intel VT-x / VT-d or AMD-V / SVM
- If Memory integrity options are missing or greyed out, check UEFI/BIOS settings and update firmware.
If you get a BSOD after changing drivers
- Boot into Safe Mode
- Use System Restore (the restore point you created)
- Reinstall a stable driver version from the vendor
Conclusion
Enabling Core Isolation (Memory integrity) is one of the most meaningful security upgrades you can apply on Windows 10/11, because it helps protect the most sensitive part of the operating system—the kernel—from untrusted or vulnerable code. If drivers block it, the fix is usually straightforward: update or remove outdated driver packages and keep your system current.Key Takeaways:
- Memory integrity (HVCI) helps prevent malicious code from running in the Windows kernel.
- Driver blocks are common and typically solved by updating drivers via Windows Update or the device manufacturer.
- Uninstalling outdated utilities and removing legacy drivers can restore compatibility.
- Creating a restore point first makes troubleshooting safe and reversible.
This tutorial was generated to help WindowsForum.com users get the most out of their Windows experience.
Last edited: