Set Up a VPN Connection with Windows 10/11 Built-In Client (IKEv2)
Difficulty: Beginner | Time Required: 20 minutesWindows 10 and Windows 11 both offer a built-in VPN client that supports IKEv2, so you can securely connect to a corporate or personal VPN without needing third-party software. IKEv2 is fast, stable, and works well on roaming networks. This tutorial walks you through creating and using an IKEv2 VPN connection using only Windows built-in tools.
Introduction
Quick walkthrough
- Why use IKEv2 with Windows’ built-in client? It’s clean, secure, and integrates tightly with Windows. It supports strong encryption, quick reconnects when you switch networks, and is widely supported by many VPN providers and corporate VPNs.
- What you’ll need: a VPN server that supports IKEv2, and the authentication details you’ll use (username/password or a client certificate). If you’re connecting to a corporate VPN, your IT department will provide the exact server address and authentication method.
- A PC running Windows 10 (any supported edition) or Windows 11.
- Internet access to reach the VPN server.
- VPN server details: server name or address, and the authentication method (Username and password or Certificate). If your VPN uses a certificate, you may need to install a root CA or a client certificate on your device.
- Administrative rights on the PC to add or modify network connections.
- Optional: knowledge of whether you want all traffic sent through the VPN (full tunnel) or only specific destinations (split tunneling). This setting can be adjusted after you’ve connected.
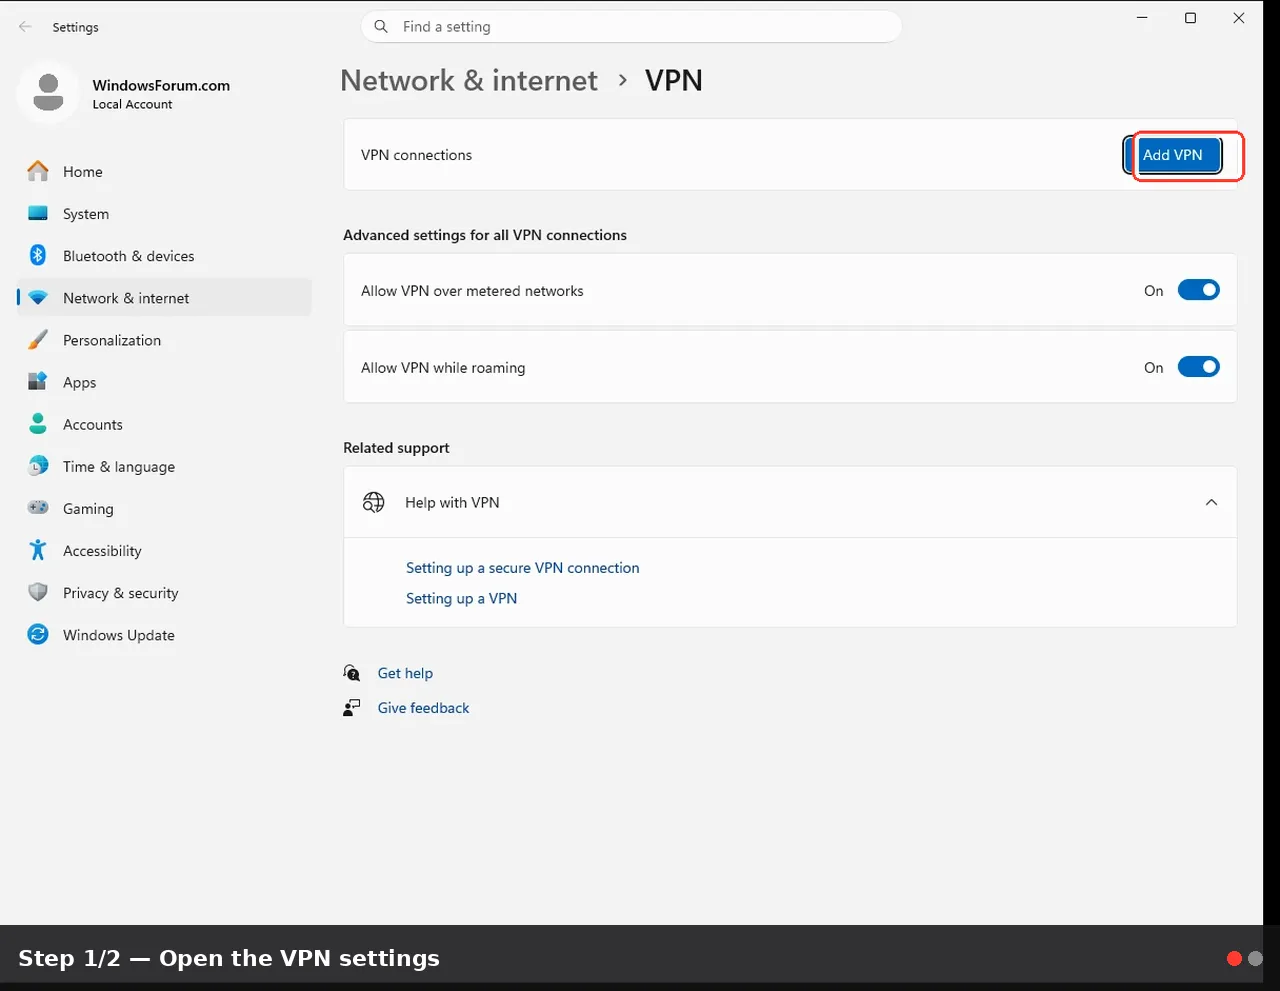
- Open the VPN settings
- Windows 10: Start > Settings > Network & Internet > VPN.
- Windows 11: Start > Settings > Network & internet > VPN.
- Add a VPN connection
- Click “Add a VPN connection.”
- VPN provider: Windows (built-in).
- Connection name: enter something descriptive (e.g., “ACME Corp IKEv2”).
- Server name or address: enter the VPN server address provided by your IT or VPN service.
- VPN type: select IKEv2.
- Type of sign-in info: choose the method your server uses:
- Username and password (for EAP-based IKEv2 with user credentials).
- Certificate (if the VPN requires a certificate for authentication).
- User name (if you chose Username and password): enter your VPN username.
- Password: enter your VPN password.
- Certificate: if you chose Certificate, select the appropriate certificate from the list (your device must have the certificate installed).
- Remember my sign-in info: optional, helps you reconnect without re-entering credentials.
- Save and test the connection
- Click Save.
- In the VPN list, click the connection you created and press Connect.
- If using certificate-based authentication, you may see a prompt about trusting the VPN server’s certificate. Verify the identity and proceed if you trust the source.
- Verify the VPN connection
- Once connected, you’ll see “Connected” under the VPN entry.
- You can verify your WAN IP or route by visiting a site like whatismyipaddress.com or by checking your network connections in Windows.
- Optional: In the VPN’s Advanced options, you can toggle “Connect automatically” or “Use this VPN even if I’m using other networks” if you want automatic protection on startup.
- Dismissing or editing the connection later
- To disconnect: open Settings > Network & Internet > VPN, select your VPN, and choose Disconnect.
- To edit: go back to the same screen, choose your VPN, then Edit. You can adjust server address, sign-in info, or authentication method as needed.
- Special considerations for corporate VPNs
- Some corporate VPNs require additional steps, such as installing a root CA certificate, using a smart card, or enrolling devices via an MDM solution. If you’re unsure, contact your IT department for the exact certificate or configuration requirements.
- If your organization requires “Always On” VPN, you may need additional policies or a different configuration method beyond the built-in Windows client.
- Ensure the server supports IKEv2 and that you’re using the correct authentication method (username/password vs. certificate). If you’re not sure, check with your VPN provider or IT department.
- Time and certificate trust matter. If you see a certificate warning, make sure the server’s certificate is valid and trusted on your device. You may need to install the root CA certificate first.
- Time synchronization helps. Ensure your PC’s date and time are accurate; large time discrepancies can cause VPN certificate validation issues.
- Firewall and security software can block VPN connections. If you can’t connect, briefly disable third-party firewalls or security tools to test (re-enable them afterward).
- VPN DNS handling: if you have DNS leaks or cannot resolve internal resources, consider adjusting the VPN’s “All traffic through the VPN” vs split-tunneling setting in the Advanced options (this is accessible from the VPN’s settings in Windows).
- Server name resolution: sometimes you’ll be given a domain-like server name (e.g., vpn.example.com) instead of an IP. Ensure you’re using the correct address.
- Reboot if things behave oddly: a quick restart can resolve lingering networking issues that block VPN establishment.
- If IKEv2 isn’t available, you may still use L2TP/IPsec or SSTP, depending on what your VPN service or corporate server supports. The Windows built-in client supports several types; choose the one your provider documents.
- On Windows 11, settings paths and prompts may look a bit different depending on updates, but the overall steps remain the same: Settings > Network & Internet > VPN, then Add a VPN connection and configure IKEv2.
Using Windows’ built-in IKEv2 VPN client is a straightforward way to secure your online traffic without extra software. It provides strong encryption, quick reconnects on roaming networks, and centralized management for both personal and professional VPNs. Once configured, you can connect with a single click and switch networks with minimal interruption to your activity.
Key takeaways
- IKEv2 with Windows built-in VPN offers fast, secure connections without third-party clients.
- You’ll need the server address and an authentication method (Username/password or certificate) from your VPN provider or IT department.
- If you encounter certificate or trust issues, ensure the correct root CA is installed and the server certificate is valid.
- For corporate setups, follow IT-provided instructions exactly, as some environments require additional certificates or policies.
This tutorial was generated to help WindowsForum.com users get the most out of their Windows experience.
Last edited: