Set Up Windows 11/10 Voice Access: Control Your PC Hands-Free + Custom Commands
Difficulty: Intermediate | Time Required: 20 minutesVoice control can be a game-changer for accessibility, productivity, and comfort—whether you have limited mobility, want to reduce wrist strain, or simply prefer hands-free control while multitasking. Windows has built-in voice features that let you dictate text, launch apps, click buttons, navigate windows, and (on Windows 11) create custom voice shortcuts so you can run actions with phrases you choose.
This guide walks you through setting up Voice Access (Windows 11) and the best equivalent options on Windows 10, plus tips to make it reliable and fast.
Prerequisites
Before you start, make sure you have:Quick walkthrough
- A microphone (USB headset is ideal; laptop mics work but pick up more noise)
- A reasonably quiet environment (especially during setup)
- Windows version notes:
- Windows 11 (22H2 and newer): Voice Access is available and includes Voice shortcuts (custom commands).
- Windows 10: Voice Access isn’t available the same way; you’ll use Windows Speech Recognition + Voice typing as the closest built-in alternatives.
- Press Win + R, type
winver, and press Enter. - Note whether you’re on Windows 10 or Windows 11, and your Windows 11 build (22H2+ recommended).
Part 1 — Windows 11: Set Up Voice Access (Hands-Free PC Control)
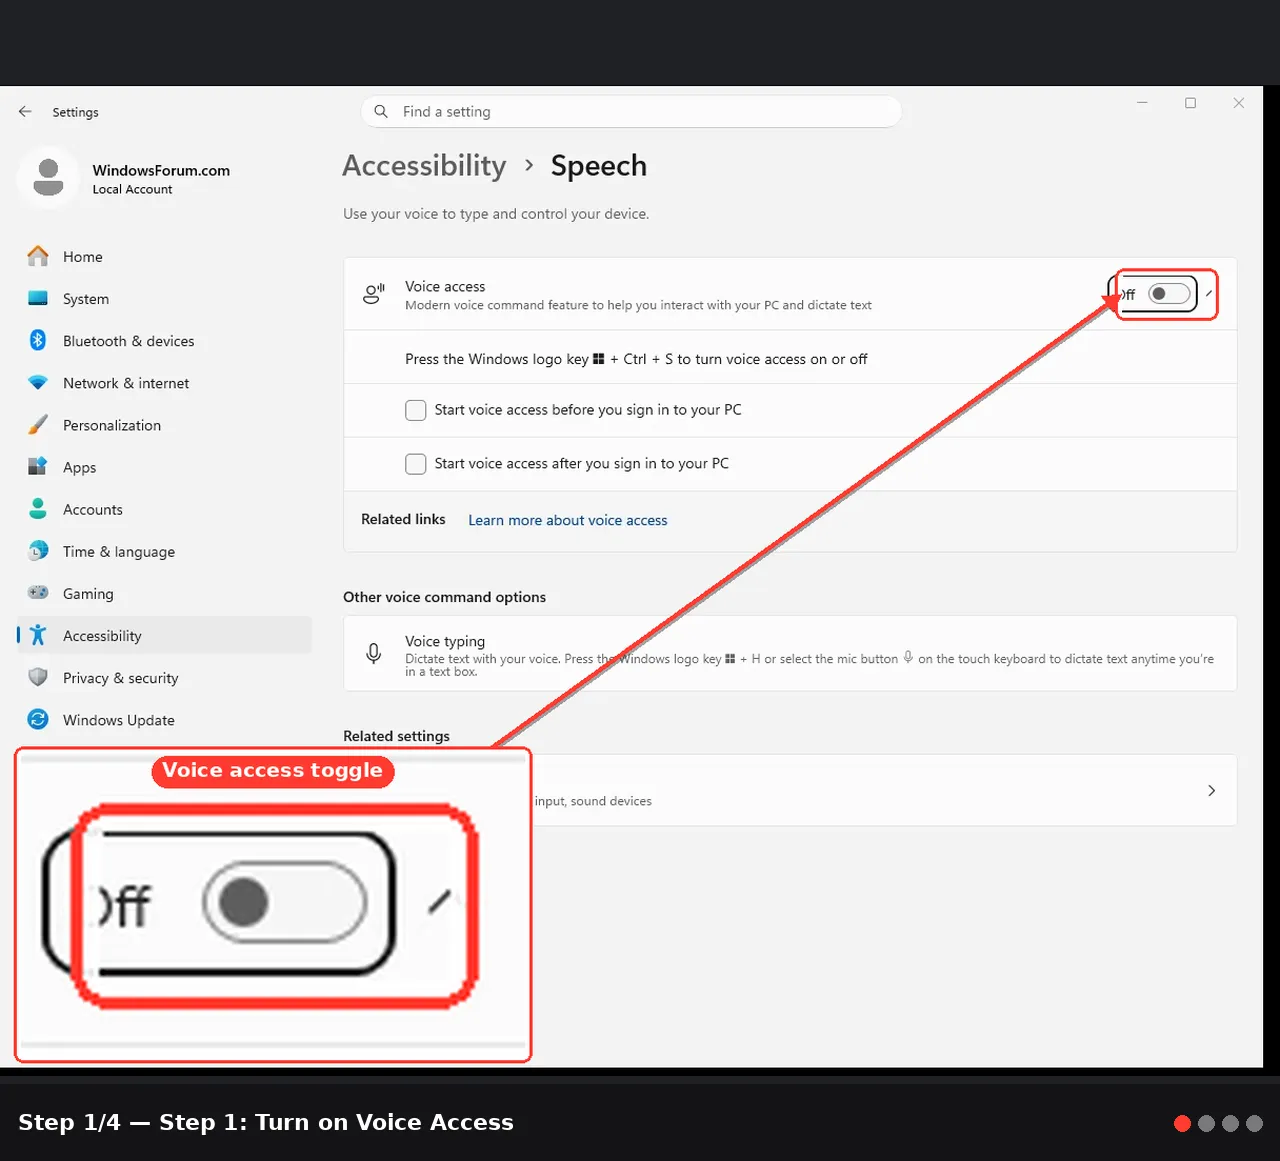
Step 1: Turn on Voice Access
- Open Settings (Win + I).
- Go to Accessibility.
- Select Speech.
- Turn Voice access On.
- If prompted, allow permissions (microphone access).
Step 2: Choose the right microphone
- In Settings > System > Sound, look under Input.
- Pick your microphone from the dropdown.
- Speak normally and confirm the input level moves.
Step 3: Complete the Voice Access setup wizard
- When Voice Access starts, follow the on-screen setup steps.
- Choose your language (must match the supported Voice Access languages installed).
- Confirm microphone setup.
Step 4: Learn the essential commands (quick practice)
Once Voice Access is on, try these common commands:- “Voice access wake up” / “Voice access sleep”
- Use “sleep” when you don’t want it listening actively.
- “Open Start” or “Open Settings”
- “Click [button name]” (example: “Click Bluetooth”)
- “Show numbers”
- Numbers appear on clickable items.
- “Click 12” (click the item labeled 12)
- “Scroll down”, “Scroll up”
- “Switch to [app name]” (example: “Switch to Edge”)
Part 2 — Windows 11: Create Custom Commands (Voice Shortcuts)
Windows 11 Voice Access includes Voice shortcuts (custom commands). These let you trigger actions like opening websites, sending key combos, or pasting text using a phrase you define.Step 5: Open Voice shortcuts
- Start Voice access (if it isn’t already running).
- Open Voice Access Help/Settings:
- Say “Open voice access settings” (wording may vary), or
- Use the Voice Access toolbar and look for Settings (gear icon).
- Find Voice shortcuts.
Step 6: Create a new custom shortcut
- In Voice shortcuts, select Create new shortcut (or Add).
- Under When I say, enter your trigger phrase, for example:
- “Open my work dashboard”
- “Start recording”
- Choose what it does. Common options typically include actions like:
- Open a URL or app
- Press a keyboard shortcut
- Insert/paste text
- Save the shortcut.
Step 7: Test and refine your shortcut
- Say your trigger phrase exactly as written.
- If it mishears you:
- Choose a less similar phrase (avoid common words like “open” + “settings” if it collides).
- Keep phrases short and distinct.
Step 8: Use custom commands for power workflows (examples)
Try building a few “starter” shortcuts:- Open a website
- Phrase: “Open forum”
- Action: Open URL →
[Windows Forum](https://windowsforum.com) - Paste a common sentence
- Phrase: “Insert my signature”
- Action: Insert text → your standard sign-off
- Run a keyboard shortcut
- Phrase: “Screenshot”
- Action: Press keys → Win + Shift + S
Part 3 — Windows 10: Best Built-In Alternatives (Speech Recognition + Voice Typing)
Windows 10 doesn’t include Voice Access in the same way, but you can still get strong hands-free capability using Windows Speech Recognition and Voice typing.Step 9 (Windows 10): Set up Windows Speech Recognition
- Open Control Panel (search for it from Start).
- Go to Ease of Access > Speech Recognition.
- Click Start Speech Recognition.
- Run Set up microphone and follow the wizard.
- (Optional but recommended) Click Train your computer to better understand you.
Step 10 (Windows 10/11): Use Voice Typing for dictation anywhere
Voice typing works in both Windows 10 and 11 for dictation (not full UI control like Voice Access).- Click in any text field (Notepad, Word, browser text box, etc.).
- Press Win + H to open Voice typing.
- Start speaking clearly.
- Use simple punctuation commands like “comma,” “period,” “new line” (availability varies by language/region).
Tips, Notes, and Troubleshooting
Improve accuracy and responsiveness
- Use a headset mic and keep it close (2–3 inches from your mouth).
- In Settings > System > Sound > Input, ensure the correct mic is selected.
- Disable “enhancements” if they cause issues (varies by device/driver).
- Speak naturally—don’t over-enunciate, but keep a steady pace.
If Voice Access won’t start (Windows 11)
- Install updates: Settings > Windows Update > Check for updates.
- Confirm your Windows 11 version is 22H2 or later (
winver). - Check language packs: Settings > Time & language > Language & region.
- Ensure microphone privacy settings allow access:
- Settings > Privacy & security > Microphone → allow access for desktop apps.
If it keeps “clicking the wrong thing”
- Use “Show numbers” then “Click [number]” for precision.
- Zoom in (Ctrl + Plus) in browsers so elements are easier to target.
- Reduce UI clutter: close overlapping windows.
Prevent accidental triggers
- Use “Sleep” when not actively controlling the PC.
- Choose custom shortcut phrases that are unlikely in normal conversation.
- Avoid using your shortcut trigger words during meetings/calls if Voice Access is active.
Conclusion
With Voice Access (Windows 11) or Speech Recognition (Windows 10), you can operate your PC with minimal mouse/keyboard use—opening apps, navigating menus, clicking controls, dictating text, and (in Windows 11) creating custom voice shortcuts for repeatable tasks. Once your microphone is configured and you learn a handful of core commands, hands-free control becomes both practical and surprisingly fast.Key Takeaways:
- Voice Access in Windows 11 (22H2+) enables full hands-free navigation plus custom voice shortcuts.
- “Show numbers” is the most reliable method for clicking UI elements accurately.
- Windows 10 users can still get strong results with Windows Speech Recognition and Win + H Voice typing.
- A quality microphone and a short training/setup period dramatically improve accuracy.
This tutorial was generated to help WindowsForum.com users get the most out of their Windows experience.
Last edited: