

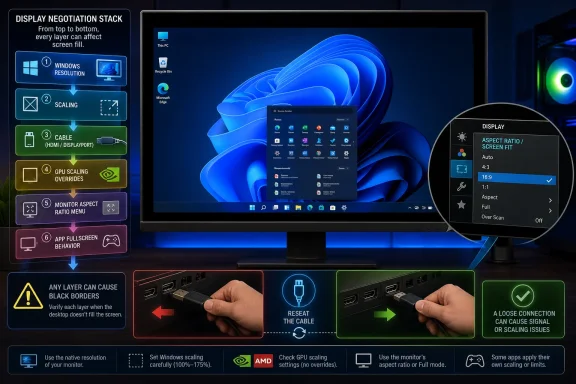
Guiding Tech’s Windows 11 troubleshooting guide argues that a monitor failing to display full screen is usually caused by mismatched resolution, scaling, monitor-side aspect settings, bad cabling, GPU scaling overrides, or app-specific fullscreen behavior. That sounds mundane, but it is exactly why the problem frustrates users: nothing is necessarily “broken,” yet the desktop still looks wrong. The real lesson is that Windows display output is no longer controlled by Windows alone. It is a negotiation between the OS, the monitor, the cable, the graphics driver, and sometimes the app fighting for the screen.
The modern Windows display stack is built on a comforting assumption: plug in a monitor, let Windows read what the panel says it supports, and apply a sensible resolution and scale. Microsoft’s own support documentation still points users toward Settings, System, Display, and the recommended resolution and scale values as the first line of defense. In most cases, that advice is correct.
But “recommended” is only as good as the information Windows receives. A monitor advertises its supported modes through EDID data, the graphics driver interprets that information, and Windows presents the result as a resolution, refresh rate, and scaling choice. When any part of that chain is stale, incomplete, or overridden, the desktop can land in the uncanny valley: visible, usable, but not actually filling the panel.
That is why the first fix in Guiding Tech’s guide is still the right one. Right-click the desktop, open Display settings, and confirm that the display resolution is set to the option marked “Recommended.” Then check Scale in the same Scale & layout area and return it to the recommended value unless there is a clear reason not to.
This matters because users often chase exotic fixes before checking the simple mismatch. A 1080p monitor running below 1920 × 1080, or a 4K panel running below 3840 × 2160, may still show an image, but it will not necessarily map cleanly to the screen’s native pixel grid. The result can be black borders, blurry scaling, or a desktop that appears subtly wrong.
Guiding Tech rightly elevates this as an early fix rather than a last resort. Use the buttons or joystick on the monitor to open its built-in menu and look for terms like “Aspect Ratio,” “Screen Size,” “Scaling,” “Full,” “Wide,” or “16:9.” If the display is actually a television being used as a monitor, the relevant option may be hiding under “Screen Fit,” “Just Scan,” “Full 100%,” or a similarly branded picture-size setting.
That monitor-side menu bypasses Windows entirely. This is why users can stare at perfect Windows display settings and still see borders. The OS is not the final authority once the signal reaches the panel.
Televisions make the issue worse because they were historically designed around broadcast overscan, where the outer edges of the picture could be cropped. PC monitors generally aim for pixel precision; TVs often assume the viewer wants an image adjusted for video. Put Windows 11 on the wrong TV input mode and the desktop can be slightly zoomed, shrunken, or padded even when Windows itself is configured correctly.
Guiding Tech’s advice to unplug and reconnect the cable at both ends is not busywork. Display detection problems often resolve when the handshake between PC and monitor is forced to happen again. This is especially true after moving a PC, adding a dock, switching GPU ports, or waking a system from sleep with multiple displays attached.
For high-resolution or high-refresh monitors, the guide’s recommendation to check for HDMI 2.1 or DisplayPort 1.4-class cabling is practical. The exact requirement depends on the monitor’s resolution, refresh rate, color depth, compression support, and the GPU port, but the principle is stable: if the cable cannot carry the requested signal, Windows may not offer the mode the panel was built to use.
Multi-monitor setups add another wrinkle. Pressing Win + P and switching from Duplicate to Extend can solve cases where Windows is trying to mirror two displays with different native resolutions. In Duplicate mode, Windows often has to choose a compromise that both screens can display, and compromise is where black bars and odd scaling are born.
That said, experienced Windows users know the limitation. Device Manager may report that the best driver is already installed even when NVIDIA, AMD, Intel, or the PC manufacturer offers a newer package. For display problems, the GPU vendor’s driver package can matter because it controls scaling behavior, supported modes, refresh-rate exposure, and panel detection.
This is where “update the driver” becomes less of a ritual and more of a reset. A clean driver install can flush out bad mode tables, stale monitor detection, or vendor control-panel settings that survived a Windows update. It can also restore missing GPU controls that Windows’ own Settings app does not expose.
But drivers should not become the first excuse. If only one monitor looks wrong, and especially if it changed after swapping a cable or changing the monitor’s own settings, the fix is probably not a full driver rebuild. Good troubleshooting keeps the blast radius small before reaching for system-wide changes.
NVIDIA’s own documentation describes the “Adjust desktop size and position” page as the place to configure desktop scaling and preview how full-screen applications behave. Guiding Tech’s recommendation is to set the scaling mode to Full-screen and, where appropriate, enable the option to override the scaling mode set by games and programs. That is the lever many users miss when a game or older app refuses to fill the panel.
On AMD systems, the equivalent path runs through AMD Software’s Display settings, where GPU Scaling and Scaling Mode can be set to fill the panel. On Intel systems, the Graphics Command Center exposes similar display scaling options. The names differ, but the battle is the same: whether the image preserves aspect ratio, stretches to the panel, or refuses to scale.
This is also where taste and correctness diverge. “Full-screen” scaling can fill the monitor, but if the source resolution does not match the display’s aspect ratio, it may stretch the image. “Maintain aspect ratio” avoids distortion but can produce black bars. The right choice depends on whether the user wants geometric accuracy or every pixel of glass illuminated.
Guiding Tech points users toward the program’s own video settings: Fullscreen, Borderless, Windowed, and resolution options. That is the correct order. Many games maintain their own display mode independent of the Windows desktop, and some will happily launch at an old resolution saved from a previous monitor.
Windows compatibility settings are the next stop. Right-clicking the executable, opening Properties, going to Compatibility, and enabling “Disable fullscreen optimizations” can help with older games or apps that misbehave under Windows’ modern fullscreen handling. It is not a universal cure, but it is targeted enough to be worth trying when the failure is isolated.
Game Mode and OEM “optimizer” utilities can complicate this layer as well. Some gaming laptops and desktop utilities alter performance profiles, resolution behavior, or GPU routing when a game launches. If the display is perfect until one application starts, the fix belongs close to that application, not in the registry.
This is a last-resort move, not a normal troubleshooting step. Editing those values can force Windows to use dimensions such as 1920 and 1080, but it also means manually touching the database Windows uses to remember display configurations. Windows may overwrite the values later, and a bad edit can create new display weirdness instead of solving the old one.
The presence of “SIMULATED” or “NOEDID” folders is itself a clue. It suggests Windows may not be receiving reliable monitor identification data. In that case, the better fix is often upstream: replace the cable, avoid a flaky dock or adapter, reinstall the GPU driver, or check whether the monitor has a firmware update or reset option.
Registry edits have a seductive quality because they feel definitive. But in display troubleshooting, they often treat the symptom rather than the handshake failure that caused it. Administrators should be especially cautious about recommending registry surgery to ordinary users when a cable swap or driver reinstall might solve the root problem.
That stack explains why two users with identical symptoms can need different fixes. One is running a duplicated laptop display onto a 4K TV. Another is using an older HDMI cable with a high-refresh gaming monitor. A third has an NVIDIA scaling override left over from a previous game. A fourth has an app launching at 1280 × 720 on a 16:10 panel.
It also explains why Windows 11 is blamed even when it is merely the visible layer. The desktop is where the failure appears, so the OS takes the reputational hit. But the fix may live in a monitor menu, a GPU utility, a cable drawer, or a game launcher.
This is the useful contribution of the Guiding Tech guide: it does not pretend there is a single magic switch. It walks from the least invasive fixes to the most invasive one. That order matters more than any individual step.
 Windows 11 Usually Knows the Right Answer — Until One Layer Lies
The modern Windows display stack is built on a comforting assumption: plug in a monitor, let Windows read what the panel says it supports, and apply a sensible resolution and scale. Microsoft’s own support documentation still points users toward Settings, System, Display, and the recommended resolution and scale values as the first line of defense. In most cases, that advice is correct.But “recommended” is only as good as the information Windows receives. A monitor advertises its supported modes through EDID data, the graphics driver interprets that information, and Windows presents the result as a resolution, refresh rate, and scaling choice. When any part of that chain is stale, incomplete, or overridden, the desktop can land in the uncanny valley: visible, usable, but not actually filling the panel.
That is why the first fix in Guiding Tech’s guide is still the right one. Right-click the desktop, open Display settings, and confirm that the display resolution is set to the option marked “Recommended.” Then check Scale in the same Scale & layout area and return it to the recommended value unless there is a clear reason not to.
This matters because users often chase exotic fixes before checking the simple mismatch. A 1080p monitor running below 1920 × 1080, or a 4K panel running below 3840 × 2160, may still show an image, but it will not necessarily map cleanly to the screen’s native pixel grid. The result can be black borders, blurry scaling, or a desktop that appears subtly wrong.
The Monitor Has a Vote, and Windows Cannot Overrule It
The most overlooked part of this problem is also the most physical: the monitor’s own on-screen display menu. Windows can send the correct image, the GPU can scale it properly, and the cable can carry it cleanly — yet the monitor can still decide to preserve an aspect ratio, underscan the picture, or apply a TV-style fit mode.Guiding Tech rightly elevates this as an early fix rather than a last resort. Use the buttons or joystick on the monitor to open its built-in menu and look for terms like “Aspect Ratio,” “Screen Size,” “Scaling,” “Full,” “Wide,” or “16:9.” If the display is actually a television being used as a monitor, the relevant option may be hiding under “Screen Fit,” “Just Scan,” “Full 100%,” or a similarly branded picture-size setting.
That monitor-side menu bypasses Windows entirely. This is why users can stare at perfect Windows display settings and still see borders. The OS is not the final authority once the signal reaches the panel.
Televisions make the issue worse because they were historically designed around broadcast overscan, where the outer edges of the picture could be cropped. PC monitors generally aim for pixel precision; TVs often assume the viewer wants an image adjusted for video. Put Windows 11 on the wrong TV input mode and the desktop can be slightly zoomed, shrunken, or padded even when Windows itself is configured correctly.
Cables Are Still the Boring Failure Point
The next uncomfortable truth is that the cable matters. HDMI, DisplayPort, and USB-C are not just different plug shapes; they are bandwidth budgets with branding attached. A cable that works for 1080p at 60Hz may not reliably carry 4K at high refresh rates, and a weak link can cause Windows to fall back to a lower mode or expose only a subset of the monitor’s capabilities.Guiding Tech’s advice to unplug and reconnect the cable at both ends is not busywork. Display detection problems often resolve when the handshake between PC and monitor is forced to happen again. This is especially true after moving a PC, adding a dock, switching GPU ports, or waking a system from sleep with multiple displays attached.
For high-resolution or high-refresh monitors, the guide’s recommendation to check for HDMI 2.1 or DisplayPort 1.4-class cabling is practical. The exact requirement depends on the monitor’s resolution, refresh rate, color depth, compression support, and the GPU port, but the principle is stable: if the cable cannot carry the requested signal, Windows may not offer the mode the panel was built to use.
Multi-monitor setups add another wrinkle. Pressing Win + P and switching from Duplicate to Extend can solve cases where Windows is trying to mirror two displays with different native resolutions. In Duplicate mode, Windows often has to choose a compromise that both screens can display, and compromise is where black bars and odd scaling are born.
Driver Updates Are Not Magic, but They Reset the Negotiation
Microsoft’s Device Manager remains the default entry point for driver maintenance, and Guiding Tech includes the standard path: right-click Start, open Device Manager, expand Display adapters, right-click the GPU, and choose Update driver. Microsoft’s support guidance likewise frames Device Manager as a way to search for updated driver software or reinstall a device driver when Windows behavior goes sideways.That said, experienced Windows users know the limitation. Device Manager may report that the best driver is already installed even when NVIDIA, AMD, Intel, or the PC manufacturer offers a newer package. For display problems, the GPU vendor’s driver package can matter because it controls scaling behavior, supported modes, refresh-rate exposure, and panel detection.
This is where “update the driver” becomes less of a ritual and more of a reset. A clean driver install can flush out bad mode tables, stale monitor detection, or vendor control-panel settings that survived a Windows update. It can also restore missing GPU controls that Windows’ own Settings app does not expose.
But drivers should not become the first excuse. If only one monitor looks wrong, and especially if it changed after swapping a cable or changing the monitor’s own settings, the fix is probably not a full driver rebuild. Good troubleshooting keeps the blast radius small before reaching for system-wide changes.
GPU Control Panels Are the Shadow Display Settings App
Windows 11’s Settings app presents display configuration as though it is the whole story. It is not. NVIDIA Control Panel, AMD Software: Adrenalin Edition, and Intel Graphics Command Center can all impose scaling rules that sit below or beside Windows’ own choices.NVIDIA’s own documentation describes the “Adjust desktop size and position” page as the place to configure desktop scaling and preview how full-screen applications behave. Guiding Tech’s recommendation is to set the scaling mode to Full-screen and, where appropriate, enable the option to override the scaling mode set by games and programs. That is the lever many users miss when a game or older app refuses to fill the panel.
On AMD systems, the equivalent path runs through AMD Software’s Display settings, where GPU Scaling and Scaling Mode can be set to fill the panel. On Intel systems, the Graphics Command Center exposes similar display scaling options. The names differ, but the battle is the same: whether the image preserves aspect ratio, stretches to the panel, or refuses to scale.
This is also where taste and correctness diverge. “Full-screen” scaling can fill the monitor, but if the source resolution does not match the display’s aspect ratio, it may stretch the image. “Maintain aspect ratio” avoids distortion but can produce black bars. The right choice depends on whether the user wants geometric accuracy or every pixel of glass illuminated.
Games and Legacy Apps Still Break the Contract
If the Windows desktop fills the monitor and every normal app behaves, the operating system is probably not the villain. A single game or application that refuses to go full screen should be treated as an app-level problem first.Guiding Tech points users toward the program’s own video settings: Fullscreen, Borderless, Windowed, and resolution options. That is the correct order. Many games maintain their own display mode independent of the Windows desktop, and some will happily launch at an old resolution saved from a previous monitor.
Windows compatibility settings are the next stop. Right-clicking the executable, opening Properties, going to Compatibility, and enabling “Disable fullscreen optimizations” can help with older games or apps that misbehave under Windows’ modern fullscreen handling. It is not a universal cure, but it is targeted enough to be worth trying when the failure is isolated.
Game Mode and OEM “optimizer” utilities can complicate this layer as well. Some gaming laptops and desktop utilities alter performance profiles, resolution behavior, or GPU routing when a game launches. If the display is perfect until one application starts, the fix belongs close to that application, not in the registry.
The Registry Fix Belongs Behind Glass
The riskiest fix in Guiding Tech’s guide is the registry edit underHKEY_LOCAL_MACHINE\SYSTEM\CurrentControlSet\Control\GraphicsDrivers\Configuration. The suggested values, including PrimSurfSize.cx and PrimSurfSize.cy, correspond to width and height entries that can appear under display configuration subkeys such as simulated or no-EDID entries.This is a last-resort move, not a normal troubleshooting step. Editing those values can force Windows to use dimensions such as 1920 and 1080, but it also means manually touching the database Windows uses to remember display configurations. Windows may overwrite the values later, and a bad edit can create new display weirdness instead of solving the old one.
The presence of “SIMULATED” or “NOEDID” folders is itself a clue. It suggests Windows may not be receiving reliable monitor identification data. In that case, the better fix is often upstream: replace the cable, avoid a flaky dock or adapter, reinstall the GPU driver, or check whether the monitor has a firmware update or reset option.
Registry edits have a seductive quality because they feel definitive. But in display troubleshooting, they often treat the symptom rather than the handshake failure that caused it. Administrators should be especially cautious about recommending registry surgery to ordinary users when a cable swap or driver reinstall might solve the root problem.
The Real Pattern Is a Stack, Not a Setting
The reason this issue keeps returning in Windows forums is that users search for “Windows 11 not full screen” and expect one setting. What they actually have is a stack. Windows chooses a resolution and scale, the GPU decides how to map frames, the cable determines which modes are available, the monitor applies its own aspect rules, and the app may request a fullscreen mode that ignores the rest.That stack explains why two users with identical symptoms can need different fixes. One is running a duplicated laptop display onto a 4K TV. Another is using an older HDMI cable with a high-refresh gaming monitor. A third has an NVIDIA scaling override left over from a previous game. A fourth has an app launching at 1280 × 720 on a 16:10 panel.
It also explains why Windows 11 is blamed even when it is merely the visible layer. The desktop is where the failure appears, so the OS takes the reputational hit. But the fix may live in a monitor menu, a GPU utility, a cable drawer, or a game launcher.
This is the useful contribution of the Guiding Tech guide: it does not pretend there is a single magic switch. It walks from the least invasive fixes to the most invasive one. That order matters more than any individual step.
The Sensible Repair Order Starts at the Pixel Grid
The practical answer for WindowsForum readers is to troubleshoot from the outside in, not from panic inward. Start with the settings that describe the monitor’s native behavior, then move through the hardware path, then the GPU layer, then the app, and only then the registry.- Confirm that Windows 11 is using the monitor’s recommended resolution and recommended scale before changing anything else.
- Check the monitor or TV’s own aspect-ratio, screen-size, or fit-to-screen setting, because that menu can override a correct Windows signal.
- Replace or reseat the HDMI, DisplayPort, or USB-C cable when high resolution, high refresh rate, docks, adapters, or intermittent detection are involved.
- Use Extend rather than Duplicate when monitors have different native resolutions and Windows is being forced into a compromise mode.
- Review NVIDIA, AMD, or Intel scaling settings if Windows looks correct but games, full-screen apps, or non-native resolutions still leave borders.
- Treat the registry edit as a recovery tactic for stubborn detection failures, not as routine maintenance.
References
- Primary source: Guiding Tech
Published: Mon, 06 Jul 2026 01:52:11 GMT
Monitor Not Displaying Full Screen (Windows 11) - Guiding Tech
Fix a monitor not displaying full screen Windows 11 with simple solutions for scaling, resolution, and graphics drivers.www.guidingtech.com
- Official source: support.microsoft.com
Update drivers through Device Manager in Windows - Microsoft Support
Learn how to update or reinstall drivers in Windows using Device Manager.support.microsoft.com - Related coverage: windowscentral.com
How to adjust display scale settings in Windows 11 | Windows Central
On Windows 11, you can change the display scale settings to make elements and text easier to use and read, and in this guide, I will explain how to perform this configuration.www.windowscentral.com - Official source: learn.microsoft.com
How do I get my home screen backto the normal size? Everything is super large. - Microsoft Q&A
How do I get my home screen back to the normal size? Everything is super large.learn.microsoft.com - Official source: microsoft.com
Make Windows Easier to See for Accessibility | Microsoft Windows
Explore Windows 11 accessibility and make Windows easier to see. Adjust your text size to make text and apps easier to read, add contrast, or use the built-in magnifying tool.www.microsoft.com
- Related coverage: techyorker.com
5 Ways to Fit the Screen to the Monitor on Windows 11 (And Fixes) - TechYorker
A Windows 11 screen that doesn’t fit the monitor can show up as black borders, stretched images, or content cut off at… techyorker.com
- Related coverage: nvidia.com
- Related coverage: techradar.com
Don't worry, Microsoft says – Windows 11 will sort those weird duplicate drivers in your update queue | TechRadar
Microsoft assures us Windows 11 knows what it's doing with driverswww.techradar.com - Related coverage: tomshardware.com
Microsoft launches Cloud‑Initiated Driver Recovery for remote rollback of faulty updates — no user action or OEM intervention will be needed to handle broken drivers delivered via Windows Update | Tom's Hardware
CIDR is rolling out now for validation and testing.www.tomshardware.com - Related coverage: ww1.microchip.com
PAC193X Microsoft Windows 10 and Windows 11 Device Driver Users Guide DS50002666
PDF documentww1.microchip.com