

EXPO means Extended Profiles for Overclocking. A compatible memory kit stores a tested profile containing its intended transfer rate, timings, and voltage. Motherboards usually start with conservative JEDEC-standard memory settings, so a “DDR5-6000” kit may initially run below its advertised rating until you choose EXPO.
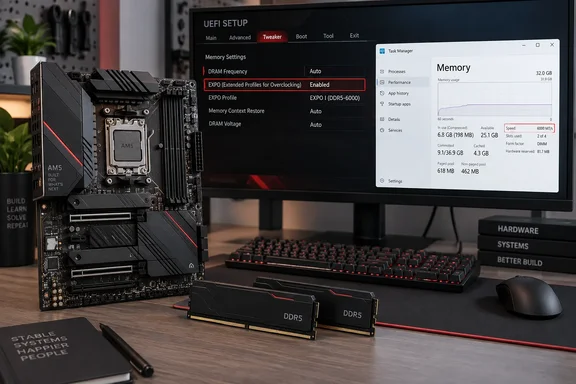 Confirm that the memory is actually running below its rated speed
Start by identifying the rated speed of the kit, not just one module.
- Check the label on the RAM packaging, the retailer invoice, or the memory manufacturer’s part-number page. Look for a value such as DDR5-6000, 6000 MT/s, or DDR5-6400.
- Treat two or four modules sold together as one kit. Do not assume separate memory sticks with matching-looking labels are a validated set.
- Make sure your motherboard supports the installed memory configuration. A board’s memory support list, often called a QVL, is the best compatibility reference—especially with high-speed kits or four populated DIMM slots.
To see the currently configured speed in Windows:
Windows 11
- Press Ctrl + Shift + Esc to open Task Manager.
- Select Performance in the left navigation pane.
- Select Memory.
- Read the Speed value in the details area.
Windows 10
- Press Ctrl + Shift + Esc to open Task Manager.
- Select the Performance tab.
- Select Memory.
- Check Speed at the lower right.
Compare that result to the rated data rate on the memory kit. For example, if a DDR5-6000 kit shows 4800 MT/s in Task Manager, it is currently using a lower default setting.
Do not halve the Task Manager number. If Windows shows 6000 MT/s for a DDR5-6000 kit, that is the expected result.
Check whether EXPO is available before changing anything
EXPO is intended for AMD AM5 systems with compatible DDR5 memory. It will not necessarily appear in every AMD PC:
- Custom-built AM5 desktops: Usually expose an EXPO setting in UEFI/BIOS.
- Prebuilt desktops: May expose the option, but some manufacturers limit firmware tuning.
- Laptops and mini PCs: Usually do not provide an EXPO control, even when they use AMD processors.
- Memory carrying only XMP: Some AMD boards can load an XMP-derived setting under a vendor-specific name such as DOCP, but that is not the same as a native EXPO profile. Start with the profile your firmware explicitly identifies as EXPO when it is available.
- AM4 and DDR4 systems: EXPO is an AM5/DDR5 feature. Older AMD systems commonly use XMP, DOCP, or motherboard-specific memory controls instead.
Before proceeding, close open work and make sure you know how to re-enter UEFI/BIOS. On many desktop boards, the entry key is Delete; some systems use F2. The first boot after changing memory settings can take longer than normal while the firmware trains the memory.
Warning: EXPO applies an overclocking profile. Although it is a preset profile stored on the memory, stability depends on the processor’s memory controller, motherboard firmware, installed module count, and the specific kit. Save important work before enabling it. Do not manually change memory voltage, timings, fabric clocks, or processor-overclocking settings as part of this basic procedure.
Enable the EXPO profile in UEFI/BIOS
The wording and location vary by motherboard brand and firmware version. The safe objective is the same: select the normal EXPO profile, usually EXPO I, EXPO 1, or Profile 1, then save without changing unrelated tuning settings.
- Restart the PC.
- As soon as the manufacturer logo appears, repeatedly press Delete. If that does not open the firmware setup, restart and try F2 or check the motherboard manual.
- In UEFI/BIOS, locate the memory profile control. It may be visible in an Easy/EZ Mode screen or under an overclocking/tweaking section.
- Select the available EXPO profile. If more than one is shown, begin with the ordinary first profile rather than a profile labeled enhanced, tweaked, low-latency, high-efficiency, or custom.
- Review the change summary if the firmware shows one. You should see memory-related settings changing, such as the DRAM data rate, timings, and voltage.
- Save and restart. On most boards, F10 opens the save-and-exit prompt.
- Allow the PC to restart normally. Do not interrupt it during a prolonged black screen immediately after enabling the profile.
ASUS AM5 boards
On current ASUS AM5 firmware, the usual path is:
- Press Delete during startup to enter UEFI/BIOS.
- Press F7 for Advanced Mode if necessary.
- Open Ai Tweaker.
- Select Ai OverClock Tuner.
- Choose EXPO I when the installed memory supports EXPO.
- Press F10, confirm the changes, and let the computer restart.
ASUS also uses DOCP on some AMD boards when the memory contains an XMP profile rather than EXPO. Do not select DOCP merely because EXPO is unavailable unless you understand that the kit is XMP-only and accept that the resulting configuration may not be validated as an EXPO setup.
MSI AM5 boards
On current MSI AM5 firmware, the EXPO selector may appear directly in EZ Mode as A-XMP/EXPO Profile or in the overclocking section of Advanced Mode.
- Press Delete during startup.
- In EZ Mode, find A-XMP/EXPO Profile or the Memory control.
- Change the default or Standard selection to EXPO 1.
- Press F10 and select Yes to save and restart.
If the Easy Mode control is absent, switch to Advanced Mode and look in the OC or Overclocking section for EXPO. Select the EXPO profile only; leave settings such as DRAM Frequency, timings, fabric clock, and voltage on their profile-controlled or automatic values.
Verify that EXPO applied successfully
After Windows loads:
- Open Task Manager with Ctrl + Shift + Esc.
- Go to Performance > Memory.
- Check Speed.
- Confirm that it matches the advertised rate of your kit or the selected EXPO profile.
For a second check, restart once more and enter UEFI/BIOS. Most boards display the active DRAM speed on the opening Easy/EZ Mode page. The reported value should align with the selected profile.
A successful boot is necessary but not a complete stability test. Use the PC normally for a few days, including the workloads that matter to you: games, compiling, video work, virtual machines, or long file transfers. Watch for:
- Unexpected restarts or blue screens
- Application crashes that did not occur before
- Freezing after sleep or during startup
- Repeated memory-training delays
- File corruption or failed archive extraction
If any of these begin immediately after enabling EXPO, treat the profile as unstable until proven otherwise.
Recover if the PC fails to boot after enabling EXPO
A failed memory overclock often looks more serious than it is. The motherboard may attempt several memory-training cycles before it falls back to a workable setting.
- Wait before powering off. If fans are running but there is no display after the EXPO change, give the board several minutes. A new memory profile can require a longer-than-usual training attempt.
- If the PC reaches UEFI/BIOS, disable EXPO. Re-enter the firmware, set the memory profile back to Auto, Disabled, or Standard, then save with F10.
- Load firmware defaults if needed. Use the motherboard’s documented option to load optimized or default settings, then save and restart. This resets more than memory settings, so you may need to restore boot order, fan settings, or other deliberate configuration afterward.
- Clear CMOS only if you cannot enter UEFI/BIOS. Shut down Windows if possible, turn off the power supply, unplug the PC, and use the exact Clear CMOS procedure in the motherboard manual. Some boards have a rear Clear CMOS button; others require a jumper or battery procedure.
Warning: Clearing CMOS resets UEFI/BIOS settings. On systems using RAID, custom boot settings, manually configured fan curves, virtualization options, or secure-boot-related changes, record those settings first if you can still access firmware. Do not move jumpers or remove the CMOS battery while the system has standby power.
After recovery, leave EXPO disabled until you have checked compatibility and firmware.
Update motherboard firmware when EXPO is unstable
A BIOS update can improve memory compatibility and training behavior, but firmware flashing has more risk than simply changing an EXPO setting. Update only when your board maker’s support page lists a newer BIOS for your exact motherboard model and revision, particularly if its release notes mention memory compatibility, DDR5, AGESA, stability, or Ryzen processor support.
Before updating:
- Record the current BIOS version from the UEFI main screen.
- Download firmware only from the motherboard manufacturer’s official support page for the exact board.
- Read that board’s BIOS-update instructions and verify any required file name, USB port, or extraction step.
- Back up important data.
- Use reliable power. Do not perform the update during a storm or when power is unreliable.
- Expect the update to reset firmware settings, including EXPO.
A typical board-level update process is:
- Format a spare USB drive as FAT32. Formatting erases its contents.
- Download the correct BIOS file and prepare it exactly as the motherboard maker instructs.
- Restart into UEFI/BIOS.
- Launch the built-in update utility—examples include M-Flash on MSI boards and EZ Flash on ASUS boards.
- Select the BIOS file and confirm the update.
- Do not turn off the computer, remove the USB drive, or disconnect power while the update is running.
- After the automatic restart, enter UEFI/BIOS again and confirm the new BIOS version.
- Load the board maker’s recommended defaults if its update procedure requires it.
- Re-enable EXPO I or EXPO 1, save, restart, and verify the speed again in Task Manager.
If EXPO remains unstable after a firmware update, revert to the default memory setting rather than raising voltages or manually tightening timings. Then check that the memory is installed in the slots specified for a two-module configuration, that all modules came from one matched kit, and that the kit is listed on the motherboard’s memory support list. A stable lower setting is preferable to an advertised speed that causes crashes, failed boots, or data integrity problems.